Oracle 12cR2 Installation
Table of contents
1 Oracle Server Version 12.2.0 Installation
( Screen - Shots of Oracle Version 12.2.0 )
Before you start with the installation, please create under the operation system
Windows a new user only for the installtion. This user have now administrator rights,
is not in the user group of administrator.
After the CD is stored in the CD-Device the installation-program runs automatically.
After successful download and unpacked files run SETUP.
Tip: Only the most important masks of the "Oracle Universal Installer" are shown
here.
-
Schritt 1: Configure Security Updates
- You can enter your email adress and your My Oracle Support password to get automated
security updates, or you can also choose to skip this step and move on if you prefer.
-
Schritt 2: Installation Option
- You can click the Install database software only button and click Next. Later we
create the database with The Database Configuration Assistant.
-
Schritt 3: Database Installation Option
- We want to install a single instance database, so we choose the first option and
click Next.
-
Schritt 4: Select Database Edition
- Select the Oracle Database edition that you are licensed to install and click next.
-
Schritt 5: Oracle Home User
- Under Use Existing Windows User enter the name and password of your created user
at first befor the installtion. Important: this user is not in the administrator
group. Click Next.
-
Schritt 6: Installation Location
- We specify the location of the Oracle_Base directory or accept the default entry.
The Software location will automatically completes from the OUI and click Next.
-
Schritt 7: Prerequisite Checks
- When the prerequisite checks detectes no problems, we will come automatically to
the next screen Summary. Otherwise, you get a message with result of reasons, so
you can clear the bugs.
-
Schritt 8: Summary
- Now we are ready to install Oracle Database 12c and we click Install.
-
Schritt 9: Install Product
- During this step the OUI presents you with a warning security screen from the Windows
Firewall. We will accept this warning and click Permit access.
-
Schritt 10: Finish
- We can complete the installation and click the Close button and we will go to point
2.
2 Listener install and setup with Oracle-Net Configuration Assistant
At first you must install the listener, before you can create a database the first
time.
Start the " Net Configuration Assistant " under Start / All Programs / Oracle - OraDB12Home1
/ Configuration and Migration Tools.
-
Step 1: Welcome
- Select Listener - Configuration.
-
Step 2: Listener
- Select "Add"
-
Step 3: Listener - Name
- The listener get a name, e.g.: "Listener". Later you find this name under Windows
General view "Services" and shoud be started under the owner of the Oracle Home User.
So we need for this action the password of this User too.
-
Step 4: Select Protocols
- Confirm the selected protocol TCP.
-
Step 5: TCP/IP - Protocol
-
Confirm the standard Port number of 1521.
-
Step 6: More Listeners ?
- We finish this step Wood you like to configure another Listener? and click NO.
-
Step 7: Configuration done
- Confirm the "Listener Configuration complete!".
-
Step 8: Welcome
- Select Naming Methods Configuration.
-
Step 9: Naming Methods Configuration
- Select Local Naming as method.
-
Step 9: Naming Methods Configuration Finish
- We can finish this step and click Next.
-
Step 11: Welcome
- We can complete the installation with a click of the Close button and we will go
to point 3.
3 Creating a IDL Konsis-Supply Database
3.1 Creating an empty Container Database
Start the "Database Configuration Assistant" under Start / All Programs / Oracle - OraDB12Home1 / Configuration and Migration
Tools.
Confirm the greetings with < Next > and use step 1 to 14.
-
Step 1: Operations
- We select "Create a Database" and click Next.
-
Step 2: Install Type
- We are going to choose the Advanced Install option. This will give us a graet deal
more flexibility when creating the database. Click Next after you have made your
hoise.
-
Step 3: Configuration Type
- Select the type General Purpose / Transaction Processing from the following list
to create a database and click Next.
-
Step 4: Database Identifiers
- Define the global database name "CONTIDL". The oracle system identifier (SID) will
get automatically the same name. We need the new future Create as Container database,
this Box is checked by default with Local Undo Tablespace for PDBs. We choose the
point "Empty Container Database" and click Next.
-
Step 5: Storage Option
- Select "File System" for Database storage. We can accept the default specified locations
for database storage, or you enter another location.
-
Step 6: Flash Recovery
- Lets leave it all disabled, unless your local DBA wants it.
-
Step 7: Net Configuration
- We choose the Listener, who has the Status started and click Next.
-
Step 8a: Initialization Parameters Memory
- Select Automatic Shared Memory, and set up 1GB at minimum or more of the physical
memory.
-
Step 8b: Initialization Parameters Sizing
- The number of processes must have at least 640.
-
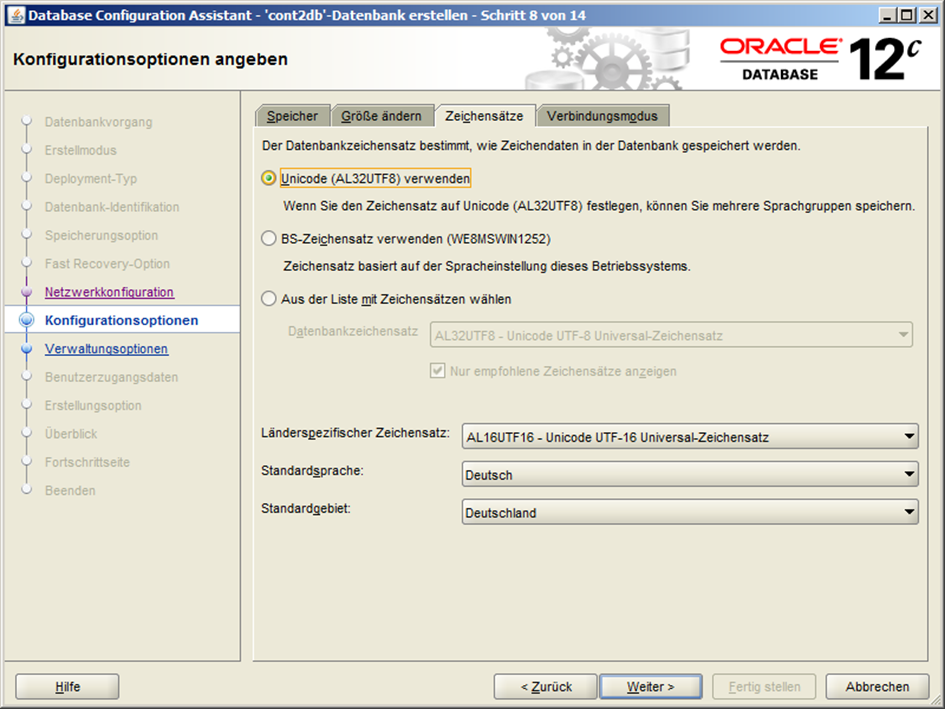
Step 8c: Initialization Parameters Character Sets
- Choose "Unicode AL32UTF-8" with AL16UTF16 and default language and country.
-
Step 8d: Initialization Parameters Connection Mode
- select "Dedicated Server Mode".
-
Step 9: Management Options
- We select Enterprise Manager Database Express (EM) button and click Next.
-
Step 10: Specify Schema Passwords
- You can choose to use seperate passwords for these accounts, or you can use a common
password for all accounts. Also you must enter the password of the Oracle Home User
before you click Next.
-
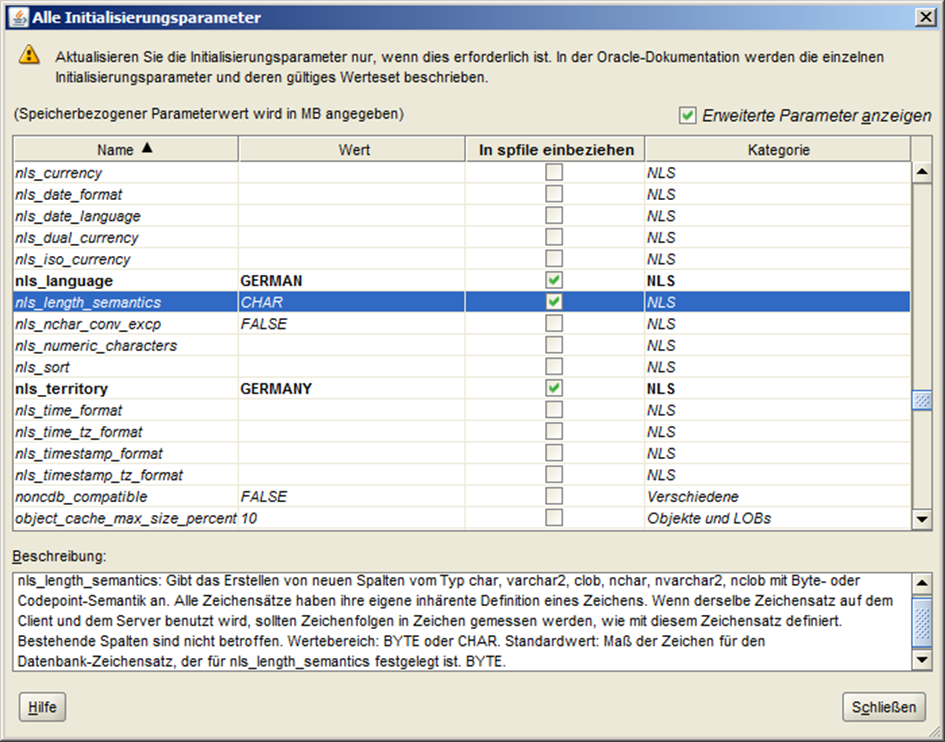
Step 11: Creation Options
- Select "Create database" from the options, and click "ALL Initialization Parameter
button". Choose in the new window "Show Additional Parameter" and you get all parameters.
In this list alter the parameter "nls_length_semantics" from BYTE to CHAR and enable
the field in the column "include in spfile" and close this window. See example as
stated below.
-
Schritt 12: Summary
- The summary shows all options. To install the database we click OK.
-
Schritt 13: Progress window
- Here you can see the current stand of the installation.
-
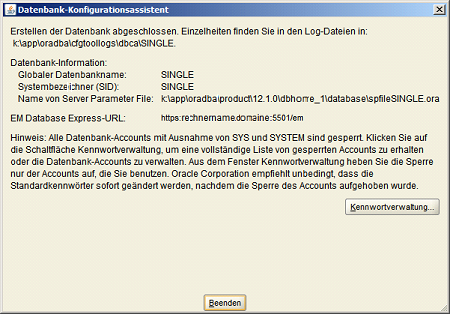
Schritt 14: Finish
- At the end of the installation we get a screen with the important URL for the EM
Databse Express. Make sure you write this URL down before you click the OK button.
See example as stated below. You need this URL for your browser to come in the EM
Database Express.
Example for the Initializierungsparameter nls_length_symantics: CHAR when you have
choosen AL32UTF-8.
Example for the EM database Express URL.
3.2 Tip for post adjustment a Unicode Database
Importent to set the following parameter: NLS_LENGTH_SEMANTICS=CHAR after the installation
the Oracle Instance with character set UTF-8 (Unicode).
- Start (open) the command line.
- Enter: SQLPLUS .
- Connect with User SYS and Password xy as sysdba .
- Enter: select * from V$NLS_PARAMETERS; .
- Control the parameter: NLS_LENGTH_SEMANTICS=BYTE .
- Enter: alter system set nls_length_semantics=CHAR scope=BOTH; .
- Enter: shutdown abort .
- Enter: startup .
- Entere: select * from V$NLS_PARAMETERS; .
- Control the parameter: NLS_LENGTH_SEMANTICS=CHAR .
- Enter: disconnect .
- Enter: exit .
- Enter again: exit .
- Start (open) the explorer .
- Change (go) to the directory 'pfile' from the Oracle installation.
- For the Oracle Instance Unicode an example: D:\oracle\product\10.2.0\admin\unicode\pfile
- Open with an editor the file INIT.ORA.252007134958 (Example) .
- Insert into the group # NLS : nls_length_semantics=CHAR
- Save the file and close the editor.
3.3 Create Pluggable Database
Start the "Databse Configuration Assistant" under Start / All Programs / Oracle -
OraDB12Home1 / Configuration and Migration Tools.
Confirm the greetings with < Next > and use step 1 to 14.
-
Step 1: Operations
- We select "Manage a pluggable Database" and click Next.
-
Step 2: Manage pluggable Database
- We select "Create a pluggable Database" and click Next.
-
Schritt 3: Source Database
- We select the Container database "CONTIDL" and click Next.
-
Schritt 4: Generate pluggable Database
- We select "Create New pluggable Database from PDB-Seed" and click Next.
-
Schritt 5: Identification options of pluggable Database
- Define the pluggable Database name "KONSIS". For Administrator of the pluggable database
we define "PDBDBA" with a password.
-
Schritt 6: PDB Storage Options
- Select "File System" for Database storage. We can accept the default specified locations
for PDB database storage, or you enter another location.
-
Schritt 7: Summary
- The summary shows all options. To install the database we click OK.
-
Schritt 8: Progress window
- Here you can see the current stand of the installation.
-
Schritt 9: Finish
- After the successful installation we click the close button.
3.4 Local Net Service Name Configuration
First we want check the local net service name CONTIDL. Please enter: "TNSPING CONTIDL"
in a Prompt (DOS) window! When we get the error: "TNS-03505: Failed to resolve name
tips", we want configure the local net service name CONTIDL.
Start the "Net Configuration Assistant" under Start / All Programs / Oracle - OraDB12Home1
/ Configuration and Migration Tools. Otherwise we go to the next point: Manuel Setup
a Database for IDL Konsis.
-
Step 1: Welcome
- Select "Local Net Service Name Configuration".
-
Step 2: Net Service Name Configuration
- Select "Add".
-
Step 3: Service Name
- Enter CONTIDL.
-
Step 4: Select Protocols
- Confirm the selected protocol "TCP".
-
Step 5: TCP/IP Protocol
- Enter the host-name for the computer where the database is located. The Host should
be reachable via ping in a Prompt (DOS) window! Select standard port number 1521".
-
Step 6: Test
- A connection test can be performed to the database.
-
Step 7: Net Service Name
- Enter "CONTIDL" for this net service name. Later you find this name under Windows
General View "Services" and shoud be started.
-
Step 8: Another Net Service Name
- We create another net service name "KONSIS" and run from step 2 through step 8 again.
This name KONSIS you don't see later under Windows General View "Services".
-
Step 9: Done
- Confirm the message "Net service name configuration complete!" and close the program.
4 Manuel Setup a Database for IDL Konsis
4.1 Creating own tablespace KONSIS
Create Tablespace KONSIS:
- SQL-Plus is used to register SYSTEM/PASSWORD of the database. To find under Start
/ All Programs / Oracle - OraDB12Home1 / application development.
-
" Execute the SQL-Command by customising the path of the parameter DATAFILE and the SIZE (Example with 4GB).
- CREATE SMALLFILE TABLESPACE "KONSIS" DATAFILE 'LW:\Path\KONSIS.DBF' SIZE 4G AUTOEXTEND
ON NEXT 256M MAXSIZE 20G LOGGING DEFAULT NOCOMPRESS ONLINE EXTENT MANAGEMENT LOCAL
AUTOALLOCATE SEGMENT SPACE MANAGEMENT AUTO;
-
" closing SQL-Plus by : disconnect or continue with point 4.2.2.
4.2 Creating Database-User
There should exist a database-user named idldb with the right authorities. This is
the master of all IDL Konsis-Tables.
The table-space KONSIS is assigned to the user IDLDB. In this space all IDL Konsis-Tables shall be generated.
Running of IDL Konsis requires one user IDLADMIN and all IDL Konsis-User with CONNECT-rights to the database. The maximum lengths of the User-Id and
Password should not exceed 8 digits. It is recommended to allocate Temporary Table-space
for all user explicitly TEMP.
You can create the IDL Konsis-User with the sample of User IDLADMIN.
The User IDLADMIN has the function of < Administrator > in the application KONSIS.
- SQL-Plus is used to register SYSTEM/PASSWORD of the database. To find under Start
/ All Programs / Oracle - OraDB12Home1 / application development.
- At first we create the role IDL_CONNECT:
-
CREATE ROLE IDL_CONNECT NOT IDENTIFIED;
- and rights to rules:
-
GRANT ALTER SESSION TO IDL_CONNECT;
-
GRANT CREATE SESSION TO IDL_CONNECT;
-
GRANT CREATE VIEW TO RESOURCE;
-
Is the user IDLDB still existent after an aborted installtion, delete the user IDLDB with the order: DROP USER idldb cascade; for a clean status please.
-
Creating the user IDLDB:
-
CREATE USER IDLDB PROFILE DEFAULT IDENTIFIED BY idldb DEFAULT TABLESPACE KONSIS TEMPORARY TABLESPACE TEMP ACCOUNT UNLOCK;
- Assigning rights:
-
GRANT CONNECT TO IDLDB;
-
GRANT RESOURCE TO IDLDB;
-
GRANT UNLIMITED TABLESPACE TO IDLDB;
-
Creating the user IDLADMIN:
-
CREATE USER IDLADMIN PROFILE DEFAULT IDENTIFIED BY admin DEFAULT TABLESPACE USERS TEMPORARY TABLESPACE TEMP;
- Assigning rights:
-
GRANT IDL_CONNECT TO IDLADMIN;
-
Closing SQL-Plus by disconnect.
4.3 Create Parameter DMPDIR
We create the parameter DMPDIR for the Oracle Import / Export function IMPDB and
EXPDB. For this parameter we allocate a local dirctory from the server. This directory
must already exist. For example we give the name "importexport" for the directory
on drive "D".
- Start "SQL-Plus" under Start / All Programs / Oracle - OraDB12Home1 / Application
develop.
- Connect to the databese with User:
- sys
- Passwort:
- ********@KONSIS as sysdba.
-
Create Parameter DMPDIR with:
-
CREATE DIRECTORY DMPDIR AS 'D:\importexport\';
- Next grant to User System with:
-
GRANT READ, WRITE ON DIRECTORY DMPDIR TO SYSTEM;
- And disconnect from SQL-Plus.
Now the user SYSTEM can put files in the Directory DMPDIR with the program IMPDB / EXPDB.
5 Establishing an Oracle 32 Bit Client 12c Release 2
The 32 bit Client installation must stay on an other server as the Oracle 64 bit
Server installtion.
5.1 Installation of the Oracle Client 32 Bit 12c Release 2 Software
Required is the CD: Oracle 12c Client or the download file: winx32_12201_client.zip
with unpacking the ZIP file.
The Oracle Instant Client is not possibly to install, because the OLEDB-driver is not supported.
Before you start with the installation, please create under the operation system
Windows a new user only for the installtion. This user have now administrator rights,
is not in the user group of administrator.
You start the installation with the setup program in the directory Client32.
-
Step 1: Select Installation Type
- Select "Custom" as type of installation.
-
Step 2: Specify Oracle Home User
- Under Use Existing Windows User enter the name and password of your created user
at first befor the installation and click Next.
-
Step 3: Specify Installation Location
- We specify the location of the Oracle_Base directory or accept the default entry.
The Software location will automatically completes from the OUI and click Next.
-
Step 4 Available Product Components
- Select additional available 7 product components:
-
- 1. Oracle Java Client
-
- 2. SQL Plus
-
- 3. Oracle JDBC/THIN Interface
-
- 4. Oracle Call Interface (OCI)
-
- 5. Oracle Net
-
- 6. Oracle ODBC Driver
-
- 7. Oracle Provider for OLE DB
-
-
Step 5: Perform Prerequisite Checks
- Nothing to do
-
Step 6: Summary
- Confirm the summery of selected components to start the installation.
-
Step 7: Installation
- Nothing to do
-
Step 8: Finish
- Click close
5.2 Local Net Service Name Configuration on the Client
Start the "Oracle Net Manager" under Start / All Programs / Oracle - OraClient12Home1_32Bit
/ Configuration and Migration Tools.
-
Step 1: Local
- Select "Local" and you see 3 more points.
-
Step 2: Service Name
- Select service name and press the green icon "+" on the left side.
-
Step 3a: Net Service Name
- on the new window enter IDLDB.
-
Step 3b: Select Protocols
- Confirm the selected protocol "TCP".
-
Step 3c: TCP/IP Protocol
- Enter the host-name for the computer where the database is located. The Host should
be reachable via ping in a Prompt (DOS) window! Select standard port number 1521".
-
Step 3d: Net Service Name
- Enter "IDLDB" for this net service name.
-
Step 4: Test
- A connection test can be performed to the database. Please change after the wrong
test the user to "IDLADMIN" with the correct password and make a test again. After
the good test finish it.
-
Step 5: Save
- Save this configuration under the menuepoint "File" and "Save Net configuration".
Close the program.
5.3 Change Password
If the password is expired, you need the key entry PwdChgDlg with an 1 under HKEY_LOCAL_MACHINE\SOFTWARE\Wow6432Node\ORACLE\KEY_OraClient12c_home1\OLEDB
in the registry, so you get the dialog window from OLE DB. This example is from an
operating system Windows 7 64 Bit.
5.4 KONSIS connection
If the KONSIS window close without an error message after the connection, you need
the entry: point semicolon (.;) at first in the environment variable PATH.
6 Loading the IDL Konsis Database-Content
6.1 Loading the IDL Konsis Database-Content with IDL Konsis-CD Delivery Database
- On a computer with Windows put the IDL Konsis-CD "Delivery Database" in the CD device.
- Start "LieferDB_Oracle.cmd" in the directory "LieferDB" and it opens a "Input-Window".
-
Enter the database name (for example KONSIS).
-
Enter the user name IDLDB.
-
Enter the password for user IDLDB.
Repeat this inputs for two times.
6.2 Loading the database (schema IDLDB) over the tool IMPDP from Oracle
Another option is to load the database (schema idldb) with the tool IMDDP. You need
only an export file from the tool EXPDP. This file is standing on the IDL Konsis Installations-CD with the name IDLDB_EXPDB.DMP. (The directory on the CD show the
version of the oracle database.)
You can only do this function on the server and not on a client.
Copy the export file from the CD in the directory, who is allocated to the parameter
DMPDIR. In our example is the directory "D:\importexport".
Tip: When you want change datas between two databases with Import and Export, you
have look implicitly that the character set are equal of the two databases. Example:
Character set "Unicode" and "Not Unicode" are incompatible.
- The User idldb should exist now and be empty!
- If the User idldb isn't empty, the User idldb should be deleted and created new as
described in Chapter 4.2.
- The following instructions should be entered into a Prompt (DOS) Window; the path
for the parameter FILE and LOG should be customised before:
-
- impdp system/passwort@KONSIS schemas=idldb DIRECTORY=DMPDIR file=IDLDB_EXPDB.DMP log=idldb_import.txt
6.3 Information for the installation of a database to an existing instance
During installations to an existing authority occasionally the request is needed
to update the user service class. All tables and views are set to PUBLIC. Through
this every user can access all tables. The users of the other authority also therefore
come about SQL orders from the IDL Konsis system to the data. To stop this, a role of KONSIS laid out which gets all rights
to the tables and views. The PUBLIC rights can be withdrawn from the tables and views
again with that. Only the users which will work directly with IDL Konsis get the role of KONSIS allocated now. Scripts (packages) were, made these in the
SQL -- can plus be executed for this:
For handling this situation there are defined scripts (packages), which can be executed
under SQLPlus.
-
Konsis_rolle_xx.sql
- - generates the role of KONSIS and takes the DBA rights away from the user IDLDB
if allocated.
-
Pck_admin_table_privileges.sql
- - generates a package to remove the rights of one user to another user.
-
Pck_move_index,sql
- - generates a package for moving the indicies of one to the other tablespace.
-
exec_move_public.sql
- - example script for moving the Grant rights of PUBLIC to the role of KONSIS.
-
exec_move_all_index.sql
- - example script for moving the indices of Tablespace KONSIS to INDX.
The user IDLADMIN and all further users need the role of KONSIS.
Moving the indices to the Tablespace INDX only is needed if for performance reasons
the Tablespace was laid out on another disc.
-
ATTENTION:
-
After every IDL Konsis-update, the modification of the rights of the role of KONSIS has to be maintained by using SQL-Plus services again.
The required files are on the IDL Konsis CD "Delivery" in the folder < \DBSAVE\ORACLE\KONSIS-ROLLE-xx-ENG.ZIP. >