IDL Forecast uses a form-based data entry system to record/plan PLAN and FORECAST values for company financial statements, depending on the company, business unit and controlling object. It supports the creation of a company financial plan using a profit and loss account (P/L), as well as the balance sheet (B/S) derived from this. The transition of the planned information (data) from the profit and loss account to the balance sheet is governed by a predefined set of rules, which takes account of a variety of planning requirements. IDL Forecast also supports the planning process by means of interactive planning functions, e.g. refreshing (updating) balances in the planning form with those from the master application (IDL Konsis), transition of B/S opening balances, distribution functions, splashing, etc.
The "Save Balances" function transfers the P/L and B/S figures from a scenario planned in IDL Forecast into IDL Konsis as balances, e.g. account balances (KTOSAL). This data can then be used for group-wide financial planning, i.e. further processed and managed using the 'Company financial statements + monitor' (EA) application and finally consolidated using the 'Group companies + monitor' (KTKGES) application. On the basis of this P/L and B/S data, as well as transactions reported, an overall cash flow statement can be created in the master application, IDL Konsis, provided that a corresponding cash flow report has been set up.
When first configuring IDL Forecast, the "master data" must be set before proceeding. However, IDL Konsis is usually already in use for the purposes of consolidation, meaning that the existing master data (e.g. companies, charts of accounts, charts of positions, B/S and P/L reports, etc.) can be used as a basis. If necessary, plan-specific details (periods, planning facts, etc.) must be added to this master data.
The main menu folder: Options / Options / "IDL FORECAST" (tab) allows the user to make adjustments to the default basic settings for IDL Forecast. These settings can be changed at any time. However, IDL Forecast (PLAN) needs to be restarted for any changes to take effect.
The following basic settings can be configured:
Other settings can be configured and additional panels enabled via the properties of the respective scenario. These settings are initially defined when a new scenario is created.
Planning forms that can be enabled:
Other configurable settings:
Following settings can later be changed in the Scenario Properties dialog. Changing the settings is only possible if the scenario is closed.
IDL Forecast can be called either using PLAN or via the Quickstart menu. The path for IDL Forecast is IDLplus / Planning / "IDLFORECAST". This opens a main window (workspace) containing several moveable panels (sections of the window) arranged along its edges. When a scenario is loaded, the reports associated with the scenario will be displayed in the central part of the main window (usually B/S and P/L).
Individual panels can be repositioned within the main window by dragging and dropping them with the mouse. If panels are moved on top of one another, a panel containing several tabs will appear at the top-left of the workspace. This option must first be enabled via the main menu folder: Options / Options / "Appearance" tab / "Movable panels". Panels that are not currently required can be dragged to the left or right edge of the window (sidebar), or are automatically moved to the sidebar when hidden.
Please note: Users wishing to work with several windows, for example on more than one monitor, can detach panels from the main window and open them as independent windows. When this type of window is closed, it is reintegrated into the main window.
Each of the panels used in the main window are briefly described below.
a. Planning Form / table area
The form-based main window of the IDL Forecast application is located in the centre of the workspace and arranges the reports selected in the scenario (account balance overviews) into adjacent tabs, which lead to individual reporting screens. These tabs are displayed in, and can be selected from, the upper-left title bar. A scenario will usually contain reporting screens for the profit and loss account, the balance sheet and, if applicable, statistics. The reporting screens display the balances (account balances, controlling balances or IC balances) for selected periods and can be created/modified by selecting individual cells, depending on the user's permissions.
Besides being able to enter comments on the account balances and their account entries via the panel "account," a field-specific commentary on the account balance can be entered directly using the planning form as an alternative. Two entries for editing and deleting commentaries are provided in the right context menu. A commentary at this level of the account balance will be shown by a info in the respective field of the planning form if the required view "Show comment symbols" has been activated in the main menu folder: Options / View.
b. Scenarios for selection area(s)
At first on this panel, the user must specify for which company and, if applicable, which business unit, planning is to be carried out. The parameters that are configured here must be selected correctly in order to display (load) a scenario for the first time. Companies and business units that have already been saved, are displayed below the scenario name and can be opened directly via double clicking on the respective row. The company and, if applicable, business unit object structures are set up in the master applications, 'GES', and 'UBR'.
Scenarios for scenario management
Apart from that, the Scenarios panel is used to manage saved scenarios. On this panel, new scenarios can be created and existing ones can be displayed, copied, renamed and permanently deleted. A scenario contains all of the fixed/variable framework parameters of a plan. If a scenario is copied, the user can select for each company whether values and rules are copied with it. For each scenario, the user can select whether details such as the planning periods, facts, reports used and chart of accounts are displayed in the panel by activating the columns with a check mark in the context menu, which can be opened by right-clicking on the table header. With an active filter (Icon: filter), the data can be filtered according to the table columns currently enabled. Comments can be left on individual scenarios, and the properties show further information about the created and edited scenario. In addition to the purely informative functions of this dialog, global parameter values can be also configured.
c. Rule Templates
The Rule Templates panel is used to save, manage and control the overall set of rules defined. From this panel, rule templates (saved rules) can be recurrently used on the scenario, be used as a template for further rule templates or be made available to other companies and, if applicable, business units. Rules are managed by grouping and sorting them into set structures. These set structures can be created automatically for selected companies and report positions. Rule templates and sets can be copied, renamed, enabled, disabled and deleted. To control the scenario, if necessary only for certain planning periods, either individual rule templates or entire sets can be used via this panel. Rule templates can be commented on individually, and the properties give further general and change information on the rule template that has been created.
d. Applied Rule Templates
This panel shows the user which rule templates and rules have been applied in the loaded scenario for the selected company and, if applicable, business unit. Rule templates that have been applied in the scenario are configured, along with their set structure, using the Applied Rule Templates panel. There is no connection between these two panels. This means that applied rule templates can be saved for specific scenarios and comments can be edited independently of the original template. The panel gives an overview of the comments and functional relationships of the applied rule templates. As a result, all or a selection of business cases can be removed from the scenario via the Applied Rule Templates panel. Properties give further general and change information on applied rule templates.
e. Account details (for closing, intercompany and controlling balances)
The Account panel displays a detailed account drill-down, including opening balance, additions, disposals and the resultant closing balance (which is displayed in the planning form). The information is at first presented as a list and can be switched to a T-account display via the button in the top-right corner, albeit with limited functionality. The various entries on the accounts are shown alongside icons that visually represent the reason for/origin of each movement. The Account panel is closely related to the Planning Form panel. For example, if a cell in the planning form is highlighted, the account drill-down for that cell will be displayed automatically. This panel is also linked to the Business Cases and Applied Rule Templates panels, on which related content is highlighted in real time.
In addition to the account balances of a selected account, detailed information on intercompany and/or controlling balances are also displayed in the account details. For this purpose, the display of the account details is either changed to account balances / intercompany or controlling balances. They take on partly similar features / functions as the display for account balances and, in the case of intercompany accounts, the display of intercompany balances replaces the display of account balances! A respective notice +change according to details+ will be shown in the display of account balances. Analogous to the account, IC balances are closely linked to the planning form. If, for example, a cell in the planning form is selected, the matching IC balance details of the currently selected cell will be displayed automatically. Depending on which cell is chosen in the planning form, all of the IC balances will be displayed at the account level and only one selected IC balance at the IC balance level.
In addition to the informative outline of the account, comments can be added to the account balance or individual account entries. This commentary can be up to 500 characters in length and will be shown in the form of a info. If a comment has been edited, then it will be displayed as a tool tip. If a comment has been stored at the level of the account balance, then this comment will be displayed in the planning form by a info. Under the main menu folder: Options / Options / Tab "IDL FORECAST," the basic setting "Export comments as remarks" can be activated to store the first 70 characters of the comment from the account balance as a remark in the account balance (KTOSAL) of IDL Konsis.
Please note: If empty and 0.00 account entries are not to be displayed in the working window, this can be completely hidden out via the main menu folder: Options / View / "Hide empty and zero values." If this option has been activated by a checkmark, you will see information on the number of hidden entries at the end of the account activity. This view is optional until the next change is made and also includes the work area business cases.
f. Business Cases:
Apart from creating accounting rules with the help of rule wizards, this panel is primarily used to display applied rules and their functional relationships within the scenario. If rules are applied in the scenario, these are listed hierarchically as a business case group on the left-hand side of the panel. A business case group is further divided into business cases for single periods and, if applicable, other dependent business cases. If a business case is selected on the left-hand side, the right-hand side will display general information in the Overview and Comment tabs, as well as the applied rule's functional relationships in the Postings and Table tabs. This panel also has links to the Account and Applied Rule Templates panels, in which the account entries affected by the business case or the applied rule template in which it originated are also selected.
Please note: If empty and 0.00 business cases are not to be displayed in the business case panel, they can be hidden completely using the main menu folder: Options / View / "Hide empty and zero entries." If this option has been activated by placing a checkmark, you will see information on the number of hidden entries at the end of the account overview. This view is optional until the next change is made and also includes the work area account.
g. Balance Differences
The Balance Differences view shows a list of all account, controlling and IC balances undergoing editing in the planning form for the current scenario that differ from those stored in the IDL Konsis master applications KTOSAL, CNTSAL and ICKTOSAL, which are used for further plan consolidation. The relevant planning form cells/balances can also be visualised with an icon. The list of differences also allows specific individual balances in the scenario to be refreshed. A filter allows the user to limit the results displayed (and by extension the balances refreshed) to certain periods, positions or accounts.
h. Plausibility check
This functionality was no longer a working window of its own in release 2013.0, but rather a main menu action entitled +check for missing / duplicate rules.+ The plausibility check verifies in particular whether a scenario contains rule templates that are applied twice or whether some are missing. Besides this main test, it also checks among other things whether the transition from +ACTUAL to PLAN+ is up to date or whether there are other indications of possible error sources for a rule template that is being used.
i. Dimensions (sidebar)
This panel that is initially located in the sidebar area allows you to change the structure of the planning form. The line and column contents of the planning form can be configured by moving them to somewhere else via drag-and-drop.
j. Table storage (sidebar)
This working window that is initially located in the page sidebar allows you to add additional tables to the table area and edit them. You will have access to a few basic formulas for performing an auxiliary calculation, for example.
In IDL Forecast, scenarios are used to help model a variety of planning alternatives. One scenario can be used for all companies and in combination with the relevant business unit, if applicable. Within a scenario, the user can configure both fixed and variable basic conditions for the planning alternative, which are continually required for different companies, business units and controlling objects. Fixed basic conditions are defined when creating a new scenario and include selected reporting structures (ReportIDs from the master application IDL Konsis) for the reporting screens of the planning form, facts for various planning areas, as well as periods for the relevant planning interval. These fundamental basic conditions cannot be subsequently changed. Parameters for variable basic conditions are defined in the properties of a scenario. This allows global scenario values, for example a pre-defined tax rate, to be listed individually, then selected and used in the respective rule templates (see section 4.12). This data can be changed and will influence the scenario accordingly.
A scenario is always divided into several data areas. ACTUAL, FORECAST and PLAN are available as data areas. In the ACTUAL area, ACTUAL account balances for the selected fact and period(s) are displayed as reference values in the Planning Form. ACTUAL figures from the master application, IDL Konsis, are write-protected cannot be changed in IDL Forecast. The FORECAST area can also be enabled for a scenario. The FORECAST planning area can be used to display a mid-year projection, in which the ACTUAL data from the year so far can be viewed and used as a basis for forecasts to year-end. The planning form in the PLAN area can either be empty or contain pre-loaded account balances. It can be edited. This also applies to the optional FORECAST area.
The planning form can be edited in the following ways:
1. Direct (online) entry / input to the planning form cells (this corresponds to the closing balance of an account). Copy and distribution functions can be used to assist input.
2. Use existing balances from the master applications, KTOSAL, CNTSAL and IC-KTOSAL. This method updates entire planning areas or selected cells of a scenario by loading existing balances from the master applications into the scenario. Where used, these balances are already present in the master applications or have been imported from legacy systems.
3. Change the plan via automatic rules, which are defined using rule wizards and typically saved in the form of rule templates.
Please note: A separate fact can be selected for each planning area. For the ACTUAL area, a fact with ACTUAL account balances must be selected. Facts can be managed in the 'FAC' master application. A scenario is significantly affected by whether the ACTUAL fact has been configured for a group or company chart of accounts. This configuration is decisive for the subsequent selection of the FORECAST and PLAN facts. If an ACTUAL fact is associated with a specific group chart of accounts, only other facts with the same group chart of accounts can be used. If only company charts of accounts are specified for the ACTUAL fact using chart flag "G", any fact with the same chart flag can be used.
Scenarios created using an older release of IDL Forecast can only be used once they have been converted to the current release. Such scenarios and rule templates are indicated in scenario management by a warning icon to the left of a scenario's name. When IDL Forecast is opened after a release update, a dialog will give the user the option of converting the scenarios automatically. The conversion will affect all scenarios that have been created. The process can take several minutes depending on the number and size of the scenarios.
Scenarios are managed using the Scenarios panel, which can be shown or hidden directly via the "Scenario list" option (icon: table grid) in the main menu. It consists of a list of all scenarios created in IDL Forecast. Which scenario information (e.g. planning period, facts, reports used and chart of accounts) is displayed in columns on the panel will depend on the view setting selected via the context menu which can be opened by right-clicking on the table header. In the default setting, the scenario name as well as the user and date of the last saving of the scenario are displayed. Additionally, the periods, facts, reports, additional tables and the chart of accounts used in the scenario can be displayed, as well as information about the lock status of the scenario and whether a comment exists. Scenarios that cannot be loaded, e.g. because they have not been converted or the user does not have sufficient permissions, are displayed in light-grey.
The Scenarios panel is used to perform the following scenario management actions:
Actions (integrated toolbar)
other actions (context menu)
The following scenario management actions are performed elsewhere:
Main menu
Main menu item: Scenario
Performing the action +Save Scenario+ will save the current data set of the scenario for the currently selected combination of company and business unit. No balances are exported to IDL Konsis this way. To provide balances to IDL Konsis, the action +Save Balances++ has to be performed via the menu +Scenario+. This will also save the scenario itself.
If the facts ('FAC' master application) have been flagged K, the group chart of accounts will be used for the purposes of the scenario. If G is set, the chart of accounts for the company selected in the Scenarios (selection area) panel will be used.
When a scenario is created, at least one report must be specified as a planning form (all reports of type E can be used). Reports are created in the 'RID' master application, and the desired row structure for the report is created and edited in 'REPZEI'. Generally speaking, e-reports already created in IDL Konsis can be used.
The planning forms (table areas, reporting screens) for a scenario are composed of the reports selected and the account structure configured ('KTP'/'KTO') for the relevant fact. The 'POSKTO' and/or 'Z-POSKTO' master applications can be used to define the report structure, in this case assignment of "accounts to positions". New positions are created and managed via the 'POS' master application based on the chart of positions ('POP').
Each scenario area (ACTUAL, FORECAST, PLAN) may contain several periods which together make up a chronologically organised planning interval. The scenario as a whole can be displayed by different time periods, a.k.a. the temporal resolution. It should be noted that the temporal resolution can only be coarsened from year to year but cannot become more detailed. Which temporal resolution is valid in each year of a scenario is defined when the scenario is created. This is defined when the scenario is created. In this context, the accounting periods are also created in the 'ABR' master application and period flags set accordingly (see overview below).
| Temporal resolution of scenario | Period flag (ABR) | Description | Scenario view |
|---|---|---|---|
| Year view | J (e.g. 12.2000) | Annual period | Planning form with annual periods |
| Month view | M (e.g. 01.2000) | Monthly period | Planning form with months and quarterly subtotals |
| Month view | M (e.g. 06.2000) | Quarter as monthly period | Planning form with months and no quarterly subtotals |
| Quarter view | Q (e.g. 06.2000) | Quarterly period | Planning form with quarters |
If future periods (FORECAST, PLAN) have not been set up as accounting periods for a scenario, they must be set up in the 'ABR' master application prior to use in a scenario.
In the interest of clarity, or to improve the speed of the application, it is convenient to reduce the number of accounts for which planning is carried out. For this reason, IDL Forecast allows the user to perform account aggregation without having to create a dedicated report or transform ACTUAL balances or balances from a preloaded detailed plan, even if the balances are located on the unneeded accounts.
In the 'KTO' application, an account that is not required for planning can be assigned to an aggregation account. Several accounts can be assigned to an aggregation account. An account assigned to an aggregation account is not displayed in IDL Forecast. Instead, the account, controlling and intercompany balances from this account are accumulated to the corresponding balances on the aggregation account. This reduces the number of accounts in the plan.
When assigning accounts, it must be remembered that accounts cannot be nested, i.e. an account acting as an aggregation account for other accounts cannot be assigned to a different aggregation account and the accounts must also be part of the same chart of accounts. The assigned accounts have to match in terms of B/S or P/L flags, Account flag, Transaction development, Consolidation function and Transaction carry-forward. If one of these parameters does not match, the IDL Konsis application Account (KTO) will show an error message and the account aggregation assignment is not valid. To accumulate controlling balances to the aggregation account, both accounts must be authorised for the same controlling dimension. To accumulate IC balances, both accounts must be flagged I or J.
If account aggregation is required in IDL Forecast, it must be enabled when a scenario is created. It cannot be enabled retroactively. If account aggregation is enabled, the balances of the assigned accounts are automatically accumulated to the aggregation account and displayed there accordingly whenever a balance import or refresh function is performed. The Balance Differences view also shows accumulated values for the balances in IDL Konsis.
Please note: If balances are written to IDL Konsis from a scenario with account aggregation enabled, all account, controlling and IC balances from accounts assigned to an aggregation account in the FORECAST and PLAN data areas will be deleted, as these balances are already contained in the balances of the aggregation accounts. Values in the ACTUAL area are not affected by this.
Please note: In order for the account aggregation to be considered during period carryforward in IDL Konsis, a classification of the FORECAST- and PLAN facts with X = planfact is required. A fact without classification is treated like an ACTUAL fact and a possible aggregation is not taken into account. Consequently, account aggregations are only considered for facts classified as FORECAST or PLAN when performing a period carry-forward for transaction developments and balance postings.
Important: Please remember that plan account aggregation in IDL Forecast until Release 2013.0 has no effect on period carryforwards that have been performed in the company and group financial statements in IDL Konsis! This means that transaction development and balance posting carryforwards must be corrected manually or by using the IDL Connector. This will have an impact on aggregated balance accounts that belong to a transaction development and/or with which consolidation postings are to take place.
New scenarios are created using the Scenario Wizard. This can be started via the main menu bar or the integrated toolbar on the Scenarios panel (icon: star). This opens a new window in which the scenario is defined step-by-step. The left-hand side of the Scenario Wizard displays the steps that must be completed, and the validity of the data entered is verified for each step. Below is an overview of these steps, with a brief description of the data required, followed by a more detailed explanation.
| Step: | Definition of scenario |
|---|---|
| 1. Select Reports | Name / Report selection / Optional settings |
| 2. Select Data Areas | Specify planning areas / Define planning interval and temporal resolution |
| 3. IC-Gegenplanung | IC-Gegenplanung de-/aktivieren und IC-Profil zuweisen |
| 4. Comment | Add a comment |
1. The "Select Reports and Settings" step: Firstly, the scenario being set up is given a name. Please note that each scenario must have a unique name. If a scenario name is already taken, the name field will be surrounded by a red border. The user must then specify which e-reports as per the 'RID' master application are to be used for the planning forms. The option selected will be applied consistently across all planning areas. This step also contains the optional "Null/empty differentiation", "Account aggregation" and "Rules across data areas" settings. The user can also choose whether intercompany and/or controlling planing will be used in the scenario. Some of these settings can only be reached via +Advanced Settings+"
Please note: A combination of intercompany and controlling planning cannot be supported at this time. When exporting balances to IDL Konsis, the combined information of intercompany balances and their corresponding controlling balances is lost!
There are three possible ways of doing intercompany planning:
2. The "Select Data Areas" step: The second step of the Scenario Wizard is used to specify the data/planning areas (ACTUAL / FORECAST / PLAN) that a scenario is to contain, as well as the time interval these will span. This involves assigning an ACTUAL source fact to the above ACTUAL planning area and assigning at least one other target fact to the FORECAST and/or PLAN area(s). The FORECAST and PLAN areas can be enabled or disabled individually in front of the target fact selection field. Please note that facts cannot be assigned to a data area more than once. Facts which can be used as FORECAST or PLAN facts are marked in bold in the selection list if they are classified as planning facts in the application Facts 'FAC'. If other facts are selected here anyway, a warning notification is shown. Additionally a source fact differing from the target fact can be assigned for the FORECAST and/or PLAN data areas. These default source facts of the scenario can later be overwritten for each company via the main menu folder: Scenario / +Configure Facts++, see section 5.3.
Next, the time interval for the scenario and the temporal resolution are defined, starting with an ACTUAL period, followed by an optional FORECAST period and concluding with one or more PLAN periods. Periods are selected from the field on the right-hand side and assigned to the planning/data periods on the left-hand side. Following this, the user must specify the time period by which the scenario will be displayed (a.k.a. the temporal resolution). It should be noted that the temporal resolution can only be coarsened from year to year but cannot become more detailed. Therefore it is not possible to select a yearly resolution for the first year and subsequently a monthly resolution for the second year. When viewed chronologically, the resolutions for each year must progress from monthly to quarterly to yearly. The +ACTUAL+ data area is excluded from this restriction. Which temporal resolution is valid in each year of a scenario is defined when the scenario is created.
A time line is visible below the both the FORECAST area and the PLAN area. This time line can be used to split a period so that it can be assigned to two data/planning areas. Periods can be split between ACTUAL and FORECAST or between ACTUAL and PLAN. To perform the split correctly, the FORECAST or PLAN period selected must not yet have been assigned to the ACTUAL data area. To ensure that a correct planning interval has been specified across all planning areas before finalising the scenario, a preview is displayed below the annual period selection field. This preview uses a table to show which periods will be processed in which planning area of the scenario.
You will also be asked which data area a decumulation of the P/L balances on a subannual basis should take place in FORECAST or PLAN with scenarios with limited periods (ACTUAL/FORECAST or ACTUAL/PLAN for a year) when these are updated in the planning form. This is extremely important in determining the decumulated / isolated P/L balances following the change from ACTUAL to FORECAST or PLAN. Either a decumulation of the following balances from the previous ACTUAL period or the previous FORECAST or PLAN period will take place. The option will be shown to the right of the selectable source fact. A decumulation of ACTUAL is the standard setting. If no periods are limited in scenario, this option will be grayed out in scenario and cannot be changed. The decumulation can later be overwritten for each company via the main menu folder: Scenario / "Configure Facts+"
Please note: Facts and periods for which a user does not have the necessary permissions will not be shown in the Scenario Wizard and cannot be selected. If a fact does not appear, the user must check whether it has been unlocked for his/her user group in the 'BENOBJ' object permissions. The corresponding permissions for periods are assigned using the 'BENABR' application. In addition to elements lacking permissions, annual periods (financial years) without the correct period flag for a scenario according to 'ABR' will also be filtered out. If a monthly temporal resolution was selected for the scenario in the first step, the monthly periods throughout a financial year should have period flag "M" set. Similarly, a financial year must be divided into quarterly periods (period flag "Q") if a quarterly resolution has been selected for the scenario. If an annual level of detail is set, no additional filtering is performed.
In addition, starting with Release 2017.0, you must specify which time-related position and account assignment (POSKTO) should be taken into account in creating the planning form below the period preview. The default setting is the first FORECAST or PLAN period that follows the CURRENT period. This setting can be displayed via the properties of the scenario. Subsequent adjustment of the period is not possible.
3rd Step ? IC Counter-Planning:The 'IC Counter-Planning (ICGP)' can be activated by placing a checkmark on this page if "Intercompany Planning" and "Apply Rules to IC Balances" have been activated on the first page of the wizard. The specification of a sub-/group must be made to determine the group currency. Afterwards, an "ICGP profile" with the account assignments must be selected from the list of available profiles. "Adopted IC balances change the account balance of J accounts" represents another option. If a checkmark has been placed on this option, the adopted balances will either increase or decrease the account balance and the third party component will remain unchanged. If this option is not checked, the third party portion will be adjusted to suit the IC details so that the account balance remains unchanged. Consequently the third party component can be issued a different sign than the account balance.
4. The "Comment" step: The left-hand side of the Scenario Wizard summarises the parameters selected for the scenario, while the right-hand side gives the option of adding a comment of up to 500 characters. The comment text will be displayed in the tooltip for the scenario and can be edited at a later date if necessary.
Please note: Once a scenario has been created, it cannot subsequently be modified. In that case, a new scenario would have to be defined!
Once a new scenario has been set up in the Scenario Wizard, it is automatically saved to the database. In order to load (show) a scenario, the user must select it from the list of available scenarios on the Scenarios panel and double-click it. A selected scenario can also be loaded via the integrated toolbar on the Scenarios panel or via the "Show Scenario" option in the context menu (icon: eye). If a scenario is shaded in grey, the user lacks the required permissions. (See section 10.2). Generally speaking, scenarios created by a user will always be accessible by that user, unless their rights have been subsequently restricted.
IDL Forecast automatically enters the company and business unit (below: "C/BU combination) from the master data application 'VOR' into the same window as a modifiable default. If no business unit is to be used, a * is entered instead of the business unit key. If a scenario is displayed for the first time, the desired C/BU combination has to be entered. If a C/BU has already been displayed and saved for a scenario, this combination is shown below the scenario name and can directly be selected by double-clicking. The previously saved status is restored. If the C/BU combination of a scenario is changed without saving first, a warning message is shown with the options of saving (Yes), changing without saving (No), or cancelling the action.
The ACTUAL data area of an as-yet unsaved scenario is always loaded with the current balances from IDL Konsis when first shown. Only once a selected C/BU combination has been saved for the first time will the system stop automatically refreshing these ACTUAL planning form balances with data from IDL Konsis when next loaded. In principle, FORECAST and PLAN balances are not refreshed automatically. For this reason, balances must be updated manually; see section 5.4.
Please note that not all C/BU combinations and controlling objects are permitted. The actual combinations available are determined by the settings in the 'FAC' and 'GESUBR' master applications. The Business unit control option is configured in the Facts ('FAC') application. Either (-), (M) or (X) can be selected. Users intending to work without business units should select (-). They then only need to enter * for the business unit. (In this case, * represents zero business unit control and should be specified in the startup data (VOR).) Users wishing to work with business units should select (X), in which case * cannot be used. Instead, a valid C/BU combination from GESUBR must be specified. These GESUBR entries must be managed in IDL Konsis for all facts and periods of a scenario. Where (M) is used, business unit control is optional and * can only be used if GESUBR contains no entries for the selected company, otherwise the system will behave as if (X) were set.
When managing business unit control in IDL Forecast, users must be ensure that all combinations of facts and periods to be used in a scenario are configured as valid in GESUBR. It is advisable to select the same settings for the various facts as for the business unit control. Under no circumstances should a mutually exclusive configuration be set, as this will mean scenarios cannot be loaded for any combination. The same applies for GESUBR entries. The necessary entries must be present in GESUBR for all facts and periods.
If you try to load a scenario that contains an undefined C/BU combination, an appropriate error will be displayed if no C/BU combination exists in the last ACTUAL period / fact of this scenario. If, however a C/BU combination exists in the last ACTUAL period / fact of this scenario, a notice will be shown that provides you with automatic allocation of the missing C/BU combination. By pressing +Create missing company+business unit allocations,+ an automatic allocation will be performed only for the company selected in the panel +Scenarios+ and the scenario will be loaded. If the action "Create missing company+business unit allocations" is not selectable (greyed out), the user is lacking the menu authorizations to insert the required company/business unit combinations. This automatic allocation only takes place for FORECAST and/or PLAN periods, not for ACTUAL periods. If you don+t want an automatic allocation to be assigned, you can end this operation by pressing +Cancel.+ Otherwise, manual allocation can be performed in the IDL Konsis application 'GESUBR' (Company+Business Unit). With the help of "mass copy," existing allocations from an entire year can be copied over to another target year. At the same time, this function can be used to only copy certain periods. With "mass copy",you will need to list the fact that the data is to be copied over to next to the period or target year.
Users with sufficient permissions can delete scenarios that have been created. A scenario is deleted by selecting it from the list and using the "Delete Scenario" option in the context menu (icon: X). The user is prompted to confirm, after which the scenario is permanently deleted. Scenarios can even be deleted while they are still open. If on the other hand a scenario is being used by another user, it cannot be deleted.
In the same way, already saved companies of a scenario can be deleted individually. The procedure is the same as described above, however not the scenario but the company to be deleted must be selected.
Users are able to copy scenarios, with an option to include or exclude values and rules. To do so, they must click a closed scenario with the right mouse button and select "Copy Scenario" from the context menu. (Open scenarios cannot be copied and must first be closed.) The subsequent dialog initially shows the original name of the scenario and prompts the user for a new name. The red border around the input field will disappear when the scenario name is unique and therefore valid. This prevents existing scenarios from being overwritten! If the "Copy only master data" option is enabled, only the basic information specified in the Scenario Wizard on creation will be copied. In this case, values and rules are not copied. If balances and rules are to be copied, the option "Copy rules and balances for:" must be activated. In the following company list the companies and business units are selected for which rules and balances are copied. For all other companies and business units, only the master data is copied.
Scenarios can be renamed. To do this, a user must click the scenario with the right mouse button and select "Rename Scenario" from the context menu. Open scenarios cannot be renamed and must first be closed.
Both new comments and those added when the scenario was originally created can be edited or rewritten by right-clicking the relevant scenario and selecting the "Edit Comment" option from the context menu (icon: info with pencil). The comment text is limited to 500 characters and is displayed in the tooltip of the scenario along with information on the user and date. Users wishing to delete a comment can do so by selecting the separate "Delete Comment" option from the context menu (icon: info with X).
The Properties window contains various tabs that give information on the content of the scenario being set up or edited. Furthermore it displays the scenario settings, some of which can be changed. These properties can be called via the "Properties" option in the context menu, regardless of whether the scenario is open or closed.
| Tab | Content/function |
|---|---|
| 1. General | Gives information on date created, date saved, temporal resolution of the scenarios, facts and reports used, as well as details of optional settings. |
| 2. Companies | Gives an overview of the C/BU combinations that have been saved and edited in the scenario (by whom and when). |
| 3. Statistics | Gives information about the volume of data contained/processed in the scenario. |
Default values can be stored for a scenario using scenario-dependent parameters and these can be used in rule templates (such as tax rates, for example).
These parameters allow calculation rules to use the precise value assigned to the specified parameter instead of a fixed value in each respective scenario and, if applicable, for each respective company and period. This enables rules to perform calculations using variables, without the user having to alter the rule or rule template itself. For example, the same sales rule template can be used with a different sales tax rate for each period in which it is applied.
Please note: The parameters used for the percentage proportion of payment and release components are exceptions. If the parameters used are changed, the rule template must be re-applied because the parameter values stored are frozen during the use of the rule template.
Parameter definitions and changes are to be made using a separate dialogue that can be opened the other main menu folder: scenario / "parameter?."
The name of each parameter cannot exceed 20 characters or contain spaces. Each parameter is assigned a default value which will be used unless other restrictions are in effect. For each parameter, a more explicit value can be specified for a particular company, timeframe or combination of these. For example, if a user specifies a more explicit value pertaining to a particular company in a parameter, and a rule is then created that uses that same parameter in that same company, it is the more explicit value that will be used, whereas for any other company, the default value will be used.
Parameters and parameter values are defined in the form of a list, with each row representing a parameter value. New rows can be added by clicking the button located below the list on the left hand side (icon: star). The name of the parameter is given in the first column. All rows containing the same parameter name collectively make up the value definition of that parameter. The value is entered into the second column. In the third and fourth/fifth columns the user can select the company and/or period/timeframe for which the value entered on a given row will apply. To do so, the user must double-click the relevant cell and select the company or period from the selection dialog that appears. Clicking the X button will delete a row.
The following periods can be set for parameter values:
| Period from | Period until | |
|---|---|---|
| blank | blank | The parameter value is valid in every period |
| 12.2013 | 12.2013 | The parameter value is only valid in period 12.2013 |
| 01.2014 | 12.2014 | The parameter value is valid from 01.2014 until 12.2014 |
| blank | 11.2013 | The parameter value is valid until and including 11.2013 |
| 01.2015 | blank | The parameter value is valid from and including 01.2015 |
Clicking the button in the lower-right corner allows the user to copy all parameters from another scenario in the database into the current scenario. A selection dialog will be opened showing all available scenarios.
Any changes made to parameters and parameter values are only applied to the scenario once the Scenario Properties dialog is closed by clicking the OK button. If the scenario is open, all rules in the affected C/BU combination will be instantly recalculated with the new parameter values. For all C/BU combinations that are closed when parameter changes are made, the new parameter values are not applied automatically. Instead, the next time the scenario with that C/BU combination is opened, the user will be asked whether the adjusted parameter values should be applied.
+No+ ensures that when a scenario is opened, the user will always be able to see the values that were present when the scenario was last saved. In contrast, +Yes+ causes all rules to be automatically recalculated with the new parameter values after the scenario has been opened. In both cases, the Scenario Properties will always show the current parameters of the scenario. The message will not appear, if the most recently processed parameter values are identical to the current parameter values of the scenario.
Working with parameters can be made easier by using two checking functions:
"Check for Missing Parameters" checks whether all parameters that are used by a rule applied in the current scenario have been defined. If a parameter is referred to that is not defined in the scenario, this parameter will be listed along with any rules that refers to it. This checking function is called automatically when a scenario is opened and when changes have been made to the parameters and/or parameter values. Ebenfalls werden angewendete Regeln mit fehlenden Parametern in der Plausibilitätsprüfung angezeigt.
Please note: Missing parameters for terms of payment and dissolutions are disregarded, as they are evaluated only during application of a rule template. See column "P" Missing Parameters in the windows "Rule Templates" and "Applied Templates".
The entry "Show Parameter Values" in the context menu of the planning form opens a window in which all parameters defined in the scenario are listed alongside their values as currently applicable to the currently selected company and period. This is particularly useful where more complex value restrictions have been set within one parameter, as it provides an easy way to determine which value is used by which parameter and where. An extra column shows whether the value displayed has been subject to adjustment on the basis of company or period. If this column is empty, the default value of the parameter has been used. It is sometimes advisable to integrate the window as a fixed panel by clicking "As Panel"; this ensures that the list of parameter values will be constantly updated to reflect the cell selected in the table area.
If positions have been subsequently added to a report structure in the 'REPZEI' application module or new accounts have been added via 'POSKTO', these new structures can be subsequently applied to a scenario. To refresh a scenario with this new information, the user must open the scenario and start the function via the Scenario / "Refresh Report" option in the main menu. The refresh function also affects C/BU combinations that are not currently active. When a new scenario is loaded, new accounts are automatically integrated into the existing report structure of the planning form so that they can be used straight away. The scenario must be saved before refreshing the planning form structure. If a scenario is not currently saved, a corresponding warning will be displayed, after which the process may either be continued (Yes) or aborted (Cancel). Once the scenario has been updated with the planning structure, all ACTUAL balances are updated and the scenario is automatically saved.
The "Refresh Cell Validities" option in the Scenario menu performs a check routine. This checks whether all data/cells in a scenario are still valid and have not been locked externally. This data includes all "valid until" and "lock" information from any IDL Konsis master applications that influence the structure and content of the scenario, e.g. Accounts (KTO), Positions (POS), Reports (RID), Facts (FAC), Companies (GES), balances locked in "Company Financial Statements + Monitor" (EA), etc. These cell validities are not checked continually in a scenario. For cell validities to be continually updated, the user must check the Options / Options / IDL FORECAST / "Update validities automatically" option in the main menu.
Please note: Allowing the system to continually update cell validities may disrupt your workflow, as each cell will be checked for validity in IDL Konsis every time the application window is switched.
The companies stored in a scenario - for each business unit, if available, can be selected from the scenario list and a lock can either be placed or removed with a right mouse click in the menu entry +Lock/unlock.+ By activating this lock function, you can lock all of the fields in the planning form analogous to Locking of balances via the context menu. Read-only companies, possibly including the business unit, can be loaded but only changed in certain cases. You will no longer be able to change balances, use rule templates or perform other functions. You will still be able to edit field comments and balances, however.
Please note: With the action +Refresh balances+ in the main menu, fields in the planning form will be updated even despite the lock! With the action +Lead over ACTUAL to +,+ a new opening balance will be created, but if you select +Automatic entry,+ the balance of the locked account will be rebalanced again with an "Automatic Entry" and thus not change.
If a company is locked, this will be shown by a closed lock. If an open lock is shown, this means that no lock has been placed on it. The lock can only be activated or deactivated when the scenario is closed.
In IDL Forecast, Planning Form is the main panel used to edit plan values for account, controlling and intercompany balances. This form-based reporting screen is used to edit and update balances directly in the planning form. Depending on how many ReportIDs (type E) have been specified in the Scenario Wizard for the display of these planning forms (table areas), these are each loaded and constructed in a dedicated panel in the upper-left corner of the table area. The IDL Forecast planning form displays and processes balances in the local currency. B/S balances are express cumulatively, and P/L balances are expressed individually. When writing the scenario balances to IDL Konsis, both B/S and P/L balances are saved to the database cumulatively.
Please note: The choice of ReportIDs specified cannot be subsequently adjusted, e.g. in the event that an entire planning form needs to be added or removed. However, report line structures can be updated to reflect the assignment of positions and accounts (POSKTO), see section 4.14. The position and account allocation of the period that was selected when the scenario was first created is what matters here.
Besides the planning forms that consist of Report IDs, either new tables or copies of existing table areas can be added to the scenario, see section 5.31.
A planning form will initially have the following row and column structure (a.k.a. dimensions). The rows of the planning form are structured hierarchically according to the report line definition ('REPZEI') of the report and sorted in descending order by position and account, then by any controlling objects, or are supplemented with IC companies (and, if applicable IC business units). The columns are also sorted hierarchically in descending order by the following criteria: year / quarter / fact / month. The hierarchical structure is displayed in the rows of the worksheet as a tree diagram with nodes. Balances for accounts, controlling objects, IC companies and, if applicable, IC business units, are displayed in the rows. Rows containing nodes display the sum of their subordinate rows, e.g. for report positions. At the column level, the hierarchy is represented by displaying extra sum columns at the end of the corresponding area. For example, the monthly or quarterly P/L balances are accumulated to this type of column at the end of a year. The sum columns therefore fulfil a similar function to the rows containing nodes in the tree diagram.
The user can adjust this basic planning form view via the configuration for rows and column. These adjustments must be made separately for each planning form / table areas and are saved along with the scenario. The configuration panel to edit the planning form structure is opened via the entry +Dimensions+ in the right sidebar. The following changes can be made:
1. Individual dimension names can be dragged and dropped along their respective rows or columns in order to adjust their position in the hierarchy. Dimension names can also be moved from columns to rows or vice versa.
2. Enabling or disabling "Show sums" allows extra sum columns or extra nodes containing sum totals to be added or hidden. Specifically, another tree diagram can be created at row level, and at column level quarterly subtotals can be shown in a monthly scenario.
3. The filter function allows selecting which data filters are available above the planning form. There are filters available for positions, accounts, years, data types, quarters and / or months. This means that no data will be filtered yet. Instead, only the various filter options will be provided. If no filter fields are displayed above the planning form, either the data filters for all dimensions have been disabled in the +Dimension+ panel or the entire filter function (icon: funnel) is disabled via the integrated toolbar of the planning form. In the accounts filter, the accounts can be filtered not only by their numbers, but also by various types, such as J accounts, IC accounts, third party accounts and / or aggregation accounts.
"Apply" must be clicked in order to apply any changes to the planning form configuration. Clicking "Reset" will reset a configuration that has not yet been applied.
Generally speaking, the balances shown in each planning form can be toggled. By default, account balances are always shown initially on each planning form. The integrated toolbar in the top-right corner can be used to switch or extend the display to controlling balances and/or intercompany balances (icon: segmented document), provided that +Enable intercompany planning+ and/or +Enable controlling planning+ has been selected while creating the scenario. Doing so will add controlling objects or IC companies (and, if applicable, IC business units) to the hierarchy as extra row dimensions beneath the account.
Balances are always viewed and edited in the local currency (LC). B/S accounts are always expressed cumulatively, while P/L accounts are always expressed individually. On saving, P/L accounts are exported to 'KTOSAL' cumulatively. (This also applies if there is a mid-year transition from the ACTUAL area to the FORECAST or PLAN area, in which case only FORECAST and/or PLAN data is saved and ACTUAL data is excluded.)
A so-called checking block can be found at the end of the planning form that allows you to check the data area for consistency between balance sheet and P/L for each period. For this purpose, all of the accounts of the planning form will be evaluated in terms of their balance sheet and P/L flags. Assets "1" / liabilities "2" and income "3" / expenditure "4" will each be balanced. The net balance sheet value (without the result) will be determined automatically and entered. Therefore, it must match the balanced P/L value. If the results don+t match, the balance sheet and P/L will not match. This type of error needs to be looked into and corrected. This data check will be performed analogous to the IDL Konsis checking block in the account balances, whereby the checking block will always be displayed in cumulated form in the account balances (KTOSAL). The checking block in the planning form on the other hand can be switched for P/L values to cumulated or decumulated display. The checking block is displayed in decumulated form by default, which can be changed via the main menu folder: Options / View / "check block accumulated". The view that has been selected will be displayed in the checking block.
When creating a scenario, a source fact that differs from the target fact can be pre-assigned as standard for the data areas FORECAST and/or PLAN. If no source fact is chosen, then the target and source fact will be identical, whereby no target fact will be needed for the ACTUAL data area. The target fact corresponds to the fact that is being used by IDL Forecast through the action "save balances" as the storage location in IDL Konsis. The source fact, on the other hand, will be taken into account with "refresh balances" and defines from which fact balances are to be imported from IDL Konsis to IDL Forecast. The standard scenario that has been defined can then be seen in the scenario properties.
You will be able to deviate from this preassigned standard scenario afterwards and choose a different setting. This is done by using the main menu folder: Scenario / "Configure Facts ...." In this dialog, another source fact can be chosen for FORECAST and/or PLAN from the respective list boxes.
You will also be asked which data area a decumulation of the P/L balances on a subannual basis should take place in FORECAST or PLAN with scenarios with limited periods (ACTUAL/FORECAST or ACTUAL/PLAN for a year) when these are updated in the planning form. This is extremely important in determining the decumulated / isolated P/L balances following the change from ACTUAL to FORECAST or PLAN. Either a decumulation of the following balances from the previous ACTUAL period or the previous FORECAST or PLAN period will take place. Depending on what data area a period limitation has been defined for in the scenario, this option will be shown to the right of the selectable source fact. A decumulation of ACTUAL is the standard setting. If no periods are limited in scenario, this option will be grayed out in scenario and cannot be changed.
The original condition can be restored by pressing the button "Reset to scenario default." If the scenario is saved, the decumalation an the preset source facts for each company and possibly business unit will also be saved.
Please note: It is important to note that the source facts and the decumulation that are selected in this dialog will be given preference and apply for all "refresh balances" actions.
If a new combination of company and, if applicable, business unit (C/BU combination) is chosen and displayed in the "scenario", IDL Forecast automatically imports ACTUAL balances into the scenario from IDL Konsis in accordance with the specified facts/periods. A blank planning form without balances is loaded in the FORECAST and/or PLAN data area(s). To import balances from IDL Konsis into IDL Forecast for FORECAST and/or PLAN, the user must manually select the Scenario / "Refresh balances" option from the main menu. The IDL Konsis fact from which balances are imported into IDL Forecast is determined by the source fact setting, see section 5.3. Once balances have been modified on the planning form and saved, the balances from the most recently saved version of the scenario will be loaded when the scenario is next opened and the account balances from the KTOSAL master application will no longer be used.
In order to feed balances (in particular P/L plans) from upstream data sources into IDL Forecast, they must first be imported into the IDL Konsis Account Balances (KTOSAL) application. It is then possible, and sometimes necessary, to import these new or modified balances into the planning form of the scenario that is currently open. This "import method" between IDL Konsis and IDL Forecast is described as refreshing balances. This process is particularly necessary when planning forms are blank, in which case the first step is to acquire the ACTUAL balances for the scenario.
Users have three different options to refresh balances.
1. Globally, via Refresh Balances: All balances (account, controlling and intercompany balances) in a planning area (ACTUAL, FORECAST or PLAN) are globally or separately updated. But you need to make sure that all applied templates are deleted beforehand in order to ensure a proper update. For FORECAST and PLAN planning areas, the user can also decide whether B/S, P/L and stat. balances are imported (refreshed) individually or collectively. These balance update functions are available from the main menu folder under Scenario / "Refresh Balances ...".
Executing this action will open a new window. Presets in the upper area can be selected to use predefined standard refresh settings. Alternatively, user-defined settings can be applied. When using user-defined settings, the balances to refresh can be selected according to the data area (ACTUAL/FORECAST/PLAN) and the account type (P/L, B/S and/or statistical). Furthermore it is possible to set in the bottom left of the dialog whether manual locked cells shall be updated as well. If manual locked cells shall be updated, this has to be confirmed with a check mark in the check box. In addition, the option "Do not import empty account balances" can be activated by placing a checkmark. This ensures that account balances that no longer exist (= blank) are not imported to the planning form with a zero balance by the source. Current plan balances in these (empty) accounts will thus remain unchanged.
2. Selectively, via the Balance Differences view: Users can use this display as an aid when reconciling differences between planning form balances and the latest balances to be processed in IDL Konsis. Which balances are used to determine the difference between "source" and "scenario" is dependent on the source fact setting. When using scenarios in which the FORECAST or PLAN area starts during the fiscal year, "Decumulate from ACTUAL" has to be selected. Balances are listed in a table. Only account, controlling and intercompany balances that differ from one another are included. If balances from IDL Konsis require updating in IDL Forecast, the user can choose to either refresh all differences on the list or to select specific balances to be refreshed using the filter. If the filter function is called from the integrated toolbar and specific balances are selected (icon: funnel), only these balances will be shown on the Balance Differences list and able to be updated selectively. The balances can be refreshed via the integrated toolbar by clicking the icon showing two arrows with a document. Before the balance update is implemented, a confirmation prompt will ask the user to confirm whether the balances should now be refreshed. Clicking "No" will abort the process, and clicking "Yes" will perform it. If manual locked cells should be included in the update, the query ?Update manually locked cells? must be confirmed by a check mark.
3. Selectively, via Refresh Balances: The final option of the context menu in the planning form, "Refresh Balances", performs a similar function. However, it does not globally update all balances for the respective planning area; it only refreshes the balances in cells that have been specially selected in advance via the planning form. Locked cells cannot be updated this way.
Please note: Balances can also be refreshed using the context menu in Balance Differences view. Please note that this method will carry out the process immediately without asking for confirmation!
Please note: If a scenario's B/S balances for the FORECAST or PLAN data areas have already been saved in IDL Konsis, these balances should not be reloaded into IDL Forecast when balances are subsequently refreshed, especially when source and target fact are identical. Rules complicate the process by making P/L balances that were transferred to the balance sheet long ago have a duplicate effect on a B/S balance. Users should therefore only update P/L balances selectively when subsequently refreshing balances. In this regard it shoud be noted that subsequent refreshing of balances should only be carried out if the scenario does not contain any applied rule templates. Otherwise, it is recommended that users visually inspect the updated B/S accounts. This warning does not apply to ACTUAL balances!
Unlike the import function "Refresh balances" in which the balances of IDL Konsis are provided for IDL Forecast, the action "Save balances" serves as an export function. The planned balances from IDL Forecast are written to IDL Konsis and can then be used in the PLAN consolidation.
If balances are to be written from IDL Forecast to IDL Konsis, this must be done by using the action +save balances+ in the main menue. It is possible to select the planning areas (FORECAST and / or PLAN), accounts (B/S, P/L and / or stat. balances) and balances (accounts, intercompany and / or controlling balances) that are to be written. If the action +save balances+ is confirmed with +OK.+ all of the balances of the planning areas FORECAST and / or PLAN that have been selected will be written in IDL Konsis for this scenario. This processing includes all of the planned periods for this scenario. ACTUAL balances will not be taken into consideration! If there are any discrepancies in the plausibility check, this will be displayed as an informative warning. Nevertheless, the balance can still be written.
Please note: If IDL Forecast balances that have already been written are to remain unchanged in IDL Konsis and be omitted in this action, then the respective data needs to be blocked using the company financial statements + monitor in IDL Konsis.
This action is necessary if a scenario with controlling objects is planned. It is used to limit the controlling objects of a company, per business unit in some cases, that are displayed in the table area. This provides a basic overview because not every company uses every controlling object. A preselection that remains set when the scenario is closed is to be made for each scenario, each company and, if necessary, each business unit as well as each controlling dimension.
Please note: The default setting of controlling objects provides fundamental clarity and supports performance because complete controlling object details are perhaps not necessary for all accounts!
For this reason, an automatic default setting will be entered for controlling objects in the scenario when you update the balance. This is done using the updated controlling balances for each account. Other Controlling objects will not be offered initially in the planning form on CNT-level balances and cannot be edited. If further controlling objects are to be added to one or more accounts, this must be done manually via the context menu entry "Default Setting Controlling Objects." The default setting is to be selected for the accounts selected earlier in the planning form. These will be displayed via the default setting on the left side. On the right side, other controlling objects can be added / activated for these accounts by placing a checkmark. If a black box appears in front of a controlling object then this controlling object has not been unlocked for all accounts selected on the left..
The preselection for controlling objects can be rejected by using +cancel+ or be confirmed with +finish.+ The planning form will then be updated and only the controlling objects selected in the preselection will be displayed in the planning form +CNT.+ The planning form +CNT+ means that the display of the planning form is set in controlling balances. The respective display can be changed via the built-in menu bar in the planning form.
This action is especially necessary if intercompany planning is to take place with rules on IC balances. In other cases, this preselection can be used to restrict the displayed IC companies in the table area.
Not every reporting company has IC relationships to every company, therefore no detailed intercompany details are needed for every company. For this reason, intercompany accounts "IC" and mixed accounts "J" are only to be activated or restricted for existing intercompany balances / IC relationships. As yet another effect, rule templates can be linked with the preselection chosen to only prepare rule templates for existing intercompany balances. Intercompany accounts "IC" are purely accounts with 100% intercompany details. Mixed accounts "J" can show intercompany as well as third party shares of an account balance. In this case, "third parties" will be presented as independent details next to the IC.
Please note: Preselection IC company ensures basic clarity and supports performance because no complete IC company details, possibly even including business divisions, for all intercompany accounts "IC" and mixed accounts "J" are necessary!
For this reason, an automatic presetting for IC companies is made in the scenario when "updating balances." This is done by using the updated intercompany balances for each IC and J account. Other IC companies will not be offered initially in the planning form at the IC balances level and cannot be edited. If additional IC companies have to be added for one or more accounts, this has to be done manually via the context menu entry "presetting IC companies." The presetting is made for the IC / J acounts previously selected in the planning form. These will be displayed in the presetting on the left side. On the right side, more IC companies can be added / unlocked for these accounts by placing a checkmark. If a black box is shown in front of an IC company, this means that this IC company is not unlocked for all accounts selected on the left.
The preselection entered for IC companies can either be canceled by pressing "cancel" or confirmed by pressing "finished." The planning form is then updated and only those IC companies selected in the preselection will be displayed in the planning form "IC." Planning form "IC" means that the display of the planning form is set to IC balances. This display can be set using the integrated menu bar in the planning form.
If a checkmark is removed in front of an IC company, this means that existing IC balances and related business cases will be deleted when you close the presetting by pressing "finish." This query can either be confirmed with "yes" or prevented with "cancel." This, however, will lead you back to the presetting so that you can correct the selected IC company/companies.
Please note: In a new scenario, all required balances (including intercompany balances) should be imported before leading over opening balances from ACTUAL and before applying rule templates. If preselections for IC companies are subsequently changed and rule templates were used, you might have to delete all "apply templates" with intercompany and reuse them. This will ensure that rule templates with intercompany also have an effect on new IC companies if the respective rule templates are linked to the preselection. With user-defined information on intercompanies in the rule templates, these rule templates must be checked manually, modified and reused. A warning in the assistant "Preselection IC companies" will point to the need to do so.
If intercompany planning is used with a scenario, you should constantly check for whether all intercompany details are complete and thus match the account balance of an intercompany account. To perform this check, the respective planning form must be displayed at the account balances level. This check is added via the main menu options / view / +warning for incomplete IC details.+ If intercompany details are incomplete, a warning icon will appear in the respective account in the planning form and a correction can be made.
In balance sheet accounts, the closing balances for the current period are carried forward as the opening balance for the next period. This is performed automatically by IDL Forecast throughout the year within a planning area. If an account balance is changed in one period, this change will be carried forward to all subsequent periods as a balance amendment. B/S accounts are accounts that are defined in the IDL Konsis account master with the balance sheet/profit & loss codes 1 (assets), 2 (liabilities), 6 (statistical assets) or 7 (statistical liabilities).
This does not apply to profit and loss accounts. These are treated individually for each period and therefore are not carried forward to subsequent periods. The final balance of P/L accounts is calculated after various changes, but these do not stem from opening balances. Depending on how row and column dimensions are configured, a sum column is inserted, e.g. at the end of a year or planning area, so that P/L balances can also be displayed cumulatively; see section 5.1. P/L accounts are accounts that are defined in the IDL Konsis account master with the balance sheet/profit & loss codes 3 (income), 4 (expenses), 8 (statistical income) or 9 (statistical expenses). Accounts with balance sheet/profit & loss code 5 (statistical quantities) behave like P/L accounts.
If a planning area spans several years, a result carry forward will be performed automatically at the turn of the year. With this result carry forward, the results account ('r account') in particular will be carried forward to a retained earnings account (usually 'x account'). Furthermore, all of the capital accounts marked in the chart of accounts of IDL Konsis - with 'transfer with the carry forward' will be taken into consideration in the result carry forward. Therefore, when a scenario is started, the system will also check whether a retained earnings account exists. If this is not the case, you will be sent a warning message to inform you that this needs to be corrected!
For balance sheet accounts in the FORECAST and PLAN planning areas, closing balances are automatically carried over to the opening balances of the next period throughout the year (a.k.a. transition). The process of carrying over/updating closing balances from an upstream planning area, for example from the final ACTUAL period to the first FORECAST or PLAN period, is not performed automatically; it must be initiated manually using the "Lead Over ACTUAL to FORECAST" or "Lead Over ACTUAL to PLAN" options in the Scenario / Lead Over menu. It is also possible to carry over closing balances from the final FORECAST period to the PLAN data area. This is done by selecting the "Lead Over FORECAST to PLAN" action from the Scenario / Transition menu. If necessary, this leading over will also include retained earnings as described in section 5.9.
Data should not be transferred to a different planning area until a scenario has been completed or a new company/business unit combination has been created. The levels of a scenario that result from the company/business unit combinations are saved to the database as separate entities. If the ACTUAL fact is updated, it is recommended that a new transition be performed in order to guarantee consistent opening balances.
Please note: If a carry forward was not performed or revised, this will be rechecked and displayed in the "plausibility check".
Despite necessary opening balances in the planning areas FORECAST and/or PLAN, the possibility of deleting lead over opening balances exists. This action can be executed via the main menu: Scenario / Lead Over / "Delete Opening Balances (FORECAST) or (PLAN)".
Account balances can be edited at both account level and position level. Account balances can be entered directly into the planning form cells. Balances from IDL Konsis can also be written to these cells automatically, for example when balances are refreshed. Business rule templates can also be used to automatically alter, or process and carry over, cell balances. If an account balance is changed, IDL Forecast automatically calculates the new balance of the associated position. If a position balance is changed, the difference between the old and new balances is distributed among the underlying account balances. The difference is distributed proportionally between existing account balances or, in the absence of these, globally across all underlying accounts. In multi-tier report structures in which positions are able influence one another, changes are applied automatically in all directions. Position balances always reflect the sum of the underlying position balances or account balances. Superordinate positions are thus increased by the difference between the previous and new balance, while subordinate positions and accounts are adjusted proportionally or globally. Positions without assigned accounts are not editable. (The multi-tier report structure (tree diagram) is defined in the 'REPZEI' application.)
The structure of the planning form is further defined by IN and EX data in 'REPZEI'. These specify special dependencies between certain positions, which influence the calculation of position totals. These are also refreshed automatically.
Account balances in individual table cells can either be empty, contain a zero, or contain any positive or negative figure of up to 13 pre-decimal places and 2 decimal places. An account balance is classified as empty if its cell remains empty, i.e. no number is present.
Please note: In the scenario properties, users can configure whether a distinction is made between zero and empty. This option is disabled by default.
Account balances can be copied from the planning form using the standard "Copy" function, then pasted to a different location. To do this, cells must be selected using the mouse (selected cells are highlighted in a darker colour), then either copied or cut. The difference between these two options is that "Cut" will also delete the contents of the selected cell. In both cases, the highlighted account balances are stored in a clipboard and can then be entered into other cells using the "Paste" function. Cells can be highlighted individually, in rows, in columns or as entire blocks of adjacent cells. For certain copy functions, the user can must hold down the CTRL key to highlight non-adjacent cells individually.
The "Cut", "Copy" and "Paste" functions can be executed from the main menu folder: Common / Edit. These functions can also be accessed through the context menu or using hotkeys: CTRL+C for "Copy", CTRL+X for "Cut" and CTRL+V for paste.
As well as allowing users to enter balances directly, IDL Forecast allows simple arithmetical operations to be performed on one or more balances. To do so, the user must highlight one or more cells in the planning form and select the "Modify Balance..." option from the context menu. A mathematical operation can then be entered in the text box that appears. This consists of an operator for addition, subtraction, division or multiplication (+, -, * or /) followed by a value. For example, entering "*10" will multiply all balances in the selected cells by 10. The user can also enter a percent sign after the value, meaning the value will be interpreted as a percentage of the balance. For example, entering "+5%" will increase all balances in the selected cells by 5%.
To select entire rows or columns, the user must simply highlight one or more cells in the selected row or column, then choose "Select Rows" (CTRL+E) or "Select Columns" (CTRL+W) from the "Select Cells" option in the context menu. This menu option also includes the "Select All" action, which has the same effect as the "Select All Cells" option in the Edit menu.
In addition to the standard "Copy" function, which allows cell contents (account balances) to be moved back and forth between spreadsheet programs (e.g. MS Excel, OpenOffice Calc) and IDL Forecast, there are two additional functions that also copy structural information from IDL Forecast. The user must first highlight a group of cells as per the normal copying procedure, then select "Copy With Headline" (CTRL+B) or "Copy With Account Changes" (CTRL+N) from the Clipboard option in the context menu. The Copy With Headline function not only copies the values but also the headlines, which contain information about the period, and the account designations. On the spreadsheet, these will be shown above and to the left of the figures. The second function, Copy With Account Changes, includes the account drill-down for each selected cell. These figures will be listed vertically on the spreadsheet, with the balance at the end of the list.
The Distribute/Delete option in the context menu contains the Paste Structure function. This special function can be used instead of the standard "Paste" function. The standard "Paste" function simply transfers the selected cells on a 1:1 basis in the sequence in which they appear. However, "Paste Structure" replicates the hierarchy of the copied cells, transferring all cells in accordance with their report structure. To achieve this, the user must highlight and copy one or more positions, select a cell in the desired target period, then use Paste Structure to paste the cells accordingly.
This function is particularly useful for transferring account balances in cases where all data belonging to a period or data area (e.g. ACTUAL data) needs to be copied to another period or data area.
Please Note: In addition to this menu item, is the function Balances copy/spread available.
The Add copy function is almost identical to the standard "Paste" function. Instead of deleting cells before pasting to them, the copied values are added to the highlighted cells (balances). This function can also be found under Distribute/Delete in the context menu.
Please Note: In addition to this menu item, is the function Balances copy/spread available.
In equal distribution, the sum of the copied cells is calculated, then this figure is distributed across all of the paste destination cells. This means the sum is distributed equally across all cells. The function is located in the Distribute/Delete option in the context menu as "Distribute Equally and Replace" and "Distribute Equally and Add". Distribute Equally and Replace overwrites the affected cells, and the previous contents are lost. Distribute Equally and Add adds the new value to the existing balance.
Please Note: In addition to this menu item, is the function Balances copy/spread available.
Distribution by percentage differs from equal distribution in that the sum is not distributed equally across all of the selected cells; instead, the pre-existing ratios between the cells are replicated. The corresponding functions are also found in the Distribute/Delete option of the context menu as "Distribute by Percentage and Replace" and "Distribute by Percentage and Add". As in equal distribution, the Distribute by Percentage and Replace action overwrites the original contents of the cell. The ... and Add variant adds the calculated value to the existing balance from the clipboard.
Please Note: In addition to this menu item, is the function Balances copy/spread available.
With the help of the function "Copy/distribute balances," FORECAST and/or PLAN data can be copied, changed or distributed more easily. This operation is performed via the main menu item "Copy/distribute scenario / balances / Create Profile...." Then, a wizard will open that can be used to gradually define what data is to be processed:
1. Source and Target Periods
The first step is to select which of the (source) periods are to be copied/distributed and which (target) periods this is to be done in. The corresponding periods are to be checked off in the respective columns of the source and target period. A selection or limitation of the account type (balance sheet, income statement and/or stat. accounts) and balance type (account, intercompany and/or controlling balances) can be made in another column; the desired entry is to be marked.
2. Account restriction
If only certain positions / accounts are to be taken into account during copying/distribution, these are to be selected on the next page. The page will be enabled for selection when a checkmark is placed at the top left on "Limit certain positions/accounts." If no restriction / selection is required, then this step can be omitted.
3. Adding up and distributing
On this page of the wizard, you can define how the balances of source periods can be copied or distributed to target periods. The following copying/distribution steps are available:
You must still decide for the last three copying/distribution steps mentioned above whether
For all four copying/distribution steps, you can also specify whether copied/distributed balances should be increased (+) or decreased (-) on a percentage basis. The corresponding function should be marked and a percentage should be entered in the empty field if this is to be taken into account.
4. IC and CNT Behavior
If the balance types Intercompany and Controlling (and thus ambiguous) are not selected on the first page of the wizard (1. Source and Target Periods), you must then specify how intercompany/controlling balances are to be 'added up or splashed' in terms of the account balance.
After the last action has been performed, a definition for adding up and splashing must be entered, which is only valid for this copying step and ignores the table settings. For details, please refer to the following chapter Automatic Distribution "Splashing" .
5. Comment
To comment on a profile, you can write up to 500 characters of text on the last page of the rule assistant.
***
If a profile has been defined for copying/distribution, this can be performed directly by entering "OK" or be saved first by entering "Save Profile." If a profile is used more often, storing this profile is highly recommended! Afterwards the stored profile can be opened and executed using the main menu "Copy / Distribute Scenario / Balances / Load Profile ?". Or a profile can be opened to edit it. Enter "Cancel" to close the wizard and the profiles that have not been saved will not be displayed or saved.
If a superordinate position balance is modified, the IDL Forecast planning function Splash operates automatically in the background to equalise its underlying balances, meaning the position balance will always show the sum of all subordinate balances. This process is known as splashing. If there are already balances beneath the position, the system will assign each of these the same proportion of the new balance as it had of the previous balance. If all account and position balances below the modified position contain zeros or are empty, the value is distributed equally (globally) across all balances that are not locked. In the reverse situation (i.e. where subordinate balances are modified), the total displayed in the superordinate position(s) will be recalculated.
Splashing also affects the structure, including subordinate account entries of an account balance. If you are working with controlling objects, controlling balances will be taken into consideration and modified as details on the account balance in the splashing hierarchy. Splashing will have the same effect on these transactions and balances as it does on positions in accounts unless these have been locked against splashing (Symbol: red circle with a wave). If, on the other hand, you are working with intercompany planning, IC balances will not be taken into consideration during splashing from higher levels of the hierarchy and will remain unchanged as details on the account balance in the splashing hierarchy. The splashed amount will be distributed to "third parties," however, and thus be used to balance the details in the account balance. At the same time, changes in account transactions and IC balances will also have an effect on the higher-level account balance by being added to the account balance. A change in the controlling balances will not result in a change in the higher-level account, however this can cause differences in the details. If account transactions or details are to no longer be changed by using the splashing function, you should consider protecting them against flashing, in other words deactivating splashing for these fields. This can be set directly in the work area Account (account statement) for the respective account transaction by deactivating the splashing symbol. The splashing function also has an effect on values if a symbol is displayed with the green circle and a wave. The value is protected against splashing when there is a red circle with a wave. On the system end, various account transactions that come from the rules will be automatically protected against splashing.
The user is able to reconfigure the above-mentioned splashing and summation behaviour for IC and controlling balances from that described above. The following default settings can be individually enabled (with tick) or disabled (no tick) via the relevant option in the integrated toolbar on the Planning Form panel (icon: document/tool):
| Option | Default 2013.0 | Description |
|---|---|---|
| Add Amount From Controlling Balances to Account Balances | disabled | modified controlling balances do NOT automatically modify the superordinate account balance (summation) |
| Splash From Account Balances to Controlling Balances (Distribute) | enabled | modified account balances automatically modify subordinate controlling balances (proportional or global distribution) |
| Add Amount From IC-Balances to Account Balances | enabled | modified IC balances automatically modify the superordinate account balance (summation) |
| Splash From Account Balances to IC-Balances (Distribute) | disabled | modified account balances do NOT automatically modify subordinate IC balances (proportional or global distribution) |
Please note: The following standard was activated up until Release 2012.0. If necessary, the user can individually change the new standard (see above) for each C/BU combination in scenario. The changed standard will be stored for each C/BU combination if the scenario was saved before exiting, otherwise the individual settings will be lost. The standard was mainly changed with 2013.0 as a result of the intercompany planning "Apply rules to IC balances."
| Option | Default until 2012.0 | Description |
|---|---|---|
| Add Amount From Controlling Balances to Account Balances | enabled | modified controlling balances automatically modify the superordinate account balance (summation) |
| Splash From Account Balances to Controlling Balances (Distribute) | enabled | modified account balances automatically modify subordinate controlling balances (proportional or global distribution) |
| Add Amount From IC-Balances to Account Balances | disabled | modified IC balances do NOT automatically modify the superordinate account balance (summation) |
| Splash From Account Balances to IC-Balances (Distribute) | enabled | modified account balances automatically modify subordinate IC balances (proportional or global distribution) |
If an account balance or position balance has been included in planning, it can be completely protected against further modifications. Users wishing to do so must highlight the balances to be protected in the planning form and apply the lock by selecting the "Locked" option (icon: circle with lock) from the context menu. Locked cells are shown in a different colour to editable cells on the planning form. The lock will continue to protect the cell until it is released via the same method. To lock all cells of a scenario at once, the lock can be set on the scenario itself, see section 4.16.
Please note: With the action +Refresh balances+ in the main menu, fields in the planning form will be updated even despite the lock! With the action +Lead over ACTUAL to +,+ a new opening balance will be created, but the balance of the locked account will be rebalanced again with an +Automatic entry+ and thus not change.
Please note: This method can only be used to release locks that the user has set in IDL Forecast. Locks present as a result of permissions and validity data from IDL Konsis cannot be released directly from within a scenario in IDL Forecast. These must first be modified in IDL Konsis before they can be imported into the scenario using the "Refresh Cell Validities" action; see section 4.15.
The Account, Controlling Balances and IC Balances panels also allow the user to set and/or release locks on individual entries and drill-downs. A icon showing an open or closed padlock is present to the right of almost every entry on the relevant panel. If an manual account entry is locked, the user will no longer be able to modify the value of this individual entry until the lock is released. However, the overall final balance of the account will not be locked. The user will still be able to edit the final balance unless it has been blocked in its entirety. If the final balance of an unlocked account is modified, e.g. as a result of "splashing" (automatic distribution of superordinate balances), the value will only be distributed over entries that can still be edited. If there are no editable entries, the system will create a new account movement with the name "Automatic entry" or, in the case of controlling or IC balances, "Remaining sum". If individual account entries are locked by rules, the lock will automatically apply to the overall final balance. However, if a balance is locked against splashing only (icon: circle with wave), the affected account, controlling or IC balance will not be locked but simply excluded from the splashing process; it will still be possible to edit the final balance directly.
To delete several account balances at once, the user must highlight the cells in the planning form using the mouse. The selected account balances are then deleted by selecting "Delete" from the context menu (icon: X). The affected cells will then be empty. Alternatively, the delete function can be called by pressing the delete key.
Please note: Please note that this delete function deletes the account balance only. If rules, postings or opening balances were set up in a cell, an "Automatic entry" will be created on deletion to ensure the account balance is correctly adjusted to zero or empty.
The delete functions of the context menu +Distribute/Delete+ are delete operations for certain account transactions of one or more accounts and not for the closing balance itself. You must select the accounts for which certain account transactions are to be deleted in the planning form. The closing balances of the accounts affected only change in terms of the amount of the deleted account activities. If, for example, an account includes several individual posting as account activities whose postings are to be deleted, then all of the individual postings are to be deleted accordingly. When deleting, only the type of account activities that were was selected in the context menu will be deleted:
Changes can be reversed using the "Undo" icon in the integrated toolbar of the planning form. The "Undo" icon shows a curved arrow pointing to the left. Alternatively, the hotkey "CTRL+Z" can be used.
Up to 100 actions can be undone in IDL Forecast. If the user closes or saves a scenario, or exits the application, the undo history will be deleted from memory. This undo history will also be deleted if a change is made to permissions from outside of IDL Konsis and this change is updated in IDL Forecast (whether manually or automatically) when the user returns to the application.
Undone actions can be redone unless a change has been made to values or rules or the undo memory has been deleted. To redo an undone action, the icon showing a curved arrow pointing to the right must be clicked. Alternatively, the hotkey "CTRL+Y" can be used.
Please note: The undo/redo functions do not record the creation and deletion of scenarios or rule templates. Once deleted, these cannot be recovered.
If values or formulas (particularly in individual tables) are to be looked for and/or replaced, this can be done by either using a key combination or the magnifying glass in the integrated toolbar. In both cases, a new window will open so that you can enter the criteria for searching (control + F) and/or replacing (control + H).
Clicking a cell in the planning form brings up a drill-down of the selected account, including account entries, on the Account details panel. This drill-down consists of three areas:
1. Title line: The title line displays information on the number, name (abbreviation as per KTO), type (assets/liabilities or income/expense with debit/credit), current fact/period and assigned transaction development of the "account" selected. Where "controlling and IC balances" are used, the title bar of the respective panel will show the same information as "Account". The information will be supplemented by the associated controlling dimensions in the "Controlling Balances" panel only.
2. Central area: The central area of the Account panel contains a list of all account entries leading up to the final balance of the account undergoing editing in the planning form. Each account movement includes a description, value, debit/credit code and individually adjustable delete/lock/comment options. For certain account entries, the value input field can be edited directly. If this is the case, the input field will be white.
Please note: Accounts for statistical quantities have the Balance Sheet/Profit and Loss code +5+ in the Accounts overview application (KTO). In IDL Konsis, the balances of these type of accounts are not required to have a Debit/Credit code assigned to them. If balances without a D/C code are imported into IDL Forecast, a Debit/Credit code is automatically assigned to them. +Debit+ is assigned to positive amounts, +Credit+ to negative amounts. Exporting balances will cause these codes to appear in IDL Konsis as well.
Account entries may already have been locked, either by the system, directly (manually) or indirectly (through a rule). To apply or release a lock manually, the two icons that appear on the right-hand side must be used. If an icon is green, no lock has been applied. If an icon is red, the account movement has been protected against changes. The icon showing a padlock locks the account movement completely, and the icon showing a wave simply excludes it from splashing.
Values/account entries can also be deleted by clicking the icon showing a X. This adjusts the final balance of the account accordingly and transfers it to the planning form. "Automatic entries" and "Manual account entries" can be deleted directly in this way. Account entries relating to "Manual postings" (and "Manual account entries") can be deleted indirectly by selecting the "Delete Manual Posting" option from the "Distribute" option in the context menu. Account entries arising from applied "rules" cannot be deleted from the Account panel directly, rather via the Business Cases or Applied Rule Templates panels. The user is able to quickly determine which account movement belongs to which applied rule by selecting the movement in question on the Account panel. Doing so will simultaneously select the associated applied rule in the Business Cases and Applied Rule Templates panels. On the relevant panel, one or more applied rules can then be deleted using the "Delete All Business Cases" option found in the context menu.
3. Bottom line: As described above, the bottom line of the account contains the calculated account balance. This balance reflects the final balance of the account (sum of all account entries) and therefore also the value that will be processed in the planning form. A final balance cannot be edited directly from the Account panel; this is done in the planning form. However, the total account balance can be fully locked, or locked against splashing only, directly from the Account panel. These lock functions are located in the context menu.
The default Account view is structured as a list and ungrouped. Among others there is also the option of switching to a simplified T-account view or to choose an other grouping mode. To choose the T-account view, the user must enable the Switch to T-Account View (icon: T-account) function on the integrated toolbar. This T-account view separates debit and credit entries into two sides. However, please note that when the sign preceding a pre-existing value on either the credit or debit side is changed, the value will not switch sides! It is for this reason that the T-account view is labelled "simplified". To display the individual account changes for an account more clearly, two different grouping modes can be selected via the integrated toolbar (symbol: points in parenthesis / brackets). On the one hand, grouping by posting types and secondly by offsetting accounts. A subtotal will be displayed for each group. Further details / information will be displayed when the node is expanded.
Please note: Entries cannot be deleted or locked in T-account view. No X or lock icons are present when this mode is enabled. Furthermore, the grouping mode cannot be selected based on posting type or contra account in this view.
If a value is modified in the input field of an account movement (confirmed by pressing "Enter"), the balance of the account and therefore the planning form value are automatically updated. This adjustment then automatically influences the totals of superordinate positions. Rules and dependencies are also recalculated automatically.
The balances of account details can either be account / intercompany or controlling balances . You must select what balances are to be displayed in the account details via the built-in toolbar of the working window. A type of +book+ will show account balances, +IC+ will show intercompany balances and a +steering wheel+ will show controlling balances. Intercompany and / or controlling balances can only be displayed in the account details if these are active for the scenario.
Please note: If intercompany planning is activated, the display +account balances+ will be replaced by the display +intercompany balances+ for intercompany accounts! The change of the display in the account details does not take place automatically, but must be changed manually depending on what information is to be displayed in the account details. If, for example, both the planning form and the account details on +account balances+ are set to be displayed, only the account transaction +change in account details+ will be shown in the account details +account balances,+ which in turn can be explained by the sum of the intercompany balances (including third parties). If, on the other hand, the account details are set to display +intercompany balances,+ all of the functions of the account details +account balances+ will be available for the account activities +intercompany balances.+
For each new account balance entry, an "Automatic entry" is created as an account movement on the Account Detail panel, for example when P/L balances are refreshed from IDL Konsis for the first time. Similarly, if controlling or IC balances without rules are being used and no drill-down has yet been planned, a "Remaining sum" entry will be created on the relevant Panel. If a account balance cell is selected in the planning form using the mouse, a drill-down of that cell will be shown on the Account Details "Closing balances" panel. This drill-down describes the composition of the account balance. This composition of individual account entries can consist of an "Automatic entry", manual postings, manually created account entries and amounts inserted by rules. In B/S accounts, the opening balance will also be included as an account movement. In addition, an "Automatic entry" is always created whenever IDL Forecast needs to to generate a specific final balance by balancing an account drill-down, but no unlocked account movement is available in which the adjustment can be made. Thus, if all entries in an account are locked and the final balance of this account is changed, the system will create an "Automatic entry" representing the difference between the old and new final balance.
The account details "IC balances" replace the account details "account balances" for scenarios with activated intercompany planning (with rules on intercompany accounts!). Thus, "automatic entries" will also be displayed and processed at the level of IC balances. For the account details "account balances," only an account transaction "change account details" will be displayed and no "automatic entries."
IDL Forecast will remove an "Automatic entry" if its value is set to zero. The Convert Automatic Entries option in the context menu allows the user to convert automatic entries in the highlighted cells into manual account entries, e.g. in order to label the figure with an individual text describing the account movement.
Users have access to two separate tools that allow them to manually influence an account balance and document this change via a posting text.
1. Account entry: A manual account entry describes one or more one-sided account entries in the "Account" drill-down which contribute to the total account balance. The function can be called via the "Account Entry..." (icon: hand) option in the context menu. If intercompany accounts "IC" or mixed accounts "J" have been selected at the IC balance level, the account entry will be performed automatically at this level for each IC company. If no such account has been chosen at the IC balance level, but rather the entire account, you will need to select the IC company in the dialogue. With third-party accounts, the account entry will be performed at the account level. This similarly creates one or more account entries for the currently selected cells in the planning form.
In the dialog that appears, the user is able to specify a posting text, the value of the entry and a credit/debit code. By default, the credit/debit code is set to create an addition to the account balance. The credit/debit code can be changed using the listbox provided. Clicking "Finish" in the dialog will create the manual account entry in the planning form.
Users intending to enter a series of different account entries are advised to select the "As Panel" option in the dialog to embed the dialog in the main window as a panel. (The embedded panel may need to be resized or repositioned to ensure that all fields are visible.) If the selection in the planning form is changed, the dialog will be refreshed automatically and can be used directly in the newly selected cell.
Users wishing to reuse a previously entered posting text from the current scenario session can do so by selecting the required text from a listbox to the right of the posting text. When a scenario is closed, the posting texts used in the session will be deleted from memory and the listbox will be empty.
2. Manual posting: In addition to these one-sided account entries, users are also able to create posting records. To do so, they must select the "Manual Posting..." (icon: hand with document) option from the context menu. This function creates several account entries in one step, which collectively make up a simple or multi-level posting record. The dialog ensures that the values on the debit and credit sides balance. If they do not, an error message appears and the posting cannot be used.
If necessary, the "Manual Posting..." dialog can also be embedded in the main window using the As Panel option.
The dialog first prompts the user to enter a posting text for each manual posting. This text will later be used for each account entry to ensure that associated postings within a given account can be easily located and identified.
The user then specifies the line entries required for the posting record using the table. Users wishing to create a multi-level posting record for which two lines are insufficient are able to add or delete extra line entries as required. The star icon at the bottom-left of the table inserts a new line item into the table. The account number, if applicable IC company, amount and debit/credit code of the line item can then be adjusted by double-clicking the relevant field in the table. Once all details have been fully selected and recorded, the "Next" and "Apply" options will be enabled. Clicking "Next" leads to the "Period Control", the "Company Control" and "Comment / Approval" screens. If "Apply" is selected, the posting will be created and then processed for the previously selected period(s).
In every planning form, the context menu "Application" contains nine items which can be used to switch to various other IDL Konsis applications.
Before switching to another application, the user is asked whether the newly planned scenario account balances should be saved ("Yes") or not ("No"). This dialog also gives the user an option, separate to the save option, to transfer the balances from the current scenario to IDL Konsis. To do so, the user must check the "Save Balances" box and then select "Yes" from the next dialog. "Cancel" aborts the process without saving, transferring the balances or switching to the other application. Applications called from IDL Forecast are usually opened in a new tab in order to prevent a scenario from being unintentionally closed without changes being saved.
Please note: If account, controlling and IC balances from a scenario have not been saved, the latest changes will not appear in KTOSAL, CNTSAL or ICKTOSAL. It must also be noted that P/L account balances are accumulated in KTOSAL but not presented cumulatively IDL Forecast.
When switching to another application, IDL Forecast transfers the data in parametrised form. The parameters (e.g. company, business unit, periods) are based on the previously selected cells in the planning form. These are set as defaults in the relevant selection area of the other application.
Users wishing to make changes to the planning form can switch to four applications menu item. The "Accounts" (KTO) and "Positions" (POS) master applications allow the user to make changes to existing accounts/positions or create new accounts/positions. The "Positions + Account Allocations" (POSKTO) application allows new accounts to be mapped to a position or stock accounts to be reported in another location. The user can also switch to the "Report Line Definitions" (REPZEI) application in order to modify or add new positions to an existing report (= planning form).
Please note: If master data is altered, the report structure of the planning form must then be updated using "Refresh Reports" option in the Scenario menu in order to transfer the changes to the scenario; see section 4.14.
The "Company Financial Statements + Monitor" application allows the user to track the planning situation of individual companies and generally apply locks to balances for various planning areas and time frames (facts and periods). Please note that this applying this type of lock in IDL Konsis will influence any scenarios in IDL Forecast that include the locked planning areas and time frames. If balances are locked using the "Company Financial Statements + Monitor" application, these locks can only be released using the same method.
The other four menu options for transaction data give the user the option to edit "Account Balances", "Controlling Balances", "Forms IC-Account Balances" or "Development Transactions" outside of IDL Forecast. The "Forms IC-Account Balances" (I-ICKTOSAL) application is only available for accounts flagged either "I" or "J". The same applies for "Development Transactions"; here, the application switched to depends on the precise transaction development type associated with an account. For accounts with transaction development type "A" the system will switch to the application for fixed asset transactions, 'ANLBEW'. For transaction development type "K" the system will switch to 'KAPBEW', the application for capital transactions, and for type "R" it will switch to 'RUEBEW', which handles provision transactions. If an account has no type specified, 'SPIBEW', the application for general transactions will be opened.
The I-ICKTOSAL application also supports multiple selections. Up to 12 consecutive months can be selected using the mouse within one fact prior to calling 'I-ICKTOSAL'. This simultaneously displays these months side-by-side in the application, allowing the user to enter IC drill-downs with a clear overview of all months.
The panel "Table storage" that can be called up initially via the table storage to the right is used to manage existing planning forms/table areas and newly created individual tables in the list that either have or don't have a file structure. Both planning forms and individual tables correspond to the table areas. Planning forms in a further sense are reports that were selected while creating the scenario.
Note: Until finally Release 2016.1 are all individual tables the same for all companies of a scenario.
To show the working window as an independent window in the application, you must press the button "Release from page storage" located to the upper left in the integrated toolbar. To store it in page storage, simply press the button "Transfer to page storage".
A individual table is created by pressing the button "Create a worksheet" (Symbol: table). This will open a new window in which you must list the name of the table, whether the table is to be valid for all companies or only for the company that is currently open (and possibly divisions), as well as enter how many lines and columns this table will most likely contain. (Note: Please bear in mind that no further lines and columns can be added here later on. On the other hand, the contents of the table can be transferred over to a larger table by pressing "Copy" (Strg + C) and "Insert" (Strg + V). "Insert table" will create a empty individual table and add it to the table area as an independent working window in scenario.
If no new customized table is to be created, but rather an existing table from another scenario is to be used, individual tables can be exported and imported. Simply mark the desired table and export it using the context menu. In this case, the table will be stored temporarily as a .stoma file in a randomly selected path. Afterwards, the table can be imported again in a different scenario. If a table with the same name already exists, the newly imported table will be assigned an additional '(2)'.
Table columns are set up alphabetically and table lines numerically. A certain field will then always consist of a column letter and a line number. For example, D6 means that the field is located in line 6 of column D. This information will be displayed in the first field above the columns if a field has been marked in the table. The alphanumerical contents of a marked field will be shown in the second field and you will see whether there is a formula for these cell contents in the third field. The entire line above the columns is referred to as a "formula line". In planning forms, this formula line is hidden. The formula line can be added via "Show formula bar" in the integrated toolbar of the planning form..
To copy sections of the existing tables, you must select an individuel table or a planning form in the table list and copy it by pressing "Copy" in the context menu. Before a new individual table is inserted, a small window will open that you can enter the name of the copied table in. By pressing "Enter", the name will be confirmed and you can continue with the copying operation. It is impossible to ever rename this table.
If planning forms / individual tables for administering and sorting are to be put into a file structure, you will need to prepare the new files first. This step can be performed by pressing "Create a new folder" (Symbol: Star). A small window that shows the name of the file will open before you insert the new file. If you press "Enter", the name will be confirmed and an empty file will be added to the list of tables. It will be impossible to rename a file later on. Now the table areas can be moved to the desired file via Drag&Drop.
To delete table areas, mark the table to be deleted and remove it from the list of tables selecting "Delete" in the context menu. If a file is marked, both the file and the tables stored inside it will be deleted. This deletion process will be performed immediately, nevertheless the deletion process will not end until after the scenario has been saved. If the scenario is closed without pressing "save" and re- "displayed", the deleted tables will be available once again.
Please note:You selected permanent reports that cannot be deleted from the list of tables when you set up the scenario. If, however, a planning form happens to be deleted, you will need to close the scenario and redisplay it again. These planning forms for the scenario will remain available even if the scenario has already been saved.
Additional calculations can be performed in individual tables using simple basic arithmetic operations and cell references. This information and these formulas are equally valid for all companies of the scenario and cannot be defined for a specific company. For example, it is impossible to refer to data on company A and B in order to form a sum which then has an affect on company C.
The following basic arithmetic operations, formulas (= functions), cell graphics, quiet and writing cell references can be entered in a formula line:
| type | formula | entry formula line = | note |
|---|---|---|---|
| basic arithmetic operation | add | A1 + A2 | |
| basic arithmetic operation | subtract | B1 - B2 | also function: absolute deviation |
| basic arithmetic operation | multiply | C1 * C2 | |
| basic arithmetic operation | divide | D1 / D2 | |
| function | percentage deviation | (E2 - E1) / E2 * 100 | |
| function | sum | SUM(F1;F2;F3) | |
| function | round | RND(C2;-2) | Rounding of cell C2 to a full hundred, for example (-2 = positions before the comma) |
| function | if ... then ... | WHEN(check [cell];then [value]; otherwise [value]) | |
| function | last entry in a table | LAST(G1;G2;G3;G4) | |
| cell graphic | bar graphic | GPX1(H1;H2;H3) | |
| cell graphic | bar graph | GPX2(I1;I2;I3) | |
| cell graphic | line graph | GPX3(J1;J2;J3) | |
| cell graphic | region graph | GPX4(K1;K2;K3) | |
| cell graphic | stacked bar graph | GPX5(L1;L2;L3) | |
| cell reference | read position | POS('G010';'12.2012';'P4') | position/period/fact |
| cell reference | read account balances | SAL('50010';'12.2012';'P4') | account/period/fact |
| cell reference | write account balances | N1=MSAL('50010';'12.2013';'P4';'Text') | account/period/fact/text account transaction |
| cell reference | read intercompany balances | IC('50031';'12.2012';'P4';'060') | account/period/fact/IC comp. |
| cell reference | write intercompany balances | P1=MIC('50031';'12.2013';'P4';'060';'Text') | account/period/fact/IC comp./text account transaction |
| cell reference | read controlling balances | CNT('50060';'12.2012';'P4';'CNT01') | account/period/fact/controlling object |
| cell reference | write controlling balances | Q1=MCNT('50060';'12.2012';'P4';'CNT01';'Text') | account/period/fact/controlling object/text account transaction |
Cell references within a worksheet are to be made by making entries under column and cell. For example, the entry "F4" refers to the cell in line 4 of column F. By using the formulas POS, SAL, IC and CNT, a reference can be made to a position, account balance, intercompany balance or controlling balance. This means you can use the database of the report sheets used in the scenario in other calculations in individual worksheets. The syntax for these formulas can be taken from the table above.
On the other hand, the formulas MSAL, MIC and MCNT allow for values from an individual worksheet to be transferred back to the account, intercompany or controlling balances and thus the result from another calculation to be used in planning. The formulas require that you enter a source cell to the left of the equal symbol and make a change by entering the appropriate value in the target account. For example, the formula N1=MSAL('50010';'12.2013';'P4';'Example') would render the value from cell N1 as a change with the text 'Example' in the account 50010 in period 12.2013 and fact P4.
A period can be entered in a cell by adding an apostrophe in front of it, for instance '04.2014. Reference to a cell can be made by entering a period instead of the period inside SAL and MSAL formulas. For example, the formula SAL ('50010';B5;'P4') would refer to the balance in account 50010 in the fact P4 and the periode contained in cell B5. Reference to a cell that specifies a fact is also possible. You will not need the apostrophe here, however.
Cell references to other cells in an individual worksheet will be changed automatically during copying and inserting. If for example a cell reference to C4 is copied into the cell to the right of it, the reference will be changed to D4. If you don-t want this to be done, the column or line index can be set by adding a dollar symbol in front of it. A cell reference $C4 would then remain as it is when it is copied into the cell to the right of it.
Functions and cell graphics can also be created using the +formula editor+. The dialogue is called up via the integrated menu bar in the table. On the right side you can select either a function or a cell graphic from the list. You must then enter the following information on the left side: The +cell index+ shows the cell in which the formula must be inserted. If you choose another cell in the table, the cell index will be updated when you click the update button. A +formula+ is initially selected by choosing a function or cell graphic on the right. The cells that are to be taken into account for the formula are to be selected directly in the table with the formula editor open. This formula can be changed and is then considered to be a +user-defined+ calculation formula. In this case, the selection regarding +column or row+ will only have an effect on the deviation functions. Thus, whether a deviation to a previous column or row is to be determined is defined here. Entries for +name+ and +insert under+ are irrelevant for individual tables. The formula is to be inserted by entering +apply+ in the cell index chosen. A formula can be deleted via either the formula line or the formula editor by pressing the +delete+ button.
Rule wizards can be called from the "star"-icon on the "Rule Templates" panel. These allow the user to create business rules step by step.
IDL Forecast uses these business rules to link plan values from a scenario with other balances for which planning is to be carried out in order to determine or derive these from other amounts. The primary basis for rules is the creation of "debit to credit" posting records, in which a balance (variable) is already present in the posting balance and then supplemented using rules. Alternatively, a new posting record is derived from another amount and thus new balances are planned.
A simple example of this would be determining the balance of a receivable (B/S) from a planned sales balance (P/L). The receivable comprises sales plus any sales tax that may apply. This sales tax is also posted to a sales tax account as a liability. An appropriate rule is used to assign the necessary accounts, usually one for sales, one for the receivable and one for the sales tax. If sales planning is then performed on the sales account using this rule, the receivable and the sales tax percentage will be calculated and used in the planning form for the balance sheet of the assigned accounts. The sum of sales plus sales tax (if applicable) is posted to the receivables account, while the sales tax percentage is posted to the sales tax account. This tool allows a P/L plan to be carried over step-by-step to a B/S plan and/or supplemented with an entry that affects net income.
The posting records of an applied rule are stored in the Business Cases panel. The individual variables of a rule together form at least one "debit to credit" posting record. If the outgoing variable of a rule is subsequently changed, the rule will recalculate all balances for all other variables in order to make the posting record consistent again. The outgoing variable corresponds to the account that has a significant effect on the other variables of the posting record. This is either the percentage base value account or the account whose balance is directly carried over to the balance sheet. Bidirectional changes to variables are not supported. Balances calculated using another amount do not have the reverse effect on the outgoing variable. This can be seen in the Business Cases panel, where these rule amounts (variables) cannot be edited. A simple example of this is a Sales Rule with sales tax calculation disabled. Here, the posting reads to sale via receivable. If sales are then increased (credit posting), the rule will transfer the value to the receivables account in the form of a debit posting. However, if the receivable is modified, this will not have a retroactive effect on the planned sales!
Please note: Rules do not usually support bidirectional changes.
A rule consists of various function modules which can for the most part be toggled by the user. To make these rules easier to use, various rule wizards are available which support step-by-step creation. In this regard, it is not essential to know how the postings are structured. The rule wizard refers to the respective accounts/account mapping and uses these to automatically create the posting records for the rule. There are two types of function modules: those that apply to almost all rules and those that are rule-specific. Users can ascertain which function modules a rule contains by referring to the navigation bar on the left-hand side of the rule wizard.
In addition, rules created via the rule wizard can be globally saved and managed as "Rule Templates" on the panel of the same name. This function is accessed using the "Save Template" option. Where planning takes place group level and no company control has been defined, rule templates can be used globally for all companies in a scenario. Users intending to use a rule template as the template for a new rule can do so by selecting it using "Load Template" on the Rule Templates panel, then editing it and saving it under a new name.
The "Back" and "Next" options allow the user to flip back and forth through the screens of the rule wizard. "Next" will only be enabled if all details required on the present screen of the rule wizard have been filled in. "Close" will exit the rule wizard after first asking for user confirmation. Any unsaved information in the rule wizard will be lost. "Apply will immediately execute the rule in the current scenario.
Please note: Accounts in IDL Konsis are fixed to a chart of accounts and can be identified by a unique account number. Accounts that have identical account numbers but are from different charts of accounts are separate accounts. For this reasons, rule templates with accounts assigned cannot be applied in scenarios with a different chart of accounts. Users working with different (company) charts of accounts must duplicate and adjust rule templates accordingly. To duplicate rule templates and rule sets, they must be selected in the Rule Templates panel and copied via the context menu.
What follows is a description of the various function modules found in the rule wizards. Sections entitled "General: [...]" are equally valid for the majority of rule wizards, while supplementary sections entitled "Details: ... [...]" give further information that applies to that specific rule wizard only.
For every scenario that has two data areas (FORECAST and PLAN), you will need to decide how the FORECAST rules that are being used should affect the subsequent PLAN data area. You will need to decide whether future postings of a rule template should be ignored in the following periods or whether these should be applied to the PLAN data area in a consistent manner. This applies in particular for rule templates, whose balance-related and/or effects that have an impact on earnings will extend for more than one periods. These include, among other things, rules with activated payment terms, investment, financing and leasing rules. Here, you must make sure that FORECAST and PLAN periods seamlessly follow each other and do not collide in terms of time. If a scenario only contains one data area (FORECAST or PLAN), this setting possibility will be irrelevant.
When setting up a new scenario, the decision needs to be made on the first page of the wizard under the point "Rules across data areas." This option will normally be activated to begin with. It is recommended that you make this decision already when you are creating the scenario so that you will be able to take these basic conditions into consideration when you use the rule templates for the first time. A subsequent change can be made via the scenario properties "General."
Please note: If this option is subsequently deactivated or activated in a scenario, the "used templates" in the FORECAST data area must be deleted and reused to ensure that the new conditions are either applied to the PLAN data area or not.
The left-hand side of every rule wizard contains a navigation bar which performs the following functions:
a) Provide an overview of all function modules and number of pages in rule wizard. Each page of a rule wizard corresponds to one or more function modules.
b) Verify and visualise the information entered in the function modules. This does not examine the content but rather the logical completeness of the information provided. If a page of the rule wizard has been filled in without error, the function module will be shown alongside a "green tick". If the information is incomplete or leads to errors, a "stop" warning is displayed and the rule cannot be applied. A "warning symbol" indicates that the details may potentially be incorrect, but that the rule can still be applied. A dash (-) will be displayed next to any optional function module that has not been selected for use.
c) Call individual pages directly clicking a function area within the navigation bar will switch to the relevant page in the rule wizard.
This functional building block is only activated in the navigation bar if intercompany planning with rules on IC balances is to take place and the intercompany accounts "IC" and/or mixed accounts "J" have been selected as the accounts in the rule assistant. If you are only working with third party accounts in the rule template, then this functional building block will also be deactivated.
The rule template that is to apply for specific IC companies/relationships is defined on this page of the rule assistant. If mixed accounts +J+ are contained in the account allocation, a possible third share will then be processed automatically as a third relationship. Due to the IC Presetting , a presetting will be entered for the IC share of mixed accounts +J+ and for intercompany accounts +IC+ for which of the IC companies/relationships a rule template is to at least apply for. If you would like to deviate from this automatic preselection because you want various rule templates to apply for various IC companies/relationships, +User-defined IC companies" must be activated by entering a checkmark. Then, the IC company selection to the right will also be activated and the desired IC companies/relationships can be selected manually or be demarcated. IC companies as defined by the IC presetting are selected automatically to start with and can be demarcated. To reset a user-defined IC company selection to automatic IC company selection based on the IC presetting, all you need to do is remove the checkmark for +User-defined IC companies." The previous user-defined IC company selection will then be overwritten. You will find a list box that shows the list based on different criteria above the list for the IC company selection:
To avoid having to set up a rule template for each detail of an intercompany account "IC" and/or mixed account "J," although the intercompany balances is 0.00, this can be surpressed. This will have an effect if "Apply rules only on existing balances" has been selected. This, however, also means that a rule template will have to be applied again if an IC company/relationship that previously had a balance of 0,00 now has an intercompany balance. Otherwise this intercompany balance will remain without a rule which leads to differences in the check block, which, however, are displayed in the plausibility check table.
Not every rule assistant supports the functional building block "Intercompany planning." The following shows a list of the rule assistants intercompany planning with rules is possible for IC balances with:
Regardless of the function building block "Intercompany," information on intercompanies will be taken into consideration in other form for the following rule wizards:
Please note: Rules with a base value can only be used for intercompany accounts "IC" and mixed accounts "J" to a limited extent - either only for third parties and/or for an individual IC company. This ensures clear distribution of the base value.
Furthermore, it might be necessary to specify in the rule assistant whether an IC detail actually needs to be maintained with the receiving/target account when reconciling an intercompany account "IC" or mixed account "J" with certain accounts. If rule templates are to be "without" IC details, this should be entered in the appropriate place.
This functional building block will be displayed in the navigation bar by making the entry "Intercompany."
For rules supporting this function module, the user is asked in the first step to define the rule type to be used in calculations. Either "Without base value from entry or from closing balance" or "With base value" can be selected. In the latter rule type, the user must enter a fixed base value percentage in the adjacent field or use either the listbox to select a flexible parameter or choose a statical account. Additional percentages can later be specified for each account relationship or base value account within "Account Mapping".
The "Without base value" option integrates an existing account balance 100% into the rules of the posting record, thereby balancing a missing credit or debit side. This rule type is primarily used to carry over a pre-planned balance to another account. Selected "Without base value from entry" in the Account (statement) panel for the outgoing account balance, the "Automatic entry" account movement is converted to a rule entry and is labelled with the corresponding rule icon. If no "Automatic entry" is available for conversion as an account movement, a new, empty rule entry will be generated in the account statement. If the option +without reference value from closing balance" is selected, no "change" from the account(statement) will be used for the rule, but rather the entire final balance from the initial account. The rule symbol therefore lies on the final balance of the account. With this approach, the amount to be added to the posting record will not be determined by the change in the account. Instead, all of the changes to the account will be taken into consideration.
By contrast, "With base value" creates a completely new posting record; the amount of this posting is calculated as a percentage of other accounts (= base value account). The user selects which accounts are to be used as the base value using the field of the same name. This rule type is primarily used to plan new balances on at least two accounts whose values depend on at least one other account (i.e. the base value account). The closing balance of the base value account is used to calculate the posting amounts. This is indicated by the presence of a rule icon on the closing balance in the Account (statement) panel and not on the individual account movement. Changes to amounts affecting the entire rule can only be made from this account.
Please note: Rules with a base value can only be used for intercompany accounts "IC" and mixed accounts "J" to a limited extent - either only for third parties and/or for an individual IC company. This ensures clear distribution of the base value.
At several points where the rule wizard asks for a value to be entered (e.g. tax or interest rates), users are able to enter a reference to a parameter instead. In this case, the rule created will use the value assigned to the specified parameter in place of a fixed value when performing calculations in each scenario and, if applicable, each respective company and period. This enables rules to perform calculations using variables, without the user having to alter the rule or rule template itself. For example, the same sales rule template can be used with a different sales tax rate for each period in which it is used.
In a rule wizard, any field allowing parameter input will have a colour background. The colour (light yellow by default) can be changed on the "Forecast" side of the options dialog. To select a parameter, click the button in the text field to open a selection dialog listing all parameters defined in the currently loaded scenario. Double-click the OK button to select the desired parameters. Alternatively, enter the name of the parameter directly into the text box, preceded by a "$" sign. Doing so can be useful, e.g. when defining a rule before the parameter has been defined for the relevant scenario. If the parameter referred to does not (yet) exist in the current scenario, a warning will be shown in the status bar of the wizard.
Please note that certain verification checks within the rule wizard (e.g. limiting the range of values for percentages) will not function when parameters are used, because at the time of creation the rule template does not yet know the value of each parameter.
The Properties window of a rule template provides an overview of all parameters used in that rule template.
The accounts on which a rule will be based can also be selected on the first page of a rule wizard. These basic selected accounts may then be supplemented by further accounts if additional function modules are selected for use on later pages of the rule wizard. Accounts are selected by moving them into the, initially empty, white input fields, the headings of which are used when querying what account type(s) is/are required at this point. To select accounts for a rule, highlight them in the Accounts Overview pane on the right, then add them to the input field using the "left arrow". If all accounts belonging to a position are affected, they can be selected collectively by highlighting and adding the entire position. To deselect an account, double-click it in the input field. Accounts can also be selected or moved by dragging and dropping.
The Accounts Overview pane on the right contains all accounts, belonging to a chart of accounts, which are active in the scenario. Above and to the left of the Accounts Overview, the user can select the location of the desired account by reference to the report. For each report, the user can filter the accounts by name and number by activating a filter function in the upper right corner. Users are able to use wildcard characters in the filter field: % for a string of characters and _ for an individual character. The adjacent symbol (a funnel with an X) can be used to delete the entry in the filter field again.
Once accounts have been selected (as described above in "Selecting accounts"), they are later assigned to the rule's posting records. This step determines the account relationships of the posting records that will be created and, if "With taxes" has been selected, the tax rate that will be used in calculations for each account relationship. If "With base value" has been selected, it is also at this point that the user can specify whether the pre-set base value or a different percentage value will be used for calculations.
The list boxes can be used to select the accounts in order to specify or adjust the required account relationship/assignments. However, please ensure that no duplicate account relationships have been defined or forgotten. Only for the account assignments created on this page will rules be created when the rule template is applied and therefore business cases which have an effect on the planning form. The "X" icon deletes account relationships/assignments from the list, and the "star" adds new ones.
Account relationships/allocations cannot only be added individually, but also at the same time for more than one account relationships/allocations. This is done using the function "Assign allocations for all" which is found next to the "star" symbol. Before more than one account relationships/allocations are added, you must choose in the list box next to it for which of the account types a new account relationship/allocation is to be established. The types of accounts that are available to choose from will depend on the respective account selection lists in the rule assistant on the first page.
This function module is shown as "Account Mapping" in the navigation bar.
This section is only important if intercompany planning with rules are to be applied to IC balances. It can be considered a supplement to chapter "Account allocation"
The account relationships / allocations shown below can be performed if both intercompany accounts "IC" / mixed accounts "J" or third party accounts "without IC / J" have been selected. With mixed accounts "J" in particular, you might have to specify a second account relationship if the target account is not a mixed account "J" that includes "full details." In such cases, you will need two target accounts that lead to the "IC share" in an intercompany or mixed account and to a "third share" in a third or mixed account. Another target account can be added for the same account relationship by using the "star" symbol located directly beneath the account relationship.
| Variant | from account | to account 1 | to account 2 | detail | note |
|---|---|---|---|---|---|
| A 1 | without IC / J | without IC / J | without | OK | |
| A 2 | without IC / J | with J | without or as a third party share | OK | |
| A 3 | without IC / J | with IC | Stop - invalid allocation | ||
| B 1 | with IC | without IC / J | Stop - invalid allocation | ||
| B 2 | with IC | with J | automatically as IC share | OK | |
| B 3 | with IC | with IC | automatically as IC share | OK | |
| C 1 | with J | without IC / J | automatically only third party share | Warning: IC share is not to be reconciled | |
| C 1 a | but in addition to account 2 | with J | only IC share chosen | OK | |
| C 1 b | or in addition to account 2 | with IC | automatically as IC share | OK | |
| C 2 | with J | with J | complete detail selected | OK | |
| C 3 | with J | with J | only IC share selected | Warning: third party share is not to be reconciled | |
| C 3 a | but in addition to account 2 | without IC / J | automatically as third party share | OK | |
| C 3 b | or in addition to account 2 | with J | only third party share selected | OK | |
| C 4 | with J | with J | only third party share selected | Warning: IC share is not to be reconciled | |
| C 4 a | but in addition to account 2 | with IC | automatically as IC share | OK | |
| C 4 b | or together with account 2 | with J | only IC share selected | OK | |
| C 5 | with J | with IC | automatically as IC share | Warning: third party share is not to be reconciled | |
| C 5 a | but together with account 2 | without IC / J | automatically as third party share | OK | |
| C 5 b | or in addition to account 2 | with J | only third party share selected | OK |
Furthermore, it might be necessary to specify in the rule assistant whether an IC detail actually needs to be maintained with the receiving/target account when reconciling an intercompany account "IC" or mixed account "J" with certain accounts. If rule templates are to be "without" IC details, this should be entered in the appropriate place.
Rule wizards that generally offset receivables/liabilities using incoming and outgoing payments can be supplemented by an optional payment component. This class of rule wizards includes sales rules, purchases rules, general income rules, general expenses rules and dissolution rules. This "Terms of Payment" function module can be used to define when and in what amount cash flows are expected.
The percentage distribution of the cash flows over one or more periods can be calculated manually or, provided a term of payment is specified, automatically. The user specifies the account ("bank/cash") on which the payments will be made and what percentage of the payment should affect the cash flow in which months. The manual input can be specified with either a fixed value or by means of parameters and statistical accounts. Selections are made in the table by clicking on the arrows; a dialog for either selecting a parameter or for selecting a statistical account will open.
Please note: If values are specified by using parameters or statistical accounts, they are not flexible as in other cases! If a rule template is applied, the values issued for the parameters used / statistical accounts will be "frozen". If amounts are changed then the rule template must be re-applied.
Other months can be added using the "star" icon ("Add payment component") in the lower-left corner. These individual terms of payment are then edited or deleted directly from the list.
| Period | Meaning | Percentage |
|---|---|---|
| 0. Month | current month | % of payment expected in this month, e.g. 50% |
| 1. Month | next month | % of payment expected in this month, e.g. 30% |
| 2. Month | month after next | % of payment expected in this month, e.g. 20% |
| etc. | etc. | etc. |
For scenarios with a monthly temporal resolution, the defined payment components are used directly for the individual months. For scenarios with quarterly or yearly resolution, the monthly percentages are converted into corresponding quarterly or yearly percentages when the rule template is applied. For example: 0. Month = 50% and 1. Month also 50%. In a scenario with quarterly temporal resolution this would result in: 0. Quarter = 83.33% and 1. Quarter = 16.67%. Payments totalling more than 100% are not supported; in this case, a "stop" warning is displayed. If a payment comes to below 100%, a "warning" is displayed and the rule cannot be applied.
"Payment: in XX days" and "Calculate" automatically calculate a percentage distribution over one or more periods and display the results in the list. This calculation is perfomed in such a way that the payments take place either at the end of the payment interval "At End" or evenly distributed over the interval "Distributed". This process assumes that the receivable/liability to be offset is to be distributed equally over the period. This straight-line distribution is performed either over 30 days (for monthly scenarios), 90 days (for quarterly scenarios) or 360 days (for yearly scenarios).
This automatic calculations can be manually readjusted.
The "Sales Tax" or "Input Tax" function module of a rule wizard calculates taxes for income/expenses and investments, as well as optionally eliminating these (Terms of Payment). Selecting this calculation and, if applicable, elimination for use by checking the relevant boxes will (partially) enable the input fields and lists on this side of the rule wizard. The following information must be entered in order to create correct posting records:
Tax rate: Which tax rate should be used for calculations in the first step? There are three options for this:
Please note: Where tax rates are to be recorded on statistical accounts, these accounts must be set up in the account master with balance sheet/profit & loss code 5. To include a statistical account at a later time, you must firstly integrate it into the reporting structure using 'POSKTO'. You must then run the "Refresh Planning Form Structure" action. If several tax rates are required, you must create a dedicated statistical account for each tax rate. To ensure the rule performs calculations correctly, you must also enter a tax rate in the planning form of the tax rate accounts. If this information is not present or set to 0.00, the rule will perform calculations without value added tax.
The specific tax rate to be used for each account relationship can be specified later on the "Account Mapping" page of the rule wizard. This page allows the user to more closely define and allocate tax rate information.
Tax accounts: Selects the accounts to which accounts payable/receivable taxes are to be posted.
Tax elimination (account): Selects the account which will usually be used for settling payments. This will be the offsetting account used to cancel out receivables/liabilities. In the area underneath the tax elimination account, you must specify when and in what amount tax elimination should be performed, i.e. cash postings should be created. The input method is similar to that of manual "Incoming and outgoing payments". Important: these input fields will only be enabled if tax elimination has been selected with a "tick".
A rule can be applied either in all periods or in certain periods only. Users wishing to associate a rule with certain periods only must select the Period Control function module with a "tick". The periods that can be selected depend on the defined time frame of the scenario. The available periods are listed in the right-hand field, from which they can be dragged and dropped into the left-hand field; the rule will then be applicable to this period/these periods only! The periods to be used can also be selected before running the rule wizard. To do this, highlight cells from different periods in the planning form using the mouse, then choose the "Selected Cells" option to automatically select them.
Unlike the individual selection / limitation of the periods that can be used shown below, a generally valid selection/limitation can be made in the upper section. This means that rule templates are reused on the basis of the selection / limitation above regardless of the timeframe of the scenario. Here, you have the following eight possibilities:
If rules from the Rule Templates panel are applied, only the periods specified in Period Control will be accounted for.
Whether a rule is restricted by a period control is displayed in the table column "E" in the working window "rule templates."
Please note: When using Period Control for rules, please note that the rules must be revised/updated in terms of periods selected if new scenarios with different time intervals are created. The rules affected are displayed in the table column "E" with a "stop." Additionally, another list is displayed in the period control page of the rule assistant, which lists the periods not existing in the scenario.
Similar to the period control, a rule can be applicable for either all or certain companies. If the rule only applies to certain companies then the function block for company control must be activated by placing a +checkmark.+ The companies chosen will be listed in the selection box below and can only be selected by placing another +checkmark.+ A rule will only be applied for these companies! With the option +add current company+ in the company list, a checkmark will be placed automatically for the company currently opened in the scenario.
If rules from the working window +rule templates+ are applied, only the companies stored in the company control will be taken into consideration.
Whether a rule is restricted by a company control will be shown in the table column +G+ in the working window +rule templates.+
The final page of the rule wizard allows a 500-character comment to be added to the rule. This comment is shown as a tooltip on the Rule Templates panel for the saved rule. The comment can be subsequently edited from this panel (Rule Templates) via the context menu for a selected rule (icon: info with pencil).
If a rule (or rule template) is applied, both the rule and its template are shown on the Applied Templates panel. The comment is also displayed on the Business Cases panel, both as a tooltip for the applied rule and in the "Comment" tab. On the Applied Templates panel, the comment on an applied rule can be edited independently of the original rule (or rule template). Any changes made to the comment in the "Comment" tab will be updated accordingly on the Business Cases panel.
Whether a comment on a rule template or applied template exists, can additionally be displayed via the column ?C" Comment in the windows.
To the right of the comment, the option to manually approve a rule exists. This may be necessary if warnings exist for a rule and the rule shall be declared as ?correct? to prevent further display in the Plausibility Check and an error mark in the Forecast Monitor. Whether a manual approval for a rule template has been set in displayed in the column ?F? Approval.
The "Sales Rule" wizard creates a rule that initially connects sales accounts to receivables accounts to use as a primary basis. Next, either an existing sales plan is carried over to the balance sheet, or a new sales plan is calculated/derived using base values that refer to other P/L planning variables. In doing so, the rule looks at every change in the base value account and uses this to calculate the new proportion for the sales value, which was previously stored in the rule as a percentage base value.
What follows is a brief description of the function modules included in the rule wizard and those that can be additionally selected for use if required.
1. Sales Rule:
The receivables accounts and sales accounts are selected as the primary basis; see "Selecting accounts". The "With/without base value" function module is used to select the desired rule type.
Posting record for the primary basis:
| Debit | Credit |
|---|---|
| Receivable | Sales |
If all other function modules are disabled, only sales accounts and receivables accounts are connected directly to one another. The value of the posting is identical on both accounts in credit and debit.
If the "with base value" rule type is selected, the rule creates a new posting affecting net income that adjusts the plan income by the percentage value of the base value account. "Without base value" simply completes an incomplete posting record without affecting profit and loss. In this case, the balance of the sales account is already present as a credit posting, and the missing debit posting is completed by the receivables account.
2. Sales Tax:
These optional function modules "calculate and (if applicable) eliminate sales tax" and select the required tax accounts.
Enabling sales tax calculation activates a sales tax account. The sales tax account is added to the liabilities side of the balance sheet, while the receivables account is on the asset side. The receivables account contains the sum of the sales tax and the sales. The posting is structured as follows:
| Debit | Credit |
|---|---|
| Receivable | Sales |
| Sales Tax |
If tax elimination is enabled, the sales tax liability is offset using the account selected in the "Tax elimination account" field.
| Debit | Credit |
|---|---|
| Sales Tax | Outgoing payment through cash/bank |
3. Account Mapping:
"Account Mapping" connects the accounts that were selected on the previous pages of the rule wizard. If an account cannot be selected from the listboxes, that account has not been preselected. This can be fixed by clicking "Back" in the rule wizard. If the "with base value" rule type is used, the base value can be modified on this page.
4. Intercompany:
This functional building block is only activated if at least intercompany planning with rules on IC balances is to take place, see "Intercompany".
5. General Allowance:
This optional function module calculates a general allowance (gen. allow.) as a percentage.
The percentage to be used for the general allowance is specified in the "General allowance" field; this can be entered either as a fixed value or by selecting a flexible parameter, the value of which is defined in the properties of the scenario, from the listbox.
This option requires accounts for provision to the general allowance in the P/L and B/S. The offsetting account for the corrected receivable is the "Provision gen. allow" account, which must be present as an expenses account in the P/L. The posting record created for this is structured as followed:
| Debit | Credit |
|---|---|
| Provision to gen. allow. | Gen. allow. on receivables |
Accounts for gen. allow. are mapped automatically; there is no need to do this separately.
Please note: "With general allowance" creates a new posting affecting net income that adjusts the plan income by the amount of the posted gen. allow. For reasons of simplification, the general allowance is not calculated from the receivables but from the sales value whose value is fed into this rule.
6. Terms of Payment:
These optional function modules use cash postings to offset receivables in accordance with the specified "Terms of Payment"; if applicable, they also allow a discount to be granted on portions of the offset receivable.
Settled receivables are recognised as assets in the bank or cash accounts. For this reason, a corresponding bank or cash account must be present in the current assets section. The receivables account is the offsetting account for these incoming payments:
| Debit | Credit |
|---|---|
| Incoming payment through cash/bank | Payment on receivables account |
Users wishing to set a discount value can do so by entering a percentage for each entry in the "Discount" column next to "Terms of Payment" (> 0.00). Multiple periods can be specified in order to apply a discount to periods on a pro rata basis only.
If a discount is granted, the sales position is reduced accordingly using a posting affecting net income. A separate discount account is required for this purpose. The applicable sales tax is also corrected. The incoming payment to the cash/bank account is reduced by the amount of the discount applied. The posting is modified as follows:
| Debit | Credit |
|---|---|
| Incoming payment through cash/bank | Payment on receivables account |
| Discount (sales reduction) | |
| Sales Tax |
7., 8. and 9. Period Control, Company Control and Comment / Approval:
These optional function modules allow "Period Control" and "Company Control" to be enabled and a "Comment / Approval" to be added.
The "Income Rule" wizard is structured in a similar way to the "Sales Rule" wizard. The only function module not offered for this rule is "General Allowance". This rule can be used for income accounts for which, depending on the situation, no other suitable rule has been used.
The "Purchase Rule" wizard creates a rule that initially connects purchases accounts to liabilities accounts to use as a primary basis. Next, either an existing purchases plan is carried over to the balance sheet, or a new purchase plan is calculated/derived using base values, usually from sales. In doing so, the rule looks at every change in the base value account and uses this to calculate the new proportion for the purchases value, which was previously stored in the rule as a percentage base value.
What follows is a brief description of the function modules included in the rule wizard and those that can be additionally selected for use if required.
1. Purchases Rule:
The liabilities accounts and purchases accounts are selected as the primary basis; see "Selecting accounts". The "With/without base value" function module is used to select the desired rule type.
Posting record for the primary basis:
| Debit | Credit |
|---|---|
| Purchases | Accounts payable |
If all other function modules are disabled, only purchases accounts and liabilities accounts are connected directly to one another. The value of the posting is identical on both accounts in credit and debit.
If the "with base value" rule type is selected, the rule creates a new posting affecting net income that adjusts the plan income by the percentage value of the base value account. "Without base value" simply completes an incomplete posting record without affecting profit and loss. In this case, the balance of the purchases account is already present as a debit posting, and the missing credit posting is completed by the liabilities account.
2. Input Tax:
These optional function modules "calculate and (if applicable) eliminate input tax" and select the required tax accounts.
Enabling input tax calculation activates an input tax account. The input tax account is added to the assets side of the balance sheet, while the liabilities account goes to the liabilities side. The liabilities account contains the sum of the input tax and purchases. The posting is structured as follows:
| Debit | Credit |
|---|---|
| Purchases | Accounts payable |
| Input tax |
If tax elimination is enabled, the input tax receivable is offset using the account selected in the "Tax elimination account" field.
| Debit | Credit |
|---|---|
| Incoming payment through cash/bank | Input Tax |
3. Account Mapping:
"Account Mapping" connects the accounts that were selected on the previous pages of the rule wizard. If an account cannot be selected from the listboxes, that account has not been preselected. This can be fixed by clicking "Back" in the rule wizard. If the "with base value" rule type is used, the base value can be modified on this page.
4. Intercompany:
This functional building block is only activated if at least intercompany planning with rules on IC balances is to take place, see "Intercompany".
5. Security Deposit:
This optional function module calculates a security deposit as a percentage.
The percentage to be used for the security is specified in the field of the same name; this can be entered either as a fixed value or by selecting a flexible parameter, the value of which is defined in the properties of the scenario, from the listbox.
Enabling the security will retain this percentage of the gross liabilities amount (purchases incl. input tax). This means that this percentage will not affect cash flow immediately. Users are recommended to repost the security to a separate liabilities account; this separate account can then be clearly and comprehensively offset in accordance with dedicated terms of payment. Simply marking the "With repost" field with a "tick" will trigger the following repost:
| Debit | Credit |
|---|---|
| Accounts payable | Accounts payable - Security |
Accounts for the security are mapped automatically; there is no need to do this separately.
6. Terms of Payment:
These optional function modules use cash postings to offset liabilities in accordance with the specified "Terms of Payment"; if applicable, they also allow a supplier's discount to be accepted on portions of the offset liability.
Settled liabilities are recognised as payments in the bank or cash accounts. For this reason, a corresponding bank or cash account must be present in the current assets section. The liabilities account is the offsetting account for these outgoing payments:
| Debit | Credit |
|---|---|
| Payment via accounts payable | Outgoing payments from cash/bank |
Users wishing to set a discount value can do so by entering a percentage for each entry in the "Discount" column next to "Terms of Payment" (> 0.00). Multiple periods can be specified in order to apply a discount to periods on a pro rata basis only.
If a discount is applied, the purchases position is reduced accordingly using a posting affecting net income. A separate discount account is required for this purpose. The applicable input tax is also corrected. The outgoing payment from the cash/bank account is reduced by the amount of the discount applied. The posting is modified as follows:
| Debit | Credit |
|---|---|
| Payment via accounts payable | Outgoing payments from cash/bank |
| Discount (purchases reduction) | |
| Input tax |
7., 8. and 9. Period Control, Company Control and Comment / Approval:
These optional function modules allow "Period Control" and "Company Control" to be enabled and a "Comment / Approval" to be added.
The "Expenses Rule" wizard is structured in a similar way to the "Purchases Rule" wizard. The only function module not offered for this rule is "Security Deposit". This rule can be used for expenses accounts for which, depending on the situation, no other suitable rule has been used.
The "Personnel Expenses Rule" wizard creates a rule that initially connects personnel expenses accounts to liabilities accounts to use as a primary basis. Next, either an existing personnel expenses plan is carried over to the balance sheet, or a new personnel expenses plan is calculated/derived using base values that refer to other P/L planning variables. In doing so, the rule looks at every change in the base value account and uses this to calculate the new proportion for the personnel expenses value, which was previously stored in the rule as a percentage base value.
What follows is a brief description of the function modules included in the rule wizard and those that can be additionally selected for use if required.
1. Personnel Expenses Rule:
The liabilities accounts and personnel expenses accounts are selected as the primary basis; see "Selecting accounts". The "With/without base value" function module is used to select the desired rule type.
Posting record for the primary basis:
| Debit | Credit |
|---|---|
| Wages/salaries | Liabilities to employees |
If all other function modules are disabled, only personnel expenses accounts and liabilities accounts are connected directly to one another. The value of the posting is identical on both accounts in credit and debit.
If the "with base value" rule type is selected, the rule creates a new posting affecting net income that adjusts the plan income by the percentage value of the base value account. "Without base value" simply completes an incomplete posting record without affecting profit and loss. In this case, the balance of the personnel expenses account is already present as a debit posting, and the missing credit posting is completed by the liabilities account.
2. Social expenses:
This optional function module calculates social security deductions as a percentage based on wages/salaries accounts.
If "With social expenses" is selected with a "tick", the user is required to enter the percentage of these deductions for the wages/salaries account. This percentage is entered in its respective field, either as a fixed value or by selecting a flexible parameter, the value of which is defined in the properties of the scenario, from the listbox. Social security deductions are calculated on a percentage basis using the selected wages/salaries accounts.
The deductions are posted to a corresponding liabilities account for social security contributions.
| Debit | Credit |
|---|---|
| Social security deductions/expenses | Liabilities from social security contributions |
Please note: "With social expenses" creates new postings affecting net income that adjust the plan income by the amount of the posted social expenses. An existing social expenses plan cannot be used at this stage. Users simply wishing to carry over social expenses to the balance sheet should create a new Personnel Expenses rule for these accounts only. Function module "2. Social expenses" must then be disabled in every Personnel Expenses rule.
3. Account Mapping:
"Account Mapping" connects the accounts that were selected on the previous pages of the rule wizard. If an account cannot be selected from the listboxes, that account has not been preselected. This can be fixed by clicking "Back" in the rule wizard. If the "with base value" rule type is used, the base value can be modified on this page.
4. Payment Postings
This optional function module uses cash postings to offset the relevant liabilities.
In contrast to "General: Incoming and outgoing payments", the user of this rule wizard does not have absolute freedom to determine the terms of payment; instead, 100% of the amount must be distributed over a maximum of two periods ("This period" and "Next period"). In doing so, the user must specify payment details for the liabilities from the wages/salaries account(s) and the social expenses account(s) separately.
The percentage to be used for the terms of payment in each case is entered in the fields adjacent to the periods, either as a fixed value or by selecting a flexible parameter from the listbox, the value of which is defined in the properties of the scenario.
If 100% is entered for "This period", 0% must be entered for "Next period". The effect of this is that the complete payment will be made immediately in the same period. If payment is not to be made until the "Next period", these percentages must be swapped around. To split the payment over both periods, the two values specified must add up to 100%.
Settled liabilities are recognised as payments in the bank or cash accounts. For this reason, a corresponding bank or cash account must be present in the current assets section. The liabilities account in each case is the offsetting account for the outgoing payments:
| Debit | Credit |
|---|---|
| Payment via liabilities to employees | Outgoing payments from cash/bank |
If selected for use, liabilities from social expenses are posted separately:
| Debit | Credit |
|---|---|
| Payment via liabilities from social security contributions | Outgoing payments from cash/bank |
5., 6. and 7. Period Control, Company Control and Comment / Approval:
These optional function modules allow "Period Control" and "Company Control" to be enabled and a "Comment / Approval" to be added.
The "Provision Rule" wizard creates a rule that initially connects P/L provision accounts (addition/dissolution) and B/S provision accounts (stock) to use as a primary basis and developed further additions. Next, either existing P/L plans for additions to/dissolution of provisions are carried over to the balance sheet or the change to the P/L provision is derived using base values that refer to other P/L planning variables. In doing so, the rule looks at every entry in the base value account and uses a percentage base value, which is set in the rule beforehand, to calculate a new percentage for the change to the provision.
What follows is a brief description of the function modules included in the rule wizard and those that can be additionally selected for use if required.
1. Provision Rule:
The P/L accounts for addition to/dissolution of provisions and the stock accounts are selected as the primary basis; see "Selecting accounts". The "With/without base value" function module is used to select the desired rule type.
To allow accurate depiction/transition, separate P/L accounts for addition to/dissolution of provisions should be included in the planning form. Corresponding provision accounts should also be present on the liabilities side.
Posting record for the primary basis (addition to provision):
| Debit | Credit |
|---|---|
| Addition to provision (expenses) | Provision account |
Posting record for the primary basis (dissolution of provision):
| Debit | Credit |
|---|---|
| Provision account | Dissolution of provisions (income) |
If the "with base value" rule type is selected, the rule creates a new P/L posting that adjusts the plan income by the percentage value of the base value account.
"Without base value" simply completes an incomplete posting record without affecting profit and loss. In this case, the balance representing an addition to the provision (expense) is already present as a debit posting, and the missing credit posting is completed by the provision account on the balance sheet. If the provision is dissolved (income), the posting record is reversed accordingly.
2. Account Mapping:
"Account Mapping" connects the accounts that were selected on the previous page of the rule wizard. If an account cannot be selected from the listboxes, that account has not been preselected. This can be fixed by clicking "Back" in the rule wizard. If the "with base value" rule type is used, the base value can be modified on this page.
3. Utilization
Additional selectable function block to reduce in particular allocations to provisions at a later point in time.
The account assignment already determines the provision accounts for which the inventory is to be reduced by removal. The +target account+ for which the utilization is to take place should be entered in the selection field with the same name. If, for instance, the bank account is selected as the target account, there will be a cash-relevant posting:
| debit | credit |
|---|---|
| reserve account | target account |
The assignment of the expected utilization to one or more months is done on a percentage basis in the last part +dissolution component.+ Here, the month and year that a certain proportion is to be used against a certain target account will be defined here. Thus, each reserve account that is used in the account assignment will be broken down with the same amount. If the breakdown is to be done against several +target accounts,+ additional +target accounts+ can be added here. Additional months/years are added (+add resolution component+) using the +star+ icon to the lower left. The individual dissolution conditions are then modified or deleted directly in the table.
| month | year | significance | proportion % |
|---|---|---|---|
| 1 = January | 0. FY | current fiscal year | Indication of use in % of the change in provisions on a specific date, e.g. always in January of the current year |
| 2 = February | 1. FY | next fiscal year | Indication of use in % of the change in provisions on a specific date, e.g. always in February of the following year |
| 3 = March | 2. FY | fiscal year after next | Indication of use in % of the change in provisions on a specific date, e.g. always in March of the year after next |
| usw. | usw. | usw. | usw. |
Please note: Dissolution conditions resulting in a total of more than 100% are not supported; this will be indicated by a +stop.+ Dissolution conditions resulting in a total of less than 100%, however, will appear as a +warning+ and the rule can still be applied.
The month is always entered with respect to a calendar year. If the calendar and fiscal year are identical then the first month of the fiscal year will be January, etc. For a fiscal year that differs from the calendar year, the first month will continue to be January. If the first month of a different fiscal year is July, for example, the +month+ of the dissolution component will not be expressed using a 1 for July, but rather 7 etc.
If the date of use is prior to the allocations to provisions in the fiscal year, the use will still take place at the earlier date. Therefore a negative provision component that is built up will be created first that will be balanced across the following periods.
4., 5. and 6. Period Control, Company Control and Comment / Approval:
These optional function modules allow "Period Control" and "Company Control" to be enabled and a "Comment / Approval" to be added.
With the Rules Wizard "Tax Rules," a rule will be created that calculates taxes on the annual profit. In planning, the tax determined will either be recognized in profit and loss at the end of the year or distributed throughout the year. To calculate the taxes, you will need a basis for assessment whose base is a selected result position before taxes that can be further defined by making cuts / additions. Here, the rule takes every change in the tax base into consideration and then calculates the new tax burden, provided a profit is still made. No taxes will be posted if a loss is reported at the end of the year. In addition to tax determination and posting, tax payments as well as any advance tax payments can be taken into account.
The function modules that the Rules Wizard includes and those that can be chosen if needed are described briefly in the following items in accordance with the navigation bar.
1st tax rule (tax base):
The first page of the Rules Wizard is used in particular to determine the basis of assessment. As a basic level, an earnings position is to be selected vor Taxes. Afterwards more accounts can be selected that either increase (= additions) or reduce (= reductions) the earnings position. In addition, a percentage share can be entered for each account to specify whether the additions / reductions are to be made 100% or only proportionately.
Net income from the earnings position plus additions and less reductions will provide the basis for calculating the tax burden at the end of the year. Which tax rate should be taken into account will also be shown on this page. The tax rate can be carried out as a fixed amount or be determined flexibly by using parameters or statistical accounts.
The "Account Selection" comprises a profit and loss account for the tax expenditure and a balance sheet account for the tax liability.
Posting record for posting the calculated tax burden:
| Debit | Credit |
|---|---|
| Taxes (Expenditure) | tax liability |
At the end of the year, the amount of the tax burden will be determined and initially be completely posted to profit and loss at the end of the year. If the taxes are to be distributed in profit and loss over the year, two options can be selected at the end of the Rule Wizard.
For scenarios with accrual accounting (the year is divided into IS and Forecast or the plan data area), two other options are available in order to be able to distribute the IS share over the remainder of the year. Important: These options are available in connection with the previous two setting options!
Example:
| ACTUAL 1st quarter | ACTUAL 2nd quarter | Forecast 3rd quarter | Forecast 4th quarter | Sum | of which ACTUAL share | of which forecast share | |
|---|---|---|---|---|---|---|---|
| Earnings before taxes | 150,000.00 | 125,000.00 | 160,000.00 | 175,000.00 | 610,000.00 | 275,000.00 | 335,000.00 |
| >> 25% share of taxes | 37,500.00 | 31,250.00 | 40,000.00 | 43,750.00 | 152,500.00 | 68,750.00 | 83,750.00 |
| >> even 25% share of taxes | 38,125.00 | 38,125.00 | 38,125.00 | 38,125.00 | 152,500.00 | 76,250.00 | 76,250.00 |
| Variant 1) | --- | --- | 72,835.82 | 79,664.18 | 152,500.00 | ||
| Variant 2) | --- | --- | 76,250.00 | 76,250.00 | 152,500.00 | ||
| Variant 3) | --- | --- | 108,750.00 | 43,750.00 | 152,500.00 | ||
| Variant 4) | --- | --- | 114,375.00 | 38,125.00 | 152,500.00 |
2. Tax prepayment:
Selectable function block for use in planning the possible tax prepayments in the planning form and posted to profit and loss. This function module works much like a reference value posting rule. By using a statistical account, the planned tax prepayment will be recorded for the respective period. By selecting this account in the Rules Wizard in the field marked "Reference value of the tax prepayment," a 100% reference value will be stored. Thanks to this reference value, a profit-neutral posting can now be made when applying a rule so that a tax prepayment can be posted to planning. To carry out the posting to the correct accounts, a tax receivables account and a bank / cash account must be selected. The following posting will be generated with the reference value from the statistical account:
| Debit | Credit |
|---|---|
| Tax receivable | Bank / Cash box |
3. Tax payment:
Selectable function block for settling the tax payable from the tax liability minus the tax claim at a later date.
The previously chosen account allocation already determines for which tax accounts the balance is to be reduced by making a payment. The question of which "bank / cash account" the payment is to be taken from will be answered in the selection field with the same name. The following cash-relevant posting will be generated:
| Debit | Credit |
|---|---|
| Tax receivable | Bank / Cash box |
If advance tax payments were planned, these will be taken into consideration by the following posting. The balance of the tax liability and the tax receivables will be the only payments due.
| Debit | Credit |
|---|---|
| Bank / Cash box | Tax receivable |
The allocation of the anticipated payment over one or several months will be done proportionately in the last part "release component." Here the time will be set in a certain month and year as to what percentage is to be paid to which target account. Thus, each tax account that is used in the account allocation will be deducted from in the same amount. If the deductions are to be made from several "target accounts," additional "target accounts" can be selected here. More months / years can be added at the bottom left by using the "star" icon ("Add release component"). The individual payment conditions can then be edited or deleted directly in the list.
| Month | Year | Meaning | Share in % |
|---|---|---|---|
| 1 = January | 0. FY | current fiscal year | Entry of use in % of the provision changes at a certain point in time, for example, always in January of the current year |
| 2 = February | 1. FY | next fiscal year | Entry of use in % of the provision changes at a certain point in time, for example, always in February of the following year |
| 3 = March | 2. FY | fiscal year after next | Entry of use in % of the provision changes at a certain point in time, for example, always in March of the year after next |
| etc. | etc. | etc. | etc. |
Note: Payment terms that total more or less than 100% will not be supported; this will be shown by a "stop."
Entry of the month will always be based on the calendar year. If the calendar year and the fiscal year are identical, the first month in the fiscal year will be January etc. If the calendar year deviates from the fiscal year, the first month will still be January. If the 1st month of a different fiscal year is July, for example, then 1 will not be entered for July, but rather 7 as the "month" in the release component etc.
4. Period Control:
The period control of the control rule works basically just like the general "Period Control" for other rules. Compared to it, it just doesn?t have all of the setting possibilities.
If you would only like certain periods to apply for a rule then the function block for the period control must be enabled by placing a "check mark." The selectable periods will be listed at the bottom right in the selection box and can be moved manually to the left field by using drag and drop, for example. Then, a rule can only be applied to this period or these periods! This list only contains year periods to select from because the tax determination and posting always refers to the entire year. In contrast to the individual selection / limitations to the applicable periods shown below, a generally valid selection / restriction can be made in the upper part. This means that rule templates can be used repeatedly regardless of the period of the scenario based on the above selection / restriction. Here, there are only two possibilities available:
5. and 6. Company control and Comments / Approval:
Selectable function modules to activate a "Company control" and to store "comments / approval".
The "Base Value Posting Rule" wizard creates a rule that initially connects any accounts for use as a primary basis. The user specifies a "base value" which is calculated from the balance of another account (base value account) and therefore determines posting amounts. The "With base value" rule type cannot be toggled to "Without base value". The accounts selected determine whether the debit/credit posting created by this rule to modify the existing plan affects net income or not. The rule looks at every change in the base value account and uses this to calculate the new proportion for the accounts, which was previously stored in the rule as a percentage base value.
What follows is a brief description of the function modules included in the rule wizard and those that can be additionally selected for use if required.
1. Base Value Posting Rule:
Any debit/credit accounts and at least one base value account are selected as the primary basis; see "Selecting accounts".
Which postings will be made to debit or credit primarily depends on whether the base value account is positive or negative. If the base value account has a positive balance, the selected debit account will be posted to debit and the selected credit account to credit. By contrast, if the base value account has a negative balance, the selected debit account will be posted to credit and the selected credit account to debit, i.e. the exact opposite applies. This ensures that the posting is executed correctly, even if the balance of the base value account changes from positive to negative or vice versa.
Selecting a B/S account and a P/L account for the debit/credit posting will result in a posting affecting net income that adjusts the plan income accordingly.
| Debit | Credit |
|---|---|
| B/S account X | P/L account Y |
Or reversed:
| Debit | Credit |
|---|---|
| P/L account X | B/S account Y |
Selecting B/S accounts only or P/L accounts for the debit/credit postings only will result in a posting that does not affect net income and only influences the presentation of the planned B/S or P/L.
| Debit | Credit |
|---|---|
| B/S account X | B/S account Y |
Or reversed:
| Debit | Credit |
|---|---|
| P/L account | P/L account |
2. Account Mapping:
"Account Mapping" connects the accounts that were selected on the previous page of the rule wizard. If an account cannot be selected from the listboxes, that account has not been preselected. This can be fixed by clicking "Back" in the rule wizard. A different reference value than the one predefined on the first page can be specified (either by entry or parameter selection) for each account allocation.
3. Dissolution
In addition to setting a debit / credit posting to a posting and posting offsetting account, a general dissolution from the posting or from the (posting) offsetting account can be done for all account assignments. Thus, for example, receivables / payables originating from the rule can be removed again. In addition to indicating from which account (either posting or offsetting account) the dissolution is to take place, a dissolution account (e.g. bank) must be specified.
The final section, "Dissolution component", allows the user to distribute the dissolution amounts over one or more periods as a percentage. This component is structured in a similar way to "Incoming and outgoing payments". Here, the user specifies for each period what percentage of the amounts will be dissolved/cancelled out. Additional periods can be added using the lower-left "star" icon ("Add dissolution component"). The individual terms of the dissolution can then be edited or deleted directly in the list.
Please note: Terms of dissolution totalling more than 100% are not supported; in this case, a "stop" warning is displayed. Terms of dissolution that add up to less than 100% are identified with a "warning" message, and the rule cannot be applied.
4., 5. and 6. Period Control, Company Control and Comment / Approval:
These optional function modules allow "Period Control" and "Company Control" to be enabled and a "Comment / Approval" to be added.
With the Rules Wizard "Indicator-Dependent Posting Rule" you can create a rule that calculates and posts the plan account balances based on indicators. This means that the account balance of liabilities, receivables and / or inventories is not derived directly from the starting inventory plus PL reconciliation, but rather is indirectly the result of the indicators. The posting logic is essentially very similar to the "Reference Value Posting Rule". Depending on the account chosen, the result of this rule is also either a profit or loss or a neutral debit / credit transaction that changed the current planning and does not carry over an existing PL balance to the balance sheet. The calculation basis is also selected reference value accounts, the sum of which is multiplied by a figure and, if necessary, modified using a constant. The rule generally observes any change in the reference value accounts, the indicators and modifiers, and recalculates the result.
The idea behind IDL Forecast is thus to release all balances owed to the bank and directly reconcile the respective PL balances to the bank from the accounts planned using key indicators. Subsequently, receivables, payables, inventories, etc. will be constructed / corrected using this rule with postings against the bank. In the following period, the posting will be canceled again and rebuilt, etc.
The function modules that the Rules Wizard includes and those that can be added as they are needed are described briefly in the following section based on the navigation bar.
1. Indicator Rule
The "Account Selection" serves as the basis for at least one reference value account, a posting and a release account, but also for selecting an indicator that the sum of all reference value accounts can be multiplied by. The entry of this figure can be made by either making a fixed entry, by means of flexible parameters or statistical accounts. Optionally, the result can then be either multiplied or divided by a modifier. This entry can be made by either entering a fixed input, flexible parameters or statistical accounts. The calculated result with respect to optional taxes is then posted to the selected posting account.
The result in the posting account is calculated as follows:
| Overview of Calculation |
|---|
| Reference Value (= the sum of the reference value accounts) |
| x Indicator |
| / or x Modifier (optional) |
| = Modified Reference Value |
| + Taxes as a percentage of the modified reference value (optional) |
| = Result in Posting Account |
The question of which posting is to be made in debit and which posting is to be made in credit depends mainly on the debit / credit tag of the reference account sum (= reference value). If the sum is negative, the posting account selected will be posted as positive in credit and the release account selected in debit. If, on the other hand, the reference value shows a balance that is positive , the posting account chosen will be posted in debit and the release account in credit, in other words exactly the other way around.
The reference value (= the sum of the reference value accounts) is negative:
| Debit | Credit |
|---|---|
| Release Account | Posting Account |
The reference value is positive:
| Debit | Credit |
|---|---|
| Posting Account | Release Account |
This posting method is always used and takes it into account when the "D/C setting is set to without." In addition, this D / C setting can define whether only indicator-dependent postings should be taken into consideration / be posted when the reference value is in the red or in the black. In this case, either "only debit" or "only credit" is to be chosen. If, for example, "only credit" is set, a 0.00 posting would be carried out with a negative reference value. If the balance changes to positive, the result will be calculated and posted.
By using the setting "with D / C control" you can determine whether two different posting accounts should be taken into account depending on the debit / credit flag of the reference value.
Negative reference value:
| Debit | Credit |
|---|---|
| Release account | Posting account Y (Credit) |
Reference value in credit:
| Debit | Credit |
|---|---|
| Posting account X (Debit) | Release account |
With respect to the reference value, you can also determine which "detail" should be used. With "full details," the total of the reference values of the entire account balance will be taken into consideration. If, on the other hand, "only the IC share" or "only the third party share" is selected, either intercompany reference value accounts or third party details will be considered in adding up the total amount. The question of what intercompany company the indicator-dependent entry will be entered for will be answered based on the intercompany balances of the reference value account. If the following indicator and/or modifier are specified as statistical I/J accounts and values are recognized as intercompany balances in these accounts, the respective intercompany indicators and modifiers that match the intercompany reference account will be chosen automatically.
A "key figure" must always be entered or selected using parameters or a statistical account. You must multiply the reference value by this figure. Then if you want the result, multiply or divide it by a modifier. Unlike the "modifier," the indicator is a calculation option.
Important: In the following period, indicator-dependent postings will be cancelled again automatically. And, if you intend to continue using an indicator-dependent posting rule, it will be recalculated and posted.
Example of an indicator-dependent posting rule:
Average stock is to be planned. Both the cost of materials and the storage period are to be planned and the average stock is to be determined.
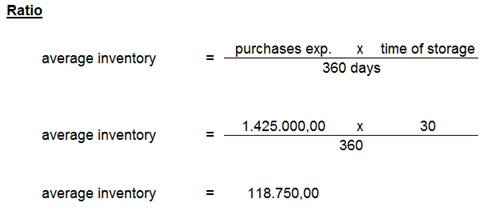
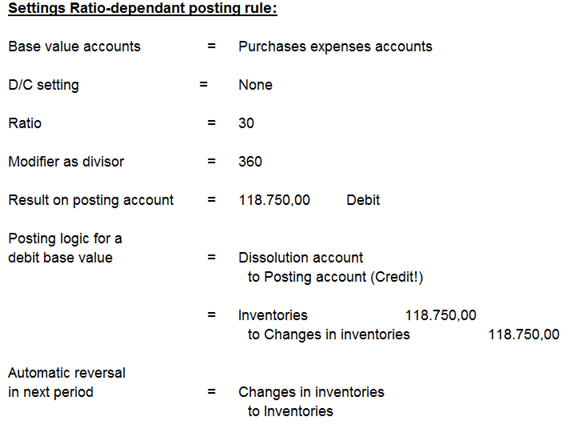
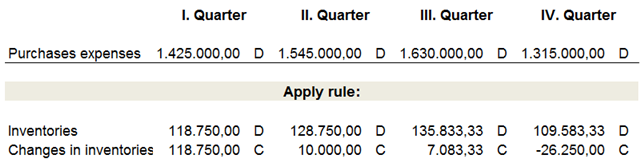
2. Taxes
Selectable function block for calculating sales tax as a percentage on earnings, posting this figure and perhaps offsetting it. Please bear in mind that the tax is not to be calculated on the reference value (= the sum of all reference value accounts), but rather based on the modified reference value (see "Overview of Calculation" above). Furthermore, tax postings are not to be cancelled in the subsequent period!
3. Intercompany:
This functional building block is only activated if at least intercompany planning with rules on IC balances is to take place, see "Intercompany".
4., 5. and 6. Period Control, Company Control and Comments / Approval:
Selectable function blocks for activating a "Period Control" , a "Company Control" and for depositing "Comments / Approval".
Using the rule assistant "Reposting Rule," a rule will be generated that will allow for the final balance for the current period to be reposted either completely or in part to one or more target accounts from any account. Depending on the account that has been selected, the result of this rule will be a posting that has an effect on PL or a neutral debit/credit posting that changes the existing planning. Here, the rule takes every change in the final balance of the source account into consideration and adjusts the reposting amount accordingly depending on the proportional reposting share.
The question of which functional building blocks the rule assistant contains and which of them will need to be selected is discussed briefly in the following points based on the navigation bar.
1. Reposting Rule:
As the basis, the "Account Selection" takes place for any accounts whose final balance is to be reposted either 100% or proportionately. The information on what proportion of the reposting share is to be taken into consideration is to be entered above the account selection. The entry of the reposting share can be made either by making a fixed entry or by selecting flexible parameters or statistical accounts.
The accounts whose final balances are to be reposted in the same period are selected In the selection field "Source Accounts." In the following selection field "Target Accounts," you determine which accounts the reposting is to be made on. Depending on the debit/credit flag for the final balance of the source account, the reposting will be generated with a changing debit/credit flag. With a 100% reposting, the final balance of the source account will always be 0.00. If there are changes in the closing balance of the source account, these will change the reposting amount.
If the closing balance of the source account is NEGATIVE, the following posting will be generated:
| Debit | Credit |
|---|---|
| target account | source account |
If the closing balance of the source account to be reposted is POSITIVE, the following posting will be generated:
| Debit | Credit |
|---|---|
| source account | target account |
2. Account Mapping:
"Account Mapping" connects the accounts that were selected on the previous pages of the rule wizard. If an account cannot be selected from the listboxes then that account has not been preselected. This can be fixed by clicking "Back" in the rule wizard. If a posting is to be made in multiple target accounts, additional target accounts can be added within an account allocation by using the "Star" symbol and a proportional distribution per target account can be made. Modification of the reposting shares (= Factor) can also be performed on this page.
3. Intercompany:
This functional building block is only activated if at least intercompany planning with rules on IC balances is to take place, see "Intercompany".
4., 5. and 6. Period Control, Company Control and Comment / Approval:
These optional function modules allow "Period Control" and "Company Control" to be enabled and a "Comment / Approval" to be added.
The "Transition Rule" wizard creates a rule that initially connects any accounts for use as a primary basis. In general, this carries over balances from planned P/L accounts directly to the balance sheet. Unlike "Posting Rule With Base Value", this rule does not create debit/credit postings that can affect the plan income; instead, it completes the missing side of the posting for account balances that have already been planned. For this reason, the "Without base value" rule type applies and cannot be toggled to "With base value".
What follows is a brief description of the function modules included in the rule wizard and those that can be additionally selected for use if required.
1. Transition Rule:
Any accounts are selected as the primary basis (see "Selecting accounts") with reference to "Account mapping". In this case, account selection and mapping are combined on one page of the rule wizard.
The individual account relationships then determine which existing account balances (source accounts) will be carried over to which accounts (target accounts) in order to complete a debit/credit posting. The source account is selected from the listboxes on the left, while the associated target account is selected on the right. If a position is selected instead of an origin account, an account allocation will be generated for each of the accounts that belong to the position. Furthermore, multiple accounts can be marked and selected simultaneously by pressing "control". Further account relationships can be added using the large "star" icon, and account relationships that are no longer required can be removed using the "X" icon on the left.
By default, the system will assume that the 100% of a balance is to be carried over from the source account to the target account. However, users wishing for the source account to be carried over to more than one target accounts can use the small "star" icon to add another target account and split the 100%. Please note that the percentages specified must always add up to 100%, otherwise the rule cannot be applied. To delete a target account created in this way, click the small "X" icon to the right of the respective account row.
The listbox "select account for assigning" above and to the right of the account relationships allows the user to select a general target account. This general target account provides support in the event that several source accounts (left) need to be carried over to the same target account (right). Select the target accounts for which the general target account selected above is to be adopted by placing a "tick" next to each target account. Next, click the "table with arrow" icon next to the general target account to transfer the general target account to the selected target accounts. To select all target accounts, use the "two fields with ticks" located above. To remove all ticks, click the "two fields without ticks" icon.
Please note: To avoid having to select each source account individually from the listboxes, they can be pre-selected in the planning form. To do so, highlight the desired accounts in the planning form before running the rule wizard. Now when the rule wizard is opened, individual account relationships will already be loaded for the pre-selected accounts.
The manner in which the incomplete posting record is completed depends on the debit/credit code of the source account. If the source account has a debit balance, the amount is posted to the target account as credit.
| Debit ! | Credit ! |
|---|---|
| Balance of source account | Amount carried over to target account |
However, if the source account has a credit balance, the amount is posted to the target account as debit accordingly.
| Credit ! | Debit ! |
|---|---|
| Balance of source account | Amount carried over to target account |
The debit/credit code of the target account is thus "changed" depending on the debit/credit code of the source account. This is the transition behaviour that is used by default, indicated by the word "Change" adjacent to the respective target account.
Please note: This behaviour can be reconfigured from the default of "Change" to "Same". If this option is selected, the incomplete posting side will not be not completed; instead, the balance of the source account is posted with the same debit/credit code as the target account!
| Debit ! | Debit ! |
|---|---|
| Balance of source account | Amount carried over to target account |
| Credit ! | Credit ! |
|---|---|
| Balance of source account | Amount carried over to target account |
The "Same" transition behaviour could, for example, be used to add amounts from any number of source accounts to a statistical target account.
2. Intercompany:
This functional building block is only activated if at least intercompany planning with rules on IC balances is to take place, see "Intercompany".
3., 4. and 5. Period Control, Company Control and Comment / Approval:
These optional function modules allow "Period Control" and "Company Control" to be enabled and a "Comment / Approval" to be added.
The "Dissolution Rule" rule wizard creates a rule that cancels out (i.e. "dissolves") the opening or closing balance of any account. If necessary, this dissolution can be staggered over more than one period. For example, users wishing to cancel out B/S opening balances that are carried over with B/S accounts from the previous year to the first period of the next can do so using this rule wizard, if necessary via a cash posting. Depending on the accounts selected, this rule creates debit/credit postings that do not affect net income but may affect cash flow for the planned B/S.
What follows is a brief description of the function modules included in the rule wizard and those that can be additionally selected for use if required.
1. Dissolve Opening/Closing Balance:
The user selects any accounts whose opening or closing balances are to be cancelled out as the primary basis; see "Selecting accounts". Accounts are mapped automatically on the basis of the accounts selected; there is no need do this separately.
First, specify at the top of the page whether the account's opening or closing balance is to be cancelled out. Then, use the "Dissolution account(s)" selection field to specify the accounts whose balances are to be cancelled out. In the second selection field, "Target account", specify the target account by which these balances will be cancelled out. For example, if the bank account is selected as the target account, the a cash posting will be made. The dissolution posting created will have the opposite debit/credit code to that of the dissolution account.
If the dissolution account balance to be cancelled out is in DEBIT, the following posting will be created:
| Debit | Credit |
|---|---|
| Target account | Dissolution account |
If the dissolution account balance to be cancelled out is in CREDIT, the following posting will be created:
| Debit | Credit |
|---|---|
| Dissolution account | Target account |
The final section, "Dissolution component", allows the user to distribute the dissolution amounts over one or more periods as a percentage. This component is structured in a similar way to "Incoming and outgoing payments". Here, the user specifies for each period what percentage of the amounts will be dissolved/cancelled out by which target account. It is at this stage that users wishing to cancel out the amounts using several "target accounts" can specify the extra "target accounts" to be used. Additional periods can be added using the lower-left "star" icon ("Add dissolution component"). The individual terms of the dissolution can then be edited or deleted directly in the list.
Please note: Terms of dissolution totalling more than 100% are not supported; in this case, a "stop" warning is displayed. Terms of dissolution that add up to less than 100% are identified with a "warning" message, and the rule cannot be applied. Please also note that terms of dissolution cannot be specified on closing balances for the "0th period" (same period) as this would result in a "circular reference".
2. Intercompany:
This functional building block is only activated if at least intercompany planning with rules on IC balances is to take place, see "Intercompany".
3., 4. and 5. Period Control, Company Control and Comment / Approval:
These optional function modules allow "Period Control" and "Company Control" to be enabled and a "Comment / Approval" to be added.
Please note: If balances are to be dissolved, this should be restricted to single periods. This avoids long and pointless strings of calculation. For example, an initial opening balance will already have been cancelled out as of a certain period and does not require further dissolution! This also ensures that balances are not cancelled out if they are the result of the current planning and may already be dissolved via other rule wizards.
The "Financing Rule" wizard creates a rule that recognizes new or existing financing measures. The result of this rule will either be a passivation of a new liability at some point in time as well as repayment and interest on the debt that has been amassed or the continuation of the existing financing measure under the current repayment and interest terms.
Please note: By default, financing rules can only be applied in the +PLAN+ data area. If it is desired to apply financing rules in the +FORECAST+ data area as well, with the rules having effects in the subsequent +PLAN+ data area, the option +Rules across data areas+ must be activated in the Scenario Properties prior to the application of the rule template
What follows is a brief description of the function modules included in the rule wizard and those that can be additionally selected for use if required.
1. Financing Rule:
During the first step, the period when financing begins/began in entered under "initial period". The format that should be used is MONTH.YEAR to express 01.MONTH.YEAR. If the initial period fallswithin the planning horizon, it will be entered as the financing amount in the bank/cash account on the incoming payment and to passivate a liability:
| Debit | Credit |
|---|---|
| Bank/Cash | Liabilities to financial institutions |
If the starting period you entered was before the planning horizon, the system will assume that this is an existing loan and that the remaining amount has already been balanced as a liability in ACTUAL, therefore no further liability is allowed to be posted. Only interest and principal are to be taken into consideration in planning.
The next step is to enter the amount of the "financing sum" or the remaining amount. It can be entered as either a fixed value or a financing amount that is variably entered in a statistical in the planning form. In this case, the starting period always equates to the period in which the financing amount is entered in the planning form in the statistical account. This ensures that the starting period always lies within the planning horizon and thus new financing will always be passivized as a liability. In addition, only one "automatic calculation" of the conditions will take place / can be selected on the following page of the rule assistant. If on the other hand a user-defined amortisation schedule is to be worked on, you must enter a fixed value.
As yet another basis, "Account selection" will appear at the end. With the "liability account," new financing will either be passivated or it will be specified what account the remaining amount of an ACTUAL liability is contained in. The principal from the financing liability will be entered later in the "Bank/cash account". Accrued interest is posted separately to the "Interest account" selected for this purpose. If intercompany accounts "IC" and/or mixed accounts "J" were already selected to be the accounts, you will need to add what intercompany financing is to be displayed.
Please note: Intercompany financing can only take place with a clear IC company and cannot contain more than one company. Multiple financing rules must be defined for each IC company if multiple intercompany financings are to be displayed.
2. Terms:
Depending on the "type of loan" chosen, principal and interest will be calculated automatically and taken into consideration differently. Three types of loans can be first found in the listbox:
You can see how financing is progressing depending on the type of loan you selected above in the amortisation schedule / preview to the right of the rule assistant. If a loan type that is "calculated automatically" has been selected, none of the fields in the amortisation schedule will be editable to start with. If a financing rule on the first page of the rule assistant is defined by a variable financing amount from a statistical account, the preview of the basis of the value will be based on the value entered for each period in the statistical account in the planning form. The amortisation schedule will only show one period as a preview, however. You can choose which amortisation schedule is to be shown as a preview via the period to the right above the list. If individual changes need to be made to the amortisation schedule, "user-defined calculation" can be selected above the list.
If you switch from an "automatically calculated" type of loan to "User-defined calculation" the previous amounts will still be shown in the preview and can be changed manually. Nevertheless, please consider that no recalculation of the entire financing will be performed if you have selected +manual entry+. If you want manual changes such as unscheduled repayments to change the entire financing automatically, you must select
On the other hand, the automatic change that can be chosen compared to the previous possibilities just mentioned will depend on the type of loan that was first entered. With annuity and final maturity loans, only the term can be changed. With amortising loans, on the other hand, either the subsequent payments or the term can be changed.
Principle, interest and interest-related expenses can be recorded in the preview in addition to the respective periods. If data / repayment plans that corresponds to the column structure "preview" is available in Excel, this can be easily added to the rule template by using "Copy & Insert." These actions can be carried out with the help of the integrated tools "Add row above," "Add row below" and "Delete row" to add additional lines or delete them, for instance. The function buttons are located above the preview in the rule assistant and feature additional tools like "copy," "cut out," "insert,"delete," "backwards," and "restore."
Please note: If a user-defined repayment plan has already been produced and the automatically calculated type of loan is to be changed later on, you will receive a warning message and be asked whether the changes that have been made should be deleted? "Yes" confirms that the preview should be updated and that information entered manually will be lost; "No" means the manually entered information will be retained.
If parts of the financing in the repayment plan are shown in gray type, these lie outside the planning horizon and will not be taken into consideration in the scenario when the rule template is used.
The "Interest rate" is either set as a fixed value or selected from the list box as a flexible parameter, the value of which is defined in the properties of the scenario. Instead of a flexible parameter, the interest rate can also be given as a varying value via a statistical account in the planning form. This process creates postings affecting net income which adjust the plan income in the amount of the interest calculated as well as recognising this interest as a cash outflow.
| Debit | Credit |
|---|---|
| Interest expenses | Bank/cash |
Please note: This posting to net income is not always made in every PLAN period and is instead made in parallel with the selected payment interval. For example, if a quarterly payment interval is used in a monthly scenario, the interest accrued is recognised as a cash expense on a quarterly rather than monthly basis.
In the "Financing duration" field, enter the length of time over which the financing amount will be repaid. Either as a fixed value or as a variable values via selecting a statistical account in the planning form. This information must be given in months, regardless of the temporal resolution of the scenario (i.e. monthly, quarterly or annual). The payment amount will be calculated automatically for the selected payment interval and posted to cash flow accordingly. The payment interval selected can be either monthly, quarterly or annual. The debt is reduced from the selected liabilities account (to financial institutions).
In this process, the above-mentioned interest posting is supplemented by a corresponding redemption posting, made as debit; the credit posting amount to the bank/cash account will then contain portions of both the interest and the redemption.
| Debit | Credit |
|---|---|
| Interest expenses | Bank/cash |
| Liabilities to financial institutions |
Please note: The cash flow is not always affected in every PLAN period, only at the selected payment interval. For example, if a quarterly payment interval is used in a monthly scenario, the redemption is posted on a quarterly rather than monthly basis.
2., 3. and 4. Period Control, Company Control and Comment / Approval:
These optional function modules allow "Period Control" and "Company Control" to be enabled and a "Comment / Approval" to be added.
The "Investment Rule" wizard creates a rule that recognises new investment measures. This rule results in the capitalisation of an asset as at a certain point in time. If required, the resulting depreciation and potential financing can also be posted.
Please note: By default, investment rules can only be applied in the +PLAN+ data area. If it is desired to apply investment rules in the +FORECAST+ data area as well, with the rules having effects in the subsequent +PLAN+ data area, the option +Rules across data areas+ must be activated in the Scenario Properties prior to the application of the rule template.
What follows is a brief description of the function modules included in the rule wizard and those that can be additionally selected for use if required.
1. Investment Rule:
The first step is to assign the "Starting period" and the "Investment amount" for the investment activity planned. The format for the date of purchase is -MM.YYYY- and thus expresses 01.MM.YYYY. With respect to the investment amount, either a fixed value or an investment amount that is variably entered in a statistical account can be entered in the planning form. In this case, the starting period always refers to the period in which the investment amount is entered in the planning form in the statistical account. This selection will have subsequent effects on the "conditions" of possible financing of the investment amount. On the page of the rule assistant that has the same name, "automatic calculation+ of the conditions can only take place or be selected if you are working with a variable investment amount from a statistical account. If, on the other hand, a user-defined amortisation schedule is to be taken into consideration in financing the investment amount, you must enter a fixed value as the investment amount.
Then select the "Investment account", used to capitalise the investment, as well as an offsetting account; see "Selecting accounts". This offsetting account determines whether the investment will affect cash flow immediately or a liability must first be created. Therefore, the account selected will either be a bank account or a liabilities account. If an intercompany account "IC" and/or mixed accounts "J" were already selected to serve as the liability account, you must also specify which IC company financing of the investment is to be shown in.
For instant payment using a "Bank or cash account", the capitalisation is posted as followed:
| Debit | Credit |
|---|---|
| Investment account | Bank/cash |
If the capital good is to be "financed", a liabilities account (e.g. to a financial institution) is selected:
| Debit | Credit |
|---|---|
| Investment account | Liabilities to financial institutions |
2. Input Tax:
These optional function modules "calculate and (if applicable) eliminate input tax" on the amount of investment and select the required tax accounts.
Enabling input tax calculation activates an input tax account. The input tax account is added to the assets side of the balance sheet, while the bank/cash or liabilities account goes to the liabilities side. The posting is structured as follows:
| Debit | Credit |
|---|---|
| Input tax | Liabilities to financial institutions OR Bank/cash |
If tax elimination is enabled, the input tax receivable is offset using the account selected in the "Tax elimination account" field.
| Debit | Credit |
|---|---|
| Incoming payment through bank/cash | Input tax |
3. Depreciation:
This optional function module applies depreciation to the amount of investment set. The amount of investment is redisplayed on this page for information purposes only; this can only be adjusted on the first page of the rule wizard.
If this function module has been enabled with a "tick", a "Depreciation account", a "Depreciation method" and a "Depreciation period" must all be specified. The Depreciation method is selected using the adjacent listbox. The options available are "Straight-line depreciation", "Declining-balance depreciation" and "Declining-balance depreciation with change to straight-line depreciation". The Depreciation period must be given in years, regardless of the temporal resolution of the scenario (i.e. monthly, quarterly or annual). The depreciation period can either be stated as a fixed value or as a flexible value via a statistical account in the planning form. Depreciation commences with the period in which the investment is made.
Please note: To recognise depreciation correctly, no PLAN periods can be absent from the scenario's planning interval.
Depending on the depreciation method used, depreciation will automatically reduce the value of the capital good with an offsetting entry:
| Debit | Credit |
|---|---|
| Depreciation account | Investment account |
4. Financing:
Selection of a liabilities account on the first page of the rule wizard indicates a decision that the capital good will not be paid in cash but rather debt-financed. Furthermore, whether or not intercompany financing is to take place has already been entered. The "Financing" function module allows these debts to be redeemed and interest applied.
The structure of this functional building block for the investment rule is analogous to the rule wizard "Financing rule".
The financing amount is the thing that can be derived from the amount of the investment less own contribution and the starting period will also be the same as the starting point of the investment. The entry of an own contribution is optional and the amount can be entered as either a fixed or variable value using the statistical account in the planning form. In addition, you can choose whether the amount of the own contribution lowers the financing requirement by an absolute value or a percentage of the investment value is to be assumed. The own contribution will be taken into consideration as an immediate payment by the bank or cash account.
| Debit | Credit |
|---|---|
| Investment account | Bank/Cash |
| Liabilities to financial institutions |
5. Terms:
The structure of this functional building block for the investment rule is analogous to the rule wizard "Financing rule".
6., 7. and 8. Period Control, Company Control and Comment / Approval:
These optional function modules allow "Period Control" and "Company Control" to be enabled and a "Comment / Approval" to be added.
A rule that allows for interest and compound interest to be calculated and posted for selected accounts using the rule assistant "Interest Rule." The result of this rule is recognized interest for account balances depending on the account balance. Negative balances result in positive interest and positive balances in interest expenses. Here, differentiated interest rates can be assumed for debit and credit interest.
The question of which functional building blocks the rule assistant contains and which of them will need to be selected is discussed briefly in the following points based on the navigation bar.
1. Interest Rule
As the basis, the "Account Selection" takes place for any accounts that are entitled to generate interest and accounts for interest earnings and expenses and their interest rates.
First, select above whether interest pertains to the closing and starting balance of an account for the current period. Or whether the basis for the interest calculation is to be distributed. "Distribution" can be used for quarterly or annual scenarios in order to calculate the compound interest calculation more precisely. The interest calculation is based on 30 days / month. With a quarterly scenario, the interest can be calculated at the end of the quarter, for example, for 90 days based on the closing balance or the difference can be distributed linearly to three months that each have 30 days. Afterwards, the respective accounts whose account balances are to receive interest are to be selected in the selection field "Source Account." In the second and third selection field "Interest Earnings and Interest Expense Account," you determine what PL accounts are to be taken into consideration for interest postings that have an effect on earnings. Afterwards, the debit and credit interest are to be entered. The interest rates can be entered by either making a fixed entry, using flexible parameters or statistical accounts.
If the account balance of the source account to receive interest is NEGATIVE, the following posting will be generated:
| Debit | Credit |
|---|---|
| Source Account | Interest Earnings Account |
If the account balance of the source account to receive interest is POSITIVE, this posting will be generated:
| Debit | Credit |
|---|---|
| Interest Expense Account | Source Account |
2. Account Mapping:
"Account Mapping" connects the accounts that were selected on the previous pages of the rule wizard. If an account cannot be selected from the listboxes then that account has not been preselected. This can be fixed by clicking "Back" in the rule wizard. If multiple source accounts are used that are to receive interest, a modification can be made on this page for each account allocation or calculation basis (starting balance, closing balance or distributed) and interest rates.
3. Terms of Payment:
With this functional building block, accrued interest payable and liabilities can be reduced once again on a monthly, quarterly or annual basis depending on the payment condition chosen.
Settled interest receivables will be recorded as savings at the bank or in the cash register. The source account that receives interest is the opposite account to these incoming payments:
| Debit | Credit |
|---|---|
| Payment received via cash register/bank | Decrease in receivables in the source account |
Settled interest liabilities will be recorded as payments made from the bank or the cash register. The source account that receives interest is the opposite account to these outgoing payments:
| Debit | Credit |
|---|---|
| Decreasing liabilities in the source account | Outgoing payments via the cash register/bank |
Please note: If interest is paid on bank accounts that are stored as source accounts, then this interest will already have been taken into consideration as payments and no other payment conditions from the same account will be possible.
4. Intercompany:
This functional building block is only activated if at least intercompany planning with rules on IC balances is to take place, see "Intercompany".
5., 6. and 7. Period Control, Company Control and Comment / Approval:
These optional function modules allow "Period Control" and "Company Control" to be enabled and a "Comment / Approval" to be added.
The "Leasing Rule" wizard creates a rule that recognises new leasing measures from the perspective of a lessee under the assumption that "full payout leasing" is used. This rule results either in the capitalisation of the leased object as at a certain point in time (= finance leasing) or the simple recognition of the lease as a rental agreement without capitalising the leased object (= operating lease). The user must decide which of these leasing methods is to be used. In financing leasing, the resulting depreciation is also posted.
Please note: By default, leasing rules can only be applied in the +PLAN" data area. If it is desired to apply leasing rules in the "FORECAST" data area as well, with the rules having effects in the subsequent "PLAN" data area, the option "Rules across data areas" must be activated in the Scenario Properties prior to the application of the rule template. Additionally, they do not relate to existing leasing plans; instead, a completely new case of leasing is recognised in the plan.
What follows is a brief description of the function modules included in the rule wizard and those that can be additionally selected for use if required.
1. Leasing Rule:
The first step is to specify whether the leased object should be capitalised by the lessee using the "Finance lease" method or the business case should be set up as "Operating lease" (= as a rental agreement) without capitalisation. The selection made here affects the subsequent pages of the wizard.
The user can also opt to "Calculate input tax" by specifying an input tax rate. If so, the user either specifies a fixed input tax rate in the "Tax rate" field or selects a flexible parameter from the listbox, the value of which is defined in the properties of the scenario. Enabling input tax calculation activates an input tax account. The input tax account is added to the assets side of the balance sheet, while the bank/cash or liabilities account goes to the liabilities side. The posting is structured as follows:
| Debit | Credit |
|---|---|
| Input tax | Liabilities to financial institutions OR Bank/cash |
Please note: At present, the input tax must be offset manually.
The planned leasing measure must be assigned a name in the "Leasing object" field so that it can be more easily distinguished from others. Enter the costs of acquisition and production incurred by the lessor in the "Leasing amount" field. If these are unknown, enter the list price of the leasing object instead. Then, specify the start date and period of the leasing measure. The period must be given in months, regardless of the temporal resolution of the scenario (i.e. monthly, quarterly or annual). There is an additional option to specify an "Initial Payment", which is posted to cash flow at the start of the leasing period. Finally, the effective annual interest rate or monthly leasing payment is specified. When one value is entered, the other is calculated using the parameter entered then displayed.
Please note: All amounts on this page must be stated net.
On the subsequent pages of the rule wizard, the relevant accounts are selected and automatically mapped for the leasing transaction using the details entered here.
2. Initial Payment:
This function module allows the necessary accounts to be selected for the initial payment specified; see "Selecting accounts". This module is skipped if no amount was entered in the "Initial payment" field on the first page.
At this stage, the user must select a leasing/interest expenses account, a bank/cash account and an accruals account. If input tax calculation has been enabled, an input tax account must also be specified.
The initial payment is posted to cash flow at the start of the leasing period.
| Debit | Credit |
|---|---|
| Accruals account | Bank/cash |
This payment is then dissolved through net income over the leasing period, whereby the amounts of the dissolution postings decrease over time due as per the compound interest method.
| Debit | Credit |
|---|---|
| Leasing/interest expenses | Accruals account |
3. Leasing Postings:
Where the operating lease method is used, this function module allows the user to select all of the accounts required to assign the leasing measure to net income as an operating lease, as with a standard rental contract; see "Selecting accounts". This module is skipped if the user chooses to capitalise the leased object on the first page of the rule wizard.
At this stage, the user must select a leasing expenses account, a bank/cash account and, if enabled, an input tax account. If an initial payment has been specified, the "Transfer From Initial Payment" button can be used to simply use the leasing expenses, input tax and bank/cash accounts selected in that module.
The monthly leasing postings are recognised as follows through net income:
| Debit | Credit |
|---|---|
| Leasing expenses | Bank/cash |
4. Capitalisation
This function module allows the user to select all of the accounts required to recognise the leasing measure as a finance lease; see "Selecting accounts". This module is skipped if the user chooses not to capitalise the leased object on the first page of the rule wizard.
At this stage, the user must select a leasing/interest expenses account, an investment account, a liabilities account, a bank/cash account and an accruals account. If input tax calculation has been enabled, an input tax account must also be specified. If an initial payment has been specified, the "Transfer From Initial Payment" button can be used to simply use the leasing expenses, input tax, bank/cash and accruals accounts selected in that module.
The capitalisation posting in the first period of the leasing period is made as follows, provided input tax is enabled, with the "Accruals account" amount corresponding to the interest portion that does not initially affect net income.
| Debit | Credit |
|---|---|
| Leasing account (assets) | Liabilities |
| Input tax | |
| Accruals account |
The liabilities are dissolved equally over the leasing period using the following posting, and the interest portion this contains is recognised as cash.
| Debit | Credit |
|---|---|
| Liabilities | Bank/cash |
The interest portion is also dissolved through net profit using the "Accruals account". The amount of the postings decreases each time over the leasing period as the monthly leasing payments are divided into an interest and redemption portion as per the compound interest method.
| Debit | Credit |
|---|---|
| Leasing/interest expenses | Accruals account |
5. Depreciation:
Where the finance lease method is used, this auxiliary function module applies depreciation to the leasing amount set. This module is skipped if the user chooses not to capitalise the leased object on the first page of the rule wizard. The leasing amount is redisplayed on this page as the "Depreciation amount" for information purposes only; this can only be adjusted on the first page of the rule wizard.
The user must select a "Depreciation account" as well as a "Depreciation method" and "Depreciation period". The Depreciation method is selected using the adjacent listbox. The options available are "Straight-line depreciation", "Declining-balance depreciation" and "Declining-balance depreciation with change to straight-line depreciation". The Depreciation period must be given in years, regardless of the temporal resolution of the scenario (i.e. monthly, quarterly or annual). Depreciation commences with the period in which the leased object is capitalised.
Please note: To recognise depreciation correctly, no PLAN periods can be absent from the scenario's planning interval.
Depending on the depreciation method used, depreciation will automatically reduce the value of the leased object with an offsetting entry:
| Debit | Credit |
|---|---|
| Depreciation account | Leasing account (assets) |
6. and 7. Company Control and Comment / Approval:
These optional function modules allow "Company Control" to be enabled and a "Comment / Approval" to be added.
Please note: Period Control is unavailable in this rule wizard because the relevant time frame is set automatically based on the starting period specified for the leasing transaction. The rule can therefore be used for the starting period only. For the leasing measure to commence from a different point in time, this must be adjusted on the first page of the rule wizard.
The "General Rule" wizard creates a rule that allows users to create their own posting record rules in the event that the predefined rule wizards are unsuitable for their planning requirements.
Important: "General rules" must always create posting records and must not form circular references. A circular reference is where one or more rules are dependent on one another, forming a loop. For this reason, users are strongly advised to test the "general rules" they create in a test scenario and save them as rule templates, meaning they will already have been "verified" when later used in the target scenario.
Before creating individual rules, users are advised to obtain an in-depth understanding of the IDL Forecast Rule Engine. The theory behind the "General Rule" is therefore set out and clarified using brief examples below.
Theory:
The IDL Forecast rules system distinguishes between additional account entries on a single account and new posting records which are referred to as relationship rules (A * B ==> C). These relationship rules are established between variables (accounts) A and C.Variable A can represent either an account movement or the opening/closing balance of an account. Variable C can represent only an account movement. Generally speaking, A is the original source of the calculation and C is the target of the calculation. B represents the factor and can be a predefined constant, a parameter or the account balance of a statistical account. If variables A or C are modified, the "General Rule" will attempt to "restore" the balance of the equation stated above (A * B ==> C) using the relationship rules. If variable A or variable B is modified, variable C will be recalculated. The result C will be the product of variable A and variable B.
1. General Rule:
As described in the theory, the definition of a relationship rule is based on three parts:
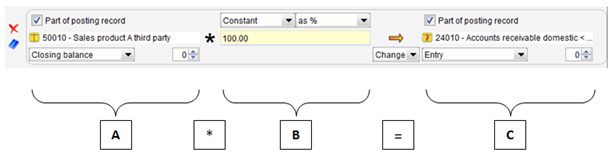
EXAMPLE 1
The explanation of the +general rule+ is initially made in the form of a simple example 1:
You would like to reconcile the previously planned account balance from the P/L account +revenues+ to the balance sheet account +receivables LuL+ in the current period. The posting would then be:
| debit | Credit |
|---|---|
| Receivables LuL (100%) | Revenues (100%) |
Step 1: Which of the accounts are related?
In this case, the P/L account equates to the origin account A (Where does this amount come from?) and the balance sheet account equates to the target account Ceg. the result (Where should the counter posting be performed?).
Step 2: What factor B should C it be calculated with?
The account balance of the P/L account should be reconciled to the receivables account in equal value. Therefore, the following useful ways are offered to define factor B :
Step 3: What type of relationship rule exists?
In this case, a posting record is to be added to and no new posting record is to be created. One page of the posting record (Origin account A) already exists and contains the amount = Plan sales in credit. The amount is shown as the +final balance+ in the P/L account (Origin account A) and can be selected as such via a list box beneath account selection A. With the balance sheet account (target account C), the P/L balance will be missing and must be taken into consideration as a new account entry in the balance sheet account. In this case, you need to select +change+ in the list box beneath account selection C.
Note: Only one change can be made to the target account C and this is not allowed to refer to the initial or final balance.
Step 4: What happens with debit and credit?
The P/L account +Revenue+ will normally be shown as a CREDIT and the balance sheet account +Receivables LuL+ as a DEBIT. To reconcile a balance sheet clearing from the origin account A, the respective debit/credit flag needs to be +changed.+ This action can be selected in a list box beneath the arrow. If such an S/H action is entered, the +general rule+ will react dynamically to the respective debit/credit balance of the origin account A.
"Change+ = The amount in the origin account A in DEBIT is to be changed to a CREDIT in the target account C and vice versa.
Step 5: What period should the relationship rule have an effect on?
In this example, the current P/L account balance is to always be reconciled with the balance sheet account without delay. To do this, you must select the respective +0+ beneath the origin account A and from the target account C. This timeframe will always pertain to the amount shown in the account selected above.
Step 6: Are the variables A and C part of a posting record?
Yes, both the P/L and the balance sheet account are part of the posting record shown above. This is to be confirmed by placing a +checkmark.+
Step 7: Comments
A maximum of 500 characters are available to make a comment on every relationship rule, to describe the relationship rule in greater detail, for example. For this purpose, you will find a +info+ to the left of the respective relationship rule that you can enter your comments in. The comment written will be displayed as a tooltip next to the +info.+
Step 8: Test
The relationship rule of the +general rule+ in a period should be tested once a definition has been assigned.
Step 9: Delete
If the relationship rule is no longer needed or completely wrong, it can be permanently deleted by clicking the +X+ button next to the respective relationship rule.
2., 3. and 4. Period Control, Company Control and Comment:
Selectable function building blocks for activating a +Period control" , a "Company Control" and for leaving behind yet another "Comment".
EXAMPLE 2

As yet another example 2, calculation of 19% sales tax is added to example 1. The posting would then read:
| Debit | credit |
|---|---|
| Receivables LuL (119%) | Revenues (100%) |
| Liability tax (19%) |
Step 1:What accounts are related to each other?
In this case, the P/L account equates to the respective origin account A (Where does the base amount come from?) and the balance sheet accounts from the target accounts C 1 + C 2 eg. the result (Where should the counter postings be performed?). In this example, a relationship rule no longer suffices due to the fact that two target accounts C are being addressed. A second relationship rule is added by using the +Star+ that can be found to the lower left.
Step 2: What factor B should C 1 + C 2 be calculated with?
The account balance of the P/L account should be reconciled to the receivable account at 119% (target account C 1) and to the accounts payable account at 19% (target account C 2). In other words, the following useful ways to use the factor B 1 + B 2 must be defined:
B 1 = 119%
B 2 = 19%
Step 3: What type of relationship rule applies?
In this case, information is to be added to a posting record and postings are to be made to two target accounts with different amounts. One page of the posting record (origin account A) already exists in terms of an amount = 100% Plan sales in credit. The amount is entered in the P/L account (origin account A) as the +final balance+ and, as such, can be selected in the list box beneath account selection A. With the receivables account (target account C 1), the P/L balance of 119% will be missing and needs to be taken into consideration as a new account entry in the receivables account. This calls for +change+ to be selected in the list box beneath select account C 1. The P/L balance of 19% will also be missing in the payables account (target account C 2) and needs to be taken into consideration as a new account entry in the payables account. This also requires that +change+ be selected in the list box beneath select account C 2 .
Step 4: What about debit and credit?
The P/L account +revenues+ will normally be in CREDIT, the balance sheet accounts +receivables LuL+ will be in DEBIT and +Tax liability+ in CREDIT. To reconcile balance sheet balancing from the origin account A, the debit/credit flag needs to be set to either +change+ or +same.+ This action can be selected using the list box located beneath the arrow of the respective relationship rule. If this type of S/H action has been entered, +general rule+ will react dynamically to the respective debit/credit balance of the origin account A.
+Change+= The amount in origin account A in DEBIT will result in a change in CREDIT in the target account C and vice versa. +Same+= Amount in the origin account A will result in a change in DEBIT in the target account C and vice versa.
Step 5: Which period should the relation rule be applied to?
In this example, the current P/L account balance is still to be reconciled with the balance sheet accounts without delay. In this case, the respective +0+ beneath the origin account A and the target accounts C 1 + C 2 are to be selected. This time-based reference always refers to the sum in the account selected above.
Step 6: Are the variables A and C part of a posting record?
Partly, for instance the P/L account is part of the posting record just once and the two balance sheet accounts are part of the posting record shown above. This is to be confirmed each time by placing a +checkmark.+
Step 7 to 9: Comments / Test / Delete
See example 1
Example 3
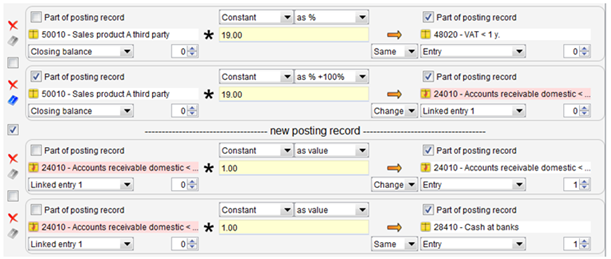
Example 3 extends example 2 to include an assumed payment of the claim accumulated in the next period. The original receivable (incl. tax) will be paid in full. The posting would then read:
| Debit | Credit |
|---|---|
| Bank (100%) | Receivables LuL (100%) |
Step 1: Which accounts are related?
The receivable account (incl. tax) according to the relationship rule, in this case, example 2 equates to the origin account A (Where do the two postings come from?) and the bank account equates to the target account C 1 (Where should the posting be made?). Furthermore, the receivable account itself is also a target account C 2 (Where should the counter posting be made?). Two relationship rules thus need to be added.
Step 2: What factor B should C you calculate with?
The amount of the account receivables (incl. tax) in accordance with the relationship rule, example 2 should be set off in full against the bank account (target account C 1). Therefore, you will have the following helpful ways to choose from in defining the factor B:
Step 3: What type of relationship rule do we have here?
In this example, no posting record is added and a new posting record is defined instead. As a result, no page of the posting record (origin account A) exists in the planning form in terms of an amount. Nevertheless, the sum to be posted will already be available as a +change+ in the target account C 1 "Receivable (incl. tax)+ in accordance with the first relationship rule, example 2. To be able to continue calculating with this amount, you will need to add a new posting record by placing a checkmark to the left and the +change+ in the receivables account (incl. tax) will have to be switched to +Linked change 1.+ The account receivable (incl. tax) can now be used as the origin account A in the new relationship rule (= new posting record) by also selecting +Linked change 1+ in the list box located beneath it. The posting amount will be missing for both the bank account (target account C 1) and the receivables account (target account C 2) and must be taken into consideration each time as a new account modification. This will call for you to enter +Change+ in a list box located beneath account selection C 1 + C 2.
Step 4: What about debit and credit?
The receivables account (incl. tax) as the origin account A will be in DEBIT, the target account C 1 +Bank+ should also be in DEBIT and the target account C 2 +Receivables LuL+ must therefore be in CREDIT in order to be able to pay the account receivable. To derive this balance sheet clearing from the origin account A, the debit/credit flag must be set to either +change+ or +same.+ This action can be chosen in a list box located beneath the arrow of the respective relationship rule. If this type of S/H action is entered, the +general rule+ will react dynamically to the respective debit/credit balance of the origin account A.
Step 5: Which period should the relationship rule have an effect on?
In this example, payment of a receivable is to take place in the next period. In this case, you must select +1+ in each area beneath the target accounts C 1 + C 2. This time-based reference will always refer to the amount in the account selected above. With the origin account A , the time-based reference should be left at +0+ beneath the account.
+0+ = same period / +1+ = next period / +1+ = previous period / +2+ = the period after next, etc.
Step 6: Are the variables A and C part of a posting record?
Partly, the origin account A +Receivables account (incl. tax)+ only serves as a database from which a debit and a credit posting can be derived in the target accounts C 1 + C 2. Therefore, only the target accounts C 1 + C 2 are parts of the aforementioned posting record. This is to be confirmed in each case by placing a +checkmark+ above the accounts.
Steps 7 to 9: Comments / Test / Delete
See example 1.
The Rule Templates panel allows the user to save and manage previously defined rules that have been newly created on the system using rule wizards or have been derived from an existing rule template and saved as a new rule template.
All existing rule templates are shown regardless of scenario in a hierarchical set (folder) structure. Each set contains rule templates and/or further subsets. The view can be configured via the table header in several ways: Information about the chart of accounts, the creation and modification dates and details on the content of each rule template can be shown or hidden via right-clicking on the table header. Information columns that are displayed in the table are indicated by a check mark next to the menu entry. The "Show filter" button (icon: funnel) opens a filter field. Then, only rule templates containing the string of characters entered in the filter field will be shown. The "Sort" button is used to change the order in which the rule templates and sets are shown within a tier of the hierarchy. Repeatedly clicking this button will cycle through the various sorting methods available: 1. Sort by rule type, 2. Sort alphabetically, 3. Sort by modification date (newest templates first), 4. Sort by modification date (oldest templates first). The toolbar also contains the usual icons to "Expand" and "Collapse" tiers in the hierarchy.
Show information on the contents of a rule template: Can be done as described above via the table header. This will enable you to display important information on the contents of an entire template without having to open the rule template. This is information on the incompleteness/completeness of a rule template (Column V), deposited comments (Column K), rule templates with restrictions on periods and/or companies (Column G) as well as their accuracy (Column E), existing intercompany information and its completeness (Column I) and parameters used, but also whether parameters are missing (Column P). Missing parameters or incomplete and false information will be displayed with a red "stop sign." Existing and complete, but also correct information will be displayed with a "green checkmark." Status displays with respect to the incompleteness / completeness of a rule template do not refer to the rule template itself. Instead, the status will be inherited by the parent file. This allows you to check both quickly and easily whether all of the rule templates are incomplete or complete.
In order to generate rules and/or business cases from one or more rule templates, these must first be applied. To do so, highlight the rule templates or rule template sets to be applied and then select one of the four relevant menu options in the panel's context menu. (Please note: If a rule set is highlighted, all rule templates located anywhere in the hierarchy beneath the selected set will be applied.) The "Apply Template/Set (All Periods)" menu option will use all selected templates in all periods of the open scenario (in accordance with any period restrictions; see below). The "Apply Template/Set (FORECAST Periods)" and "Apply Template/Set (PLAN Periods)" options will apply the templates only in periods that belong to the FORECAST or PLAN data areas respectively. The "Apply Template/Set (Selected Periods)" option applies the rule templates only in the period(s) currently selected in the planning form of the scenario. These restrictions will be applied in addition to any period restrictions configured in the rule templates themselves (= Period Control). For example, if a rule template with active period restrictions is applied via the "Apply Template/Set (FORECAST Periods)" menu option, the rule template will only be applied in periods of the scenario that have been set in Period Control as well as falling within the FORECAST area.
Incomplete and erroneous templates (i.e. those that have been created using a rule wizard despite not all pages of the wizard being valid at the time) cannot be applied. These are shown in the column V with a stopp in the rule template overview. A set containing an incomplete or erroneous set will itself be considered incomplete, shown in red and unable to be applied. (This does not apply if the incomplete template has been disabled. See below.) In addition to the incomplete / incorrect rule templates, there will also be rule templates that are not displayed as faulty in the column V, but are still not used in the scenario. Only when the rule templates are applied will system-side routines reach the conclusion that perhaps one / several rule templates are not (usefully) applicable or should not be used in this scenario. Which of the rule templates were not applied and for what reasons will be summarized and displayed in a report following their application. These reasons can include the following, for example:
The "Open Template..." menu option opens a highlighted rule template in the associated rule wizard. A template can also be opened by double-clicking it or using the "Enter" key.
The context menu also contains options to "Delete" "Copy" and "Cut out" highlighted rule templates and sets. Rule templates/sets that have been copied or cut out can be reinserted at any point in the set hierarchy using the "Paste" function. To do this, the desired destination set must first be selected. If nothing is highlighted, the rule template will be pasted to the top level. "Rename..." allows templates and sets to be renamed; no two templates within a set can have identical names. "Create Set..." creates a new set within the currently highlighted set. This opens a dialog prompting for the name of the new set. If nothing is highlighted, the set will be inserted at the top level.
Rule templates and sets can be "disabled". Disabled templates are not included when the set in which they are located is applied. Disabling a set will disable all templates and sets contained within that set. Disabled sets and templates are displayed in grey on the panel. Disabling an erroneous template (displayed in red) means that the set will be able to be applied while still containing the template.
Comments can be added to rule templates and sets. In addition to entering the comment when defining the rule template in the rule wizard, it is also possible to add comments at a later time. To do so, highlight the desired rule template or set and select the "Edit Comment..." option from the context menu. In the dialog that appears, the comment text can be entered or a previous comment text can be edited. The comment is limited to 500 characters. The comment, along with the date and user name, is also displayed as a tooltip when hovering over the rule template. When a rule template is applied, the business cases this creates will be given the same comment as the template. Please note that subsequently editing the comment of a rule template will not affect the comments of the business cases created. To do so, the comment of the Applied Template must be edited. To delete comments, select the "Delete Comment" option from the context menu. This function can be used on several rule templates at once.
Rule templates and sets can be exported to and reimported from files. In the hierarchy, highlight the rule templates and sets to be exported and select the "Export Rule Templates..." option from the context menu. A dialog will appear requesting the name and destination folder of the export file. If only a single rule template or a single set is selected for export, its name will be automatically set as the file name. Rule export files are automatically given the extension ".rtp".
To import a template, select the desired destination folder. A complete rule template set that has been exported to a file can be reimported at the top level of the rule template hierarchy. Select the "Import Rule Templates..." option from the context menu and select the rule template file from the dialog that appears. Please note: At present, only rule templates exported with the same release version of IDL Forecast can be imported! Click the "OK" button to import the rule templates contained in the file, including sets. To import successfully, all accounts and periods in the rule template must be available. If this is not the case, an error message will be displayed and the rule template will not be imported. If necessary, the required objects will have to be created in the KTO and ABR applications. Sometimes, the set selected for import will already contain rule templates with the same names as those to be imported. In this case, a dialog will appear asking whether the existing rule templates should be overwritten or the rule templates should be imported under a different name.
The "Create Set Structure" option in the context menu can be used to automatically create a set structure. The user can select whether this will be done in line with the companies created in the GES application or the report structure of a scenario. This provides a quick way of creating a clear set structure in which to sort the rule templates. This option must be selected by calling the context menu from the set within which the sets will be created. It is also possible to select several sets. In this case, the set structure will be created within each of the selected sets. In the window that opens, the user must first specify whether the set structure created should reflect companies or positions. The companies or positions for which a set will be created must then be specified in the panes below. To simplify the process, buttons are provided to highlight all companies or positions shown and to delete all selected items. Below these panes, the user is able to specify how the sets are named: The user can choose whether the company/position number should be placed at the front of the name as well as whether the short or long text of the company/position name should be used. Click "OK" to create the folders according to the specifications entered. This may take some time depending on the size.
In the interest of clarity, it can occasionally be useful to display just one set at a time. To do so, highlight the set required and select "Show Only This Set" from the context menu. The set will be shown on the panel as if it were the top folder of the rule template tree. A status bar showing the name of the set is also displayed in the upper area of the panel. Clicking the "Show parent level" button (icon: upwards arrow) shows the next highest set in the hierarchy. Clicking the "Show template tree" button (icon: three upwards arrows) restores the overall view of the rule template tree.
The "Properties..." context menu option opens a window with additional information about the selected rule template. This includes the creator, time of creation and last modified time of the rule template. (Please note: When a template is copied or imported, the last modified time remains the same while the time of creation is set to the time at which the template is copied or imported.)
The Applied Templates panel is very similar in structure to the Rule Templates panel. When a rule template is applied in a scenario and rules are created from the template, a copy of the rule template is made and displayed on the Applied Templates panel. The process also duplicates the set structure found above the rule template. The date and time at which the rule template was applied is displayed next to the name of the applied rule template. Rule templates that were not created via a rule template, rather directly from a rule wizard, also produce an "applied rule template" that is shown on this panel. These rules are displayed in a special "From rule wizards" set tree.
As a result, for every rule applied in a scenario there is an associated rule template on the Applied Templates panel. The rule templates on this panel can be opened in the relevant rule wizard in the same way as all other rule templates. This allows the user to check the settings of every rule via the wizard, even if the original rule template has since been modified or deleted.
Please note: If a user opens an applied rule template in the wizard, makes changes and clicks "Use" again, the previously created rule will not be changed! Instead, another new rule will be created containing the modified settings!
When a rule template is applied, its comment is copied to the "applied rule template". Changing this comment in the applied rule template will not change the comment of the original rule template. However, doing so will change the associated applied rule in the overview of the Business Cases panel.
The properties dialog for an applied rule template shows the time at which the rule template was created and the user who created it. It also displays the total number of business cases that were created when the rule template was applied. The "Modified" indicator shows whether the number of business cases created from the rule template has since changed.
The "Delete All Business Cases" option in the context menu of the Applied Templates panel allows the user to delete all business cases created from the rule template. This function can be applied to entire sets. This also provides an easy way of reversing the deletion of rule templates without using the "Undo last input" function.
The "Filter function" and "Sort function" buttons in the integrated toolbar work in the same way as the corresponding functions on the Rule Templates panel.
Display information on the templates applied: This can be done by right-clicking on the table header and the table columns marked will inform you of existing intercompany information (Column I), comments (Column K), or any parameters used, but also whether any parameters might be missing (Column P). Missing parameters will be shown by a "Warning.+ Besides, information on the area of application (Column Area) of a rule template that is being used will also be shown. The following information will be displayed in the area column, depending on how the rule templates were used:
| Apply rule templates/tables ... | "Area" applied template: |
|---|---|
| ... for all periods | All periods |
| ... for FORECAST | FORECAST |
| ... for PLAN | PLAN |
| ... for the periods chosen | for example, 06/2013 + 12/2014 |
Please note: Periods selected that do not follow each other chronologically will also be displayed as time periods in "Area."
If a rule template is selected on the Applied Templates panel, all associated business cases created from that rule template will be shown on the Business Cases panel. Conversely, if a business case is selected on the Business Cases panel, the applied template from which the business case was created will be selected. The tree will be expanded accordingly. This provides a simple way of viewing the relationships between business cases and applied rule templates.
If the use of a rule template is undone or the last remaining business case created from a rule template is deleted, the corresponding applied rule template will be removed. This will not apply to any sets that have been created. Sets that are no longer required will only disappear from this panel after the next save.
The Business Cases panel allows the user to view the applied rules and business cases within the scenario. The business cases are displayed in a tree structure on the left side of the panel. If a business case is highlighted on the left-hand side, information relating to it will be displayed on the right.
The business cases displayed depend on the display mode in operation, which is indicated in the space between the buttons on the left and the filter row on the right. Cell mode displays all business cases that have an effect on the cells currently selected in the planning form. Rule templates mode displays the business cases that were created from the rule templates selected in the Applied Templates panel. Search result mode displays the business cases that contain the search string entered in the filter row. If a cell or rule template is selected or a search string is entered, the Business Cases panel automatically switches the mode accordingly. For this reason, the Business Cases panel will usually show the business cases associated with the most recently selected planning form cell or Applied Templates rule template. Users may occasionally wish to keep viewing the currently displayed information, even when another cell or rule template is selected. In this case, the synchronisation can be switched off by disabling the "Synchronise with table area" option (icon: two arrows). The currently displayed business cases will then remain in view until the option is switched back on.
The filter row allows the user to search all business cases that have been created in the current scenario. The search is not limited to business case names; the user is also able to search by account number, period and fact. For example, searching by account number lists all business cases that have an influence on the account in question. Users can also use wildcard characters in the search: ? for an individual character and * for a string of characters.
The business cases are displayed as a tree structure. A business case group is usually shown at the top level. All business cases created from the same rule template will appear in one group, named after the rule template. The group will normally contain one business case for each period in which the rule template has been applied. For certain types of business case, dependent business cases (e.g. payment components) are in turn displayed within their parent business case. Typically, when a cell is selected in the planning form, not all business cases belonging to a group will be associated with that cell. Despite this, the user is able to select whether all business cases belonging to a displayed business case group should be shown or only those business cases that relate to the selected cell. This setting is operated via the button on the far left (icon: tree structure).
The "Rename" option in the context menu of the business case tree allows the user to rename business cases and groups. "Open in Wizard" opens the applied rule template from which the selected business case was created in the relevant rule wizard. Please note that none of these menu options will work on dependent business cases. These cannot be renamed or deleted independently of their parent business case.
If a business case is selected in the tree, all account entries belonging to this business case will be highlighted on the Account panel. The template from which the business case was created will also be highlighted on the Applied Templates panel. This provides a simple way of viewing the relationships between account entries, business cases and rule templates.
When a business case is selected in the tree, relevant information is displayed on the right-hand side of the panel. This information is split between four tabs: The "Overview" tab shows a general summary of the business case. This tab displays which accounts are affected by the business case, including the amounts of the affected account entries. It also shows the arithmetical parameters of the business case (e.g. tax or interest rates), as well as the period to which the business case belongs and the name of the Applied Template from which the business case was created. The "Postings" tab shows all posting records that the business case contains, listed in the standard form (i.e. debit to the left and credit to the right). The "Table" tab, which is only available for certain business cases, displays the values of the business case as a tabular overview. The "Comment" tab shows the comment of the business case, if any (Creation or editing of comments is not possible from this screen. This can be done from the Applied Templates panel.). The precise information shown in the four tabs depends on the type of business case.
In a plannning scenario, there are basic steps required in IDL Forecast to create an initial basis for planning or to update a scenario, for example. In general, identical steps will be repeated for each company or business unit. In order to optimize the planning process for multiple companies or business units, basic steps can be summarized as planning steps in a Forecast Sequences (PA) and configured using Forecast Sequences Parameters (PAPAR). These planning processes can be processed for several companies and business units as a whole via the Forecast Monitor (PM). The Forecast Monitor displays the status of the steps performed for a selected scenario for each company or business unit.
A documentation on this topic can be openend via the Forecast Monitor .
The forecast log application (PLANLOG) initially informs you of all of the planning steps performed for a scenario in the planning monitor (PM) by providing you with information on users, point in time, running time, and information on errors and warnings. Furthermore, the processing logs that were shown during execution of the process can be called up again with this application. If desired, the application also logs the user+s directly executed actions between loading and storage of a scenario, in the planning application IDL.FORECAST (PLAN), but only the action itself and not the details.
A documentation on this topic can be openend via the Forecast Logs .
The Balance Differences view lists all of the account, controlling and IC balances currently present in the loaded scenario that differ from the balances stored in the IDL Konsis applications KTOSAL, CNTSAL and ICKTOSAL. This provides a quick overview of the differences in the data currently held by IDL Forecast and IDL Konsis. This panel can also be used to refresh individual balances. See section 5.4
The differences are shown in a table. Each row represents a difference in an account, controlling or IC balance. The columns show the relevant account name, the period and fact, the balance in the scenario, the balance in the IDL Konsis application, as well as the creator and last modified date of the IDL Konsis balance. For controlling and IC balances, the affected controlling objects/IC companies are also shown.
If a source fact has been selected for the FORECAST and/or PLAN data area that differs from the target fact, the difference view allows displaying either the differences between scenario and source fact or the differences between scenario and target fact. By default, the differences between scenario and source fact are displayed. By clicking the button in the toolbar (icon: target) the view can be switched to display differences between scenario and target fact.
To avoid delays, the differences do not refresh automatically. Instead, the view must be refreshed manually by clicking the refresh button in the toolbar (icon: green and red arrow). A warning displayed at the bottom of the panel lets the user know if values have been changed in the planning form since the view was last refreshed. By accessing Extras / Options / IDL FORECAST / "Automatic balance differences", the user can configure this view to automatically update the list of differences after loading and saving a scenario and/or after refreshing balances.
The Balance Differences view also contains an option to mark cells in the planning form with a yellow icon if they contain balances that differ from those in the IDL Konsis database. This function can be toggled in the toolbar of the panel.
The view also contains several filter options: Using icons in the toolbar, the user is able to show and hide differences in account, controlling and/or IC balances. By default, only account balances are shown. A more detailed filter can be applied using another button in the toolbar (icon: funnel with yellow icon). This opens a filter window in which the facts and periods to be displayed can be selected on the left-hand side, and positions and accounts can be selected on the right-hand side. Please note: The filter restrictions on the left and right-hand sides have a cumulative effect, meaning balances will only be shown if they meet the criteria selected for both facts/periods and positions/accounts. The user can identify whether the filter is applied by the presence of an icon showing a funnel with a green tick in the toolbar. An applied filter can be switched off by clicking the button showing a funnel with a X. (The filter can later be reapplied in the filter window without losing the filter settings.) Additionally the regular table filter can be used to filter the differences table. As usual, this filter is activated via the button with the funnel symbol (without the yellow icon).
The Balance Differences view contains an option to update the balances displayed in the planning form with the corresponding balances from the KTOSAL, CNTSAL and ICKTOSAL applications. To do so, highlight the balances to be updated in the table and then select "Update in Scenario" from the context menu. There is also an option to refresh all balances currently shown in the table on this panel. To do so, click the relevant button in the toolbar (icon: two arrows on square background) and confirm when prompted. After balances are updated in the Balance Differences view, these will usually be refreshed automatically.
In Release 2013.0, this functionality was not yet a working window of its own, but rather a menu action entitled +check for missing/duplicate rules.+ The plausibility check is displayed first as an additional tab in the working space +business cases+ / +balance deviations+ and can be called up and moved as an independend working window. The plausibility test shall identify potential sources of error in the scenario in order to check and correct them, if necessary. The following causes can lead to an error / message in the plausibility check:
The possible sources of error for a scenario are presented in the form of a table. Each line corresponds to one source of error / inconsistency. Other related information is displayed in the columns. This information includes, among other things, the account name, fact and period to locate the source of error. If a line is marked in the plausibility check, the affected account will be selected in the planning form and the account details, for example, can be examined. The columns: Name of the rule / change, value, intercompany and cause provide information about the reason and origin of a source of error. The reason can usually be found in the +cause+ column (for an explanations, please see previous list) and the origin in the column +name of the rule / entry.+ This shows whether an inconsistency comes from a rule template that has been applied, an +automatic entry+ or an +account entry.+ If rules are to be used at the intercompany level, the column +intercompany+ will show whether there is an error source from intercompany accounts. If the value of an inconsistency can also be analyzed, this will be displayed in the column of the same name.
If there are any changes in the scenario or the plausibility check is called up for the first time, the display needs to be updated. This is done by using the icon +double arrow+ in the integrated toolbar. If an update is necessary, this will be indicated by a warning message at the bottom of the working window. If no warning message appears then the display of the plausibility check is up to date. If the display remains blank, this means the system hasn+t recognized any sources of error in the scenario that is currently open.
A filter line (symbol: funnel) can also be added for the plausibility check via the integrated toolbar. Thus, the information selected from the various columns of the table can be filtered in the display of the plausibility check.
The table area can be extended to include yet another planning form, the liquidity report. By starting off with an initial amount of cash and cash equivalents, you can derive a possible final value of cash and cash equivalents for each period via cash-in and cash-out accounts.
Before developing a liquidity report, the user uses the wizard to define which accounts are included in the opening balance and which accounts should be taken into consideration as cash-in and cash-out accounts. Because the liquidity report is not a report in the sense of IDL Konsis that otherwise needs to be selected when setting up a scenario, the liquidity report can be added at any time, regardless of the framework conditions of the scenario. Nevertheless, this means that no report is stored in the form of a liquidity report in IDL Konsis.
1. Preparing a liquidity report
The wizard for use in preparing a liquidity report can be called up by using the integrated toolbar in the work area "Table storage" (Symbol: table grids). This work area is initially located in the right sidebar.
The liquidity report is issued a name to start with in the upper left of the field marked "Name." The wizard then further divides itself into two areas; on the left side, there are three entry fields that accounts can be allocated to. The first entry field refers to "Accounts with opening balances," the second entry field is used to assign normal "Cash-in accounts" and the third "Cash-out accounts." The accounts that can be allocated are located on the right. If accounts are divided due to different planning forms, for balance and pl, for instance, you can select which accounts should be displayed in the tree structure in the list box above it. The account allocation for the respective entry field is performed either by marking accounts/positions and assigning using the "left arrow" or via drag&drop. If accounts are to be deleted from an entry field, this is done by double-clicking on the accounts you would like to delete. Furthermore, accounts can be moved from one entry field to another by using the drag&drop technique.
The liquidity report can be defined on a customized basis through this account allocation. This means the user is responsible for making the decision on the contents and significance. Regardless of this, please find below a few examples intended to provide you with an initial sense of orientation.
The following accounts can be assigned to the positions in the wizard to obtain a more simplified view of liquidity.
With this way of looking at things, you presume that sales and expenses are payable immediately. Possible changes in the level of claims and liabilities will not be taken into consideration, neither will changes in stock levels.
If, however, only 70% of the sales revenues have actually been paid, and 30% remain as claims, a 100% "cash-in" notice in the full value of the sales revenue wouldn+t actually be correct. Sales revenues (Credit +) would then need to be corrected by these 30%. The 30% is contained as a change in the liability that has resulted in the creation of a claim (Debit -) in this particular case. This case is only one example and can also be displayed for material expenses and liabilities, for instance. If, for example, only 60% of the material expenses have been paid and 40% remain as an outstanding liability, then showing 100% "Cash-out" in the full amount of the material expenses wouldn't be right either. The material costs (Debit -) would then need to be corrected by 40%. These 40% are contained as a change in the liabilities that have resulted in the creation of a liability on this topic (Credit +) and therefore represent a loan. If, for instance, all of the liabilities had been paid in the next period, this would have resulted in a reduction in liability (Debit -) that results in a "Cash-out."
Important: This means, on the one hand, that changes in the balance in DEBIT will have a negative effect (Debit -) on the liquid closing balance and changes in CREDIT will have a positive effect (Credit +). On the other hand, it also means that a pl account balance in CREDIT has a positive effect (Credit +) and a balance in DEBIT a negative effect (Debit -) on the liquid closing balance. PL accounts are generally quite clear with respect to the Debit/ Credit code, unlike changes in balance accounts. These can be in both DEBIT as well as CREDIT. Therefore, it will depend on the DEBIT / CREDIT code of the balance account change as to whether the liquid closing balance needs to be added or subtracted.
If such balance changes are to be taken into consideration, the above way of viewing them needs to be expanded:
Please Note: If changes in the balance sheet depending on the debit/credit tag are to be reported automatically in "Cash-in" or "Cash-out, these balance accounts must assigned twice in both "Cash-in" and "Cash-out.".
The way of viewing this can be individually further refined, if, for example, additional cash-relevant pl accounts are to be taken into consideration that are contained in other operational income (cash-in) or other operational expenditures (cash-out). It is up to the user to define and interpret these. PL accounts that are not cash-relevant, like additions to provisions, latent taxes, and write-downs should not be allocated.
If there are pl accounts with Debit/Credit control (these will be displayed in the cells of the planning form by two reciprocal arrows), the balance based on position and account allocation (POSKTO) according to IDL Konsis will be shown as either revenue or expense depending on the Debit / Credit tag. Such pl accounts can be reciprocally shown as either "cash-in" or "cash-out" in the liquidity report. The respective accounts are to be assigned once to the "cash-in accounts" and once to the "cash-out accounts."
Once all of the desired accounts on the left side of the assistant have been allocated, you can exit by pressing "insert" and a new planning form will be created in a new tab in the table area. You can close the assistant by entering "cancel" and a new liquidity report will be created. More than one liquidity report can be produced.
Please note: If a new liquidity report has been produced and you closed the scenario without saving it, you will lose the liquidity report! The liquidity report is not transferred to IDL Konsis when you write a scenario.
2. Edit liquidity report
To edit a liquidity report, the wizard for creating a liquidity report must be called up first via the integrated toolbar in the working window +table repository+ (symbol: table grid). Subsequently, an existing liquidity report can be displayed and edited in the wizard via +load liquidity report.+ The loaded liquidity report can be overwritten with +Update.+ If only the name of a liquidity report needs to be changed, this is done in the same way. Following this procedure, a loaded liquidity report can also be used as a template. In order to obtain the loaded liquidity report and create a new changed liquidity report, the wizard must be closed with +insert+ instead of +Update.+ If the wizard is closed with +cancel,+ no liquidity report will be changed or created.
Please note: If a liquidity report was edited and the scenario completed without it being saved, the changes in the liquidity report will also be lost!
If not all liquidity reports (if there are more than one) should be displayed as planning forms, they can be hidden. All available tables / planning forms are displayed in the working window +table repository+ and an +eye+ can be seen before the name. If this is not crossed out, the table will be displayed as a planning form in the scenario. If the +eye+ is +crossed out,+ however, the table will not be displayed as a planning form. The table can be shown or hidden by double-clicking on the table name.
3. Sign / calculation logics of the liquidity report presented
The above examples explained what payment effect the debit / credit tag will have on liquidity. This is shown once again quite clearly in table 1:
| Liquidity payment effect | Soll | Credit |
|---|---|---|
| Change in active accounts = BG 1 | negative | positive |
| Change in passive accounts = BG 2 | negative | positive |
| Balance in revenue accounts = BG 3 | negative | positive |
| Balance in expense accounts = BG 4 | negative | positive |
BG = Balance and pl codes based on account or position master IDL Konsis: 1 = Assets / 2 = Liabilities / 3 = Income / 4 = Expenses.
If balance accounts are to be assigned to a "cash-in or cash-out account" in the liquidity report, only the change from the opening balance to the closing balance will be taken into consideration, not the entire account balance. The entire account balance from pl accounts will be used.
In contrast to the logic shown above, the balance accounts that are allocated to the "accounts with opening balances" in the liquidity report will only be taken into consideration in terms of their opening balance and will have an effect on liquid funds as shown in table 2 :
| Liquidity payment effect | Debit | Credit |
|---|---|---|
| Opening balance of active accounts = BG 1 | positive | negative |
| Opening balance of passive accounts = BG 2 | positive | negative |
Please note: If there are no opening balances, as in the first ACTUAL period, for example, derivation of liquidity will be inconclusive / inaccurate.
The logic (according to table 1 and 2) deviates from the way in which the balance and PL are normally displayed in the system. In a balance, both the assets and liabilities will be shown to be positive. Claims will be shown as DEBITS and be displayed as positive. Negative claims will show a CREDIT balance and would actually be liabilities. The same applies for liabilities: liabilities are presented as CREDITS and shown to be positive. Negative liabilities indicate a DEBIT balance and are really more of a claim. The fact that assets and liabilities can both be shown to be positive, despite a different debit/credit code, has to do with the balance and pl code (BG) of the account, see table 3:
| Balance / pl report statement | debit | credit |
|---|---|---|
| Account = BG 1 = assets (typically on the debit side) | positive | negative |
| Account = BG 2 = liabilities (typically on the credit side) | negative | positive |
| Account = BG 3 = income (typically on the credit side) | negative | positive |
| Account = BG 4 = expenses (typically on the debit side) | positive | negative |
The statement of the sign in particular will depend on the balance and pl code (BG) of the position the account has been allocated to. If the BG code is the same for account and position, the statement of the code will remain at the position level in accordance with the account. If accounts from a position with a deviating BG code are to be allocated, the statement of the code on the position level will change although the debit/credit code of the account balance hasn't changed.
Example: if earnings and expense accounts with the typical BG code are defined in the account master (earnings accounts = BG 3 / expense accounts = BG 4) and the pl position is also set up in a standard manner (sales = BG 3 / material expenses = BG 4 / write-downs = BG 4 / etc.) the statement in the pl report will generally be positive for both earnings and expense accounts. If, on the other hand, all pl positions, for example with the BG code 3 are defined, earnings will normally be shown to be positive and expenditures negative in the pl report.
The liquidity report combines both of the logics listed above in one report. There are accounts/positions taken from the normal balance and pl and therefore show the balance/ pl report statement based on table 3. Furthermore, there are liquidity positions that ultimately show the effect of payment in order to be able to determine a final balance in terms of liquid resources in accordance with table 1 and 2. Table 4 (the last column) shows which logic a conclusion can be made on with respect to the sign on the debit/credit code:
| Positions in the liquidity report | Balance / pl positions, Accounts | BG | Keys | Calculation | Sign according to |
|---|---|---|---|---|---|
| 1. Opening balance | 1 = Credits | OPENING | plus OPENING 1 minus OPENING 2 | Table 2 | |
| 1.1 Opening balance credits | 1 = credits | OPENING 1 | Sum | Table 3 | |
| 1.1 allocated active accounts | 1 = credits | Table 3 | |||
| 1.2 Starting balance debits | 2 = debits | OPENING 2 | Total | Table 3 | |
| 1.2 allocated passive accounts | 2 = debits | Table 3 | |||
| 2. Cash-in positions | 1 = Credits | CASHIN | plus CASHIN-B plus CASHIN-G | Table 1 | |
| 2.1 Cash-in balance | 2 = debits | CASHIN-B | plus passive accounts minus active accounts | Table 1 | |
| 2.1 allocated active accounts | 1 = credits | Table 3 | |||
| 2.1 allocated passive accounts | 2 = debits | Table 3 | |||
| 2.2 Cash-in pl | 3 = earnings | CASHIN-G | plus earnings account minus expense accounts | Table 1 | |
| 2.2 allocated earnings accounts | 3 = income | Table 3 | |||
| 2.2 allocated expense accounts | 4 = expenses | Table 3 | |||
| 3. Cash-out positions | 1 = credits | CASHOUT | plus CASHOUT-B plus CASHOUT-G | Table 1 | |
| 3.1 Cash-out balance | 2 = debits | CASHOUT-B | plus passive account minus active accounts | Table 1 | |
| 2.1 allocated active accounts | 1 = credits | Table 3 | |||
| 2.1 allocated passive accounts | 2 = debits | Table 3 | |||
| 3.2 Cash-out pl | 3 = income | CASHOUT-G | plus income account minus expense accounts | Table 1 | |
| 2.2 allocated income accounts | 3 = income | Table 3 | |||
| 2.2 allocated expense accounts | 4 = expenses | Table 3 | |||
| 4. Closing balance | CLOSING | plus OPENING plus CASHIN plus CASHOUT | Table 1 |
The columns "Positions in the liquidity report" and the respective columns "BG"; "Keys" and "calculation" pertain to the fixed structure of the liquidity report and cannot be changed. Usually, not all of the application possibilities with respect to the column "balance / pl positions, accounts" can be exercised using the assistant, therefore the liquidity report will be shortened by "balance / pl positions, and accounts" that are not included in it. In the assistant, accounts will only be allocated to the liquidity positions "accounts with opening balance," "cash-in accounts" and "cash-out accounts" initially. The respective balance/pl position will be added to this account in the liquidity and a tree structure will be created that follows the following hierarchical pattern: liquidity position > balance / pl position > account. The "closing balance" is the sum of the main positions in the liquidity report and presents the intended closing balance of liquid resources. If this is negative, there is a shortfall. If, on the other hand, it is positive, there is a surplus.
This part of the documentation shows all of the chapters necessary to do "step-by-step" intercompany planning (with rules on IC balances):
Furthermore, so-called IC Counter-Planning can be performed to transfer planned IC revenues and IC expenses to other IC companies across companies. A documentation on this topic can be accessed via IC Counter-Planning.
The IDL Konsis permissions system is supported universally throughout IDL Forecast and IDL Konsis. The global settings apply across all applications.
The multi-tier permissions concept used manages the locking of balances and access to certain master data objects. Implementation of the permissions concept requires all users to be sorted into user groups. This can be carried out in the 'BEN' master application. Permissions are defined for user groups, meaning that individual users receive the permissions for their respective (user) group. As a minimum, one user can be assigned to one user group.
A more in-depth description of user groups can be found in 'Users and permissions'.
Menu permissions can be used to hide or lock features, applications or parts of applications, for specified user groups (see 'BENMEN'). E.g. in the KON MEN PLAN object in BENMEN, the Display permission must be set to 0. To make IDL Forecast available for a user group, all rights must be set to 1. (Though it is only necessary to set the Display permission at present, it is advisable to set all rights in case of future expansions.)
For IDL Forecast, this means that this applications can be disabled for certain groups.
| Anwendung | Menü-ID |
|---|---|
| Forecast Monitor | KON MEN PM |
| Planning Application | KON MEN PLAN |
| Forecast Sequences | KON MEN PA |
| Forecast Sequence Parameter | KON MEN PAPAR |
| Forecast Logs | KON MEN PLANLOG |
Additionally, the following features / parts of the application can be toggled separately for a user group:
| Function | Menu ID |
|---|---|
| Intercompany Planning | KON MEN ICGP |
| Scenario lock / unlock | KON MEN PLANLOCK |
| Convert Forecast Data | KON MEN PLANMIGRAT |
| IDL FORECAST Options | KON MEN PLANOPTS |
| Refresh Planning Form Balances | KON MEN PLANREFREP |
| Create a new top-level rule directory | KON MEN PLANRULDIR |
| Create a new scenario | KON MEN PLANSZEN |
Object permissions in IDL Konsis recognise a range of object types for which a permission can be set. Like menu permissions, object permissions are assigned on a user group basis. In particular the following object types are relevant to IDL Forecast:
| Object type | Abbreviation | Use in IDLForecast |
|---|---|---|
| Scenario | --- | The rights display, change and delete can be defined for scenarios. Scenarios without rights will not be displayed in the scenario selection window. |
| Rule | --- | The rights display, change and delete can also be defined for scenarios. If the right execute is not assigned then no rule templates can be used in the scenario. Individual rule templates or entire rule template files can be assigned. |
| Fact | FAC | Each scenario contains either 2 or 3 facts. When a new scenario is created, the only facts available in the Scenario Wizard will be those for which the Display permission is set. If a scenario has already been created with a fact for which the user does not possess the Display permission, it will be greyed out and will not open. If the user does not possess the Modify permission, the scenario can be loaded, but the facts in question will be locked against editing. |
| Accounting period | ABR | In the Scenario Wizard, only accounting periods for which the user possesses the Display permission are offered. Additionally, only scenarios for which Display permissions are present for all periods can be loaded. |
| Company | GES | Scenarios can only be opened for companies for which the user has the Display permission. Balances cannot be edited unless the Modify permission is set. |
For object permissions to be used for a user in the first place, they must first be unlocked/enabled for the individual object types in 'VORADMIN'. When doing so, the data permissions for the various object types must be set to 2 (data permission as per BENDEF or BENABR). If 0 (as per VOR) is selected for facts or account periods, no scenarios can be created or loaded.
When balances are saved, the existing permissions are re-examined. If permissions are not (or no longer) present, the balances are not saved as a result.
Please note: Object permissions (e.g. facts, companies, scenarios, rules) are configured in the 'BENDEF' application. For accounting periods, the 'BENABR' master application must be used.
Balance locks always apply to all users and thus cannot be assigned to user groups or controlled. The lock can be set in the "Company Financial Statements + Monitor" application, 'EA' (this application can be called from within the current software (see section 5.30)). Locks can be applied per period, per fact and per company. If a period is locked, all IDL Konsis data in that period can no longer be edited.
More detailed instructions for locking in IDL Konsis can be found in the 'Locking functions' documentation.
A period of validity can be specified for facts, companies, business units and accounts. A period of validity must contain a starting period can also include an end period. This end period is optional. In each single-block application, the period of validity is defined by entering a period. The Valid from input field is an adjustable minimum, while Valid until is an optional field.
For example, if a period of validity is set for a fact, all balances outside of that period will be locked against editing. Periods of validity on companies and business units affect all facts in equal measure, with priority given to shorter periods of validity.
For accounts, the lock caused by the period of validity does not affect entire periods, only the relevant data cells of the planning interval.
Locks and permissions are generally displayed in another colour with grey text.
Please note: Where locks are applied due to periods of validity, non-editable planning form cells that contain a balance are additionally identified with a warning triangle. This is to alert the user to the fact that despite the "Lock", the values can still be deleted outside of the valid data area by using the "Delete" key. This function is permitted in order to give users the opportunity to delete invalid balances.