This application allows you to enter fixed asset transactions with the help of forms. The keys Company, Period, Type of Data (Fact), and Business Unit, if necessary, must be entered clearly. Entering data for various types of these keys simultaneously is not possible. Furthermore, you need to preset a sorting option and a column option. You'll find further details on this topic in the next chapter 'Selection Possibilities and additional input fields' . The display can be limited by entering the optional fixed asset object. By entering a language, you will be able to control whether the fixed asset objects and other positions are given names in a different language than that of the user.
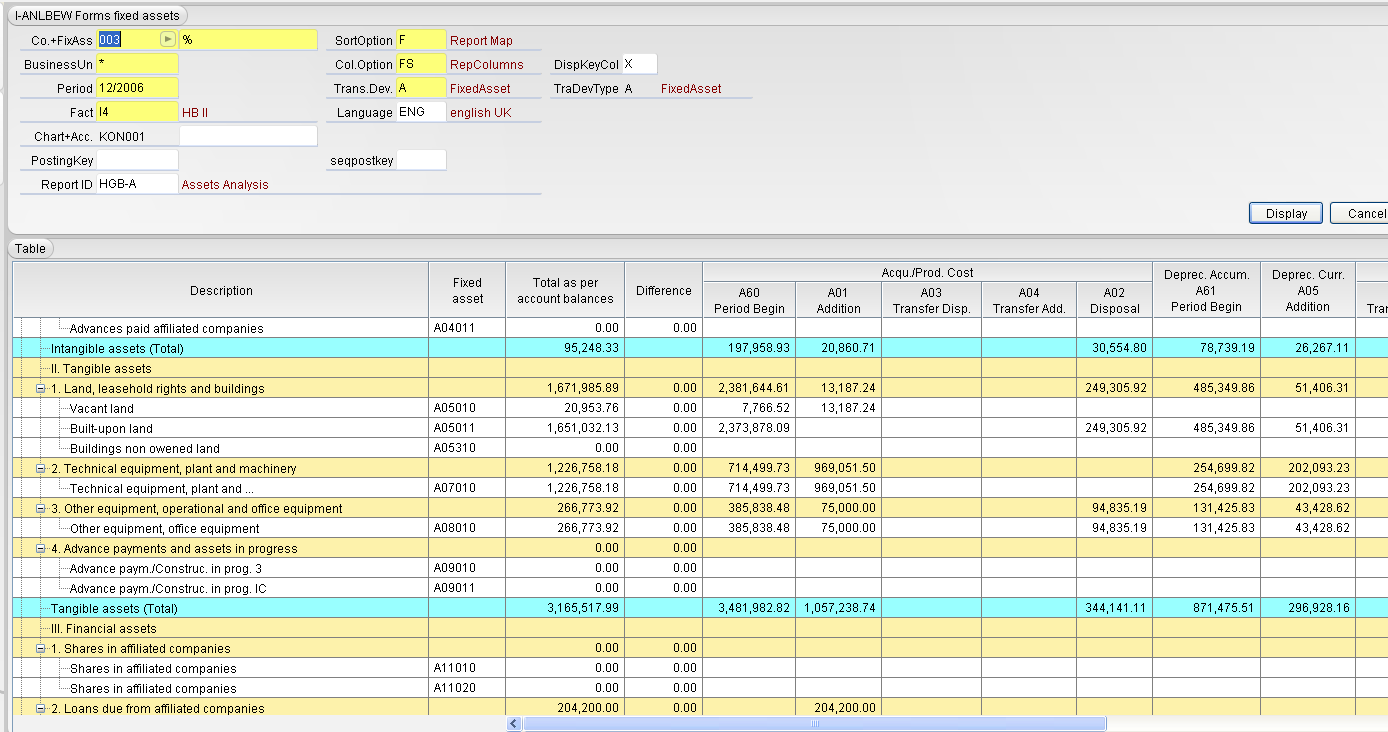
Image 1: Overview Form Entry Fixed Asset Transactions
The forms entry application for fixed asset transactions is subject to some restrictions caused by the introduction of accounts for value adjustment for the company financial statement:
Only one fixed asset object (i.e. the standard fixed asset with key = prefix + account number) is displayed per fixed asset account contained in the report structure. If such a fixed asset object was provided with a value adjustment account, then the fixed asset transactions on this value adjustment account are shown at this fixed asset object providing a difference between the total of the fixed asset transaction and the account balance displayed as comparison value. Therefore it is suggested to enter value adjustment accounts only for fixed asset objects individually defined in addition.
=> The form entry application for fixed asset transactions should not be used for fixed asset objects with entry of a value adjustment account.
You can find the application in the menu trees (resource tree and quick starter) below the menü <Master files>, below the submenü <Company financial statements / Entry>.
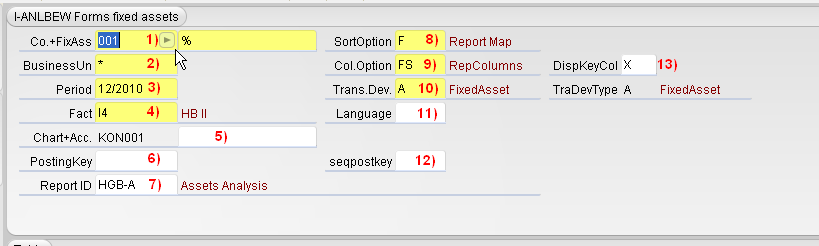
Image 2: Selection Possibilities
[ 1) Co +FixAss ]: Obligatory input fields for entering the company whose fixed asset transactions are to be maintained, as well as a predefined fixed asset object. If all of the fixed asset objects are to be processed, it is recommended that you use the entry ?%?.
[ 2) Business Unit] : Obligatory field: If necessary, a business unit may be entered, otherwise <*> for ?without business unit?.
[ 3) Period ]: Obligatory field for entering the periods you would like to work on right now.
[ 4) Type of data (Fact)]: Obligatory field for entry of the data level that is to be worked on right now.
[ 5) Chart+Acc] Here, the entry can be optionally limited to one account
[ 6) PostingKey]: Here, the entry can be optionally limited to one posting key
[ 7) Report ID ]: Here, with SortOption <F> you must enter a reporting scheme (asset analysis). Careful: The Report ID entered as the preset value is always used here, even if this does not correspond with asset analysis. Nevertheless, it is limited to positions with the BILGUV code 1 for "Assets". In the master data table for report idents (RID) a "Flag report default" of a transaction development report can be set. This flag is evalueted by the entry forms for Fixed Assets Transactions. If a report exists designated in this way for the selected development, then this report is automatically supplemented in the selection area. Then usually there is no more selection or entry of a suiting report id necessary.
[ 8) SortOption ]: The sorting option controls how the accounts are displayed: <K> presents a simple list of the respective fixed asset objects defined in the chart of accounts. If you use <F> , the account lines in the structure of the positions of the respective transaction development report specified will be displayed - see under 7) 'Selection'.
[ 9) Col.Option]: The column option controls the display and type of entry: <LE> produces a list: a line with the value will be recorded or modified for each account and posting key and an additional empty line will be shown in which another value can be entered in conjunction with a new posting key. This column option is preset if there is no asset posting key with an entry for the "form entry column" in the BSL application. <FS> allows for form entry in columns: only one line is to be filled out for each account. One input field in which a value may be entered or changed is included for each ascertainable posting key (including a column number for form entry in the BSL master). Existing transactions for additional posting keys (automated carry forwards, for example) will be displayed in a column for amounts remaining and added up to a total sum that can be compared with the account balance. This column option will be preset automatically and stored in the BSL posting key application for asset analysis in the form of an entry in "Form entry column". The respective column caption is to also be defined in the application <BSL>.
[ 10) Transaction development]: If you have more than one transaction developments of the transaction development type ?A?, the transaction development that is to be processed should be entered here.
[ 11) Language]: Here, you can select the language in which the sets of data are to be shown, assuming the system supports the respective language.
[ 12) Columns for Forms data entry]: If you are interested in working only on one specific form entry column (that belongs to a certain BSL), you may enter this here so that it alone will be displayed.
[ 13) DispKeyCol]: Analogous to how reporting results are displayed, there is an input field for displaying the key column that is preset with X on a standard basis. If the ?X? is not marked in the column option <FS> then the key for the position, account or fixed asset objects and the lines can only be identified based on the terms.
The keys <TAB> and <ENTER> move the cursor to the next respective cell that is prepared to accept entries. A new line will appear automatically after the last input cell of a cell when you press <ENTER> a new input line will be added to the table for the same fixed asset object. The input line of another fixed asset object can be changed by pressing <TAB> or by using the mouse.
If you have selected the tree structure as the display for the logging applications (SortOption F), this tree will always be shown completely open at the start so that you?ll be able to work on all of the input fields immediately (see image 1). After the action <Save> the display will remain set at its previous position.
With entries made by columns, the sums of the recorded LW values will be stored automatically in sum lines for each fixed asset object. If the values differ from the account balances in local currency, the difference will be displayed in the entry line. Otherwise, no checks will be performed during entry of data.

Image 3: Summation for each fixed asset object and display of the differences to the account balance
After the button for the action <Save> has been pressed, a virtual text file that consists of the data that has been entered will be generated and forwarded to the importing application for storage. This data will be checked here and entered into the database. Existing data will be updated, if necessary. Errors will be reported and displayed in the entry mask by being displayed in the additional columns error field and error message. After the <Save> function has been carried out, the display will remain set at the previous position so that entries can continue on from the position was worked on most recently.
A line that has already been saved can only be deleted in the single block application (ANLBEW). In the form entry section, you can only write over a value that has been entered with 0, which is then retained as a single block with a value of zero.
Additional data, like the date of transaction, posting text, IC company, IC Business Unit, Value and Currency Code, as well as conversion rules in group and parallel currency, can be recorded with the help of the Additional Dialogue function. If additional information exists on a column, this will be displayed with the column option LE by way of a small flag (small red triangle) displayed in the cell. If the mouse remains on one of the cells, existing or additional recorded attributes will perhaps be shown in the tool tip. A double-click onto one of the cells will open up a dialogue box inside which the respective additional attributes can be entered or changed. As an alternative, the cursor can stop at <Tab> to open up the additional dialogue on this cell by pressing the <F5>key. With the column option FS, the additional dialogue can be opened by using the right mouse button.
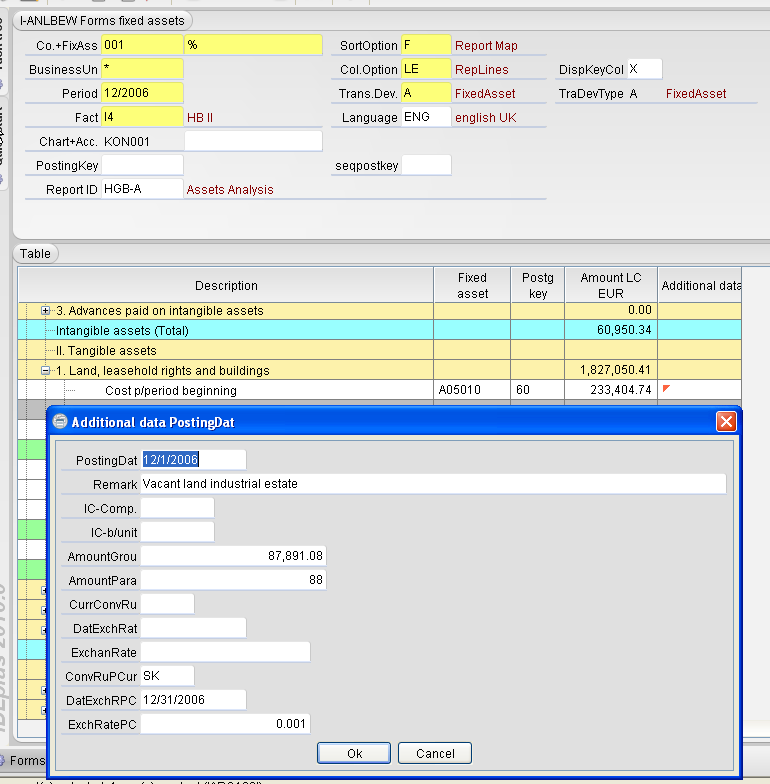
Image 4: Additional Information
Lines or columns of data whose posting keys contain a usage tag will be coloured gray and be made available solely as display data. If, during column-based entry (column option FS), the posting key contains a usage tag in the first column, all of the account terms, fixed asset objects and account balances will unfortunately be shown in a grey colour, nevertheless other columns that do not contain usage tags can still be filled with posting keys.
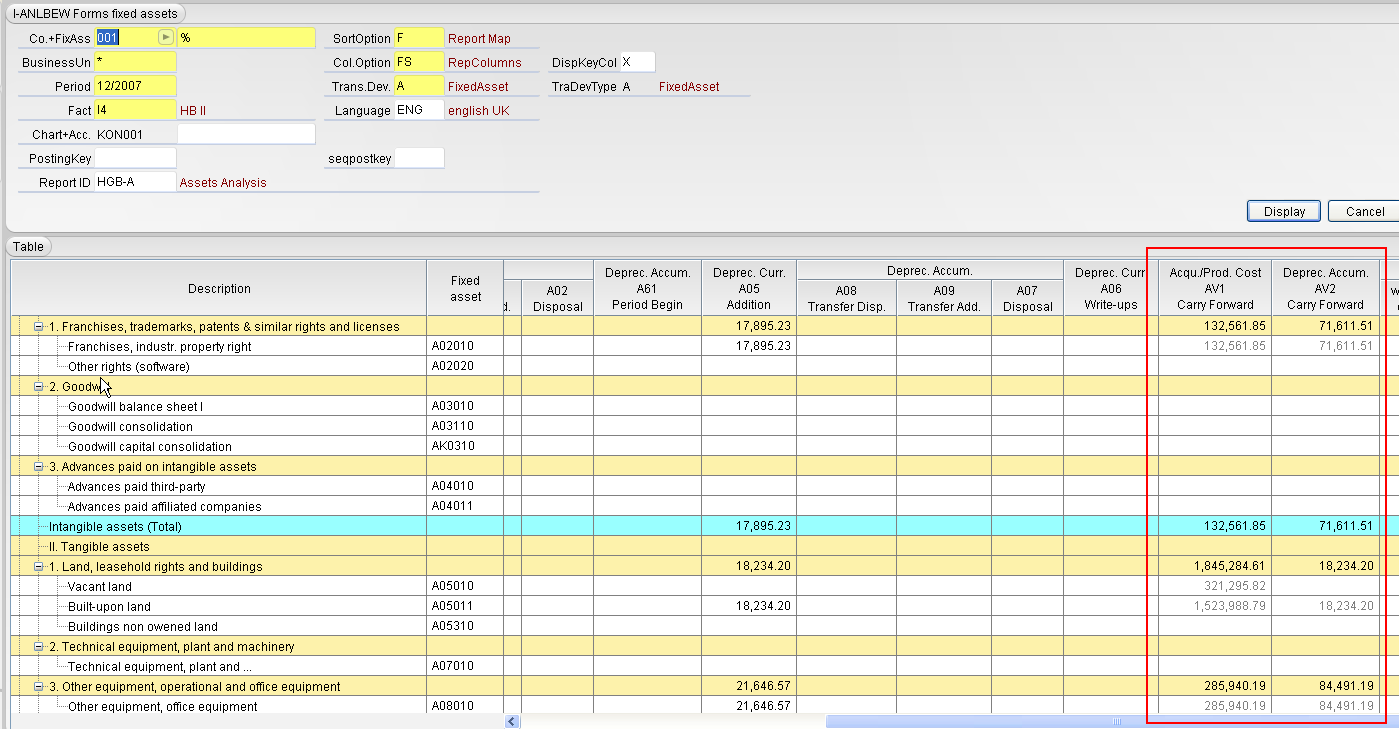
Image 5: Grey coloration of the columns that cannot be filled
You may enter a BSL with a usage tag while filling in the lines, however an error will be reported when you try to save it. Existing transactions that have a BSL with a usage tag will be displayed in grey type and cannot be overwritten.
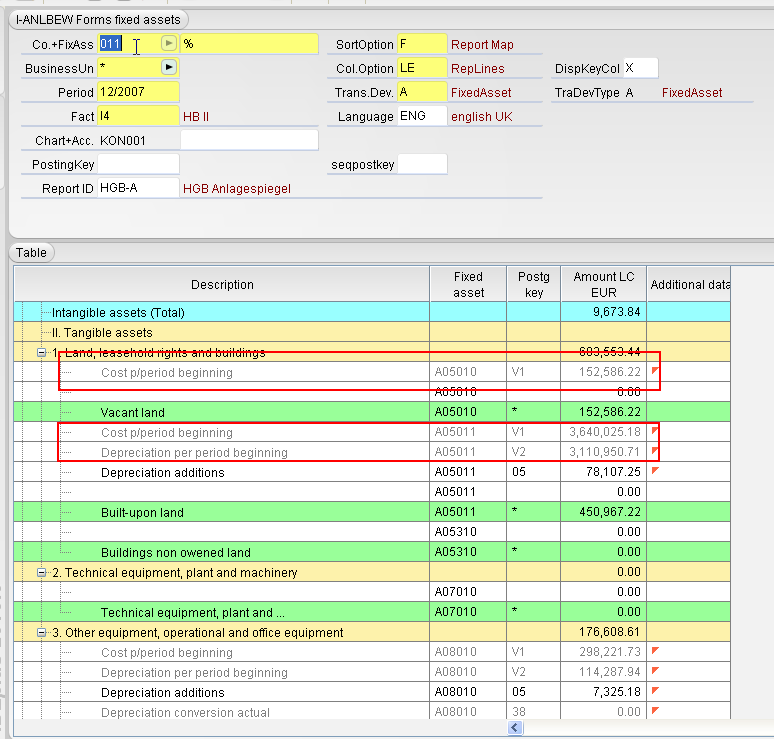
Image 6: Grey coloration of the lines that cannot be filled and an error message with the respective BSL
The entry cell will also have a grey background if there are multiple transactions in one and the same account that have one and the same posting key. The net value will be displayed in the entry cell, but cannot be changed, however, due to the fact that clear allocation of transactions would then be impossible.
Interim sums will be shown for each account; this will be done by line with the column option LE. A sum column will be shown at the end of the table with the column option FS. These sums will be updated dynamically in accordance with the data recorded, therefore you will always be able to check the values recorded.
With the sorting option 'F' (Entry based on the report line scheme), additional position sums will be calculated and provided. Analogous to the report, this covers the sum of the account balances per position (summation upwards) as well as the summation based on the sum control included in the report (summation downwards).
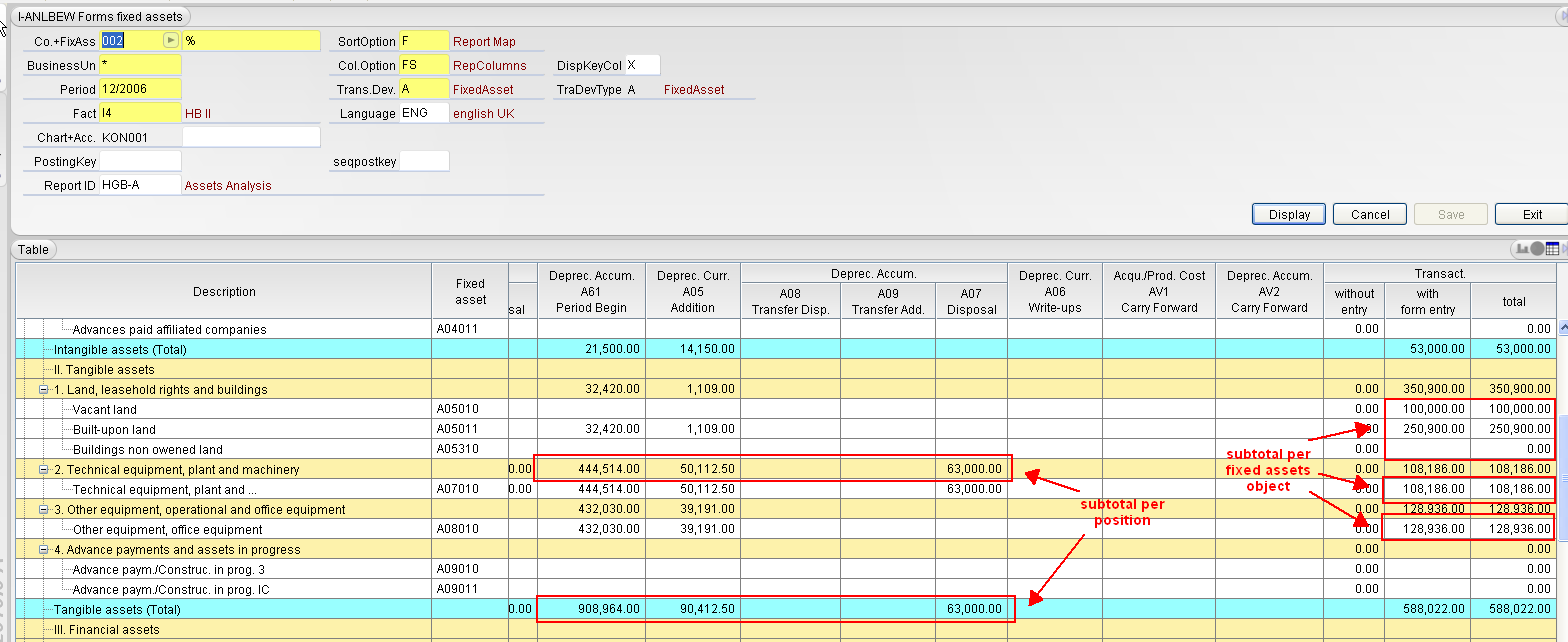
Image 7: Automatic subtotals for each fixed asset object and each position with the column option FS
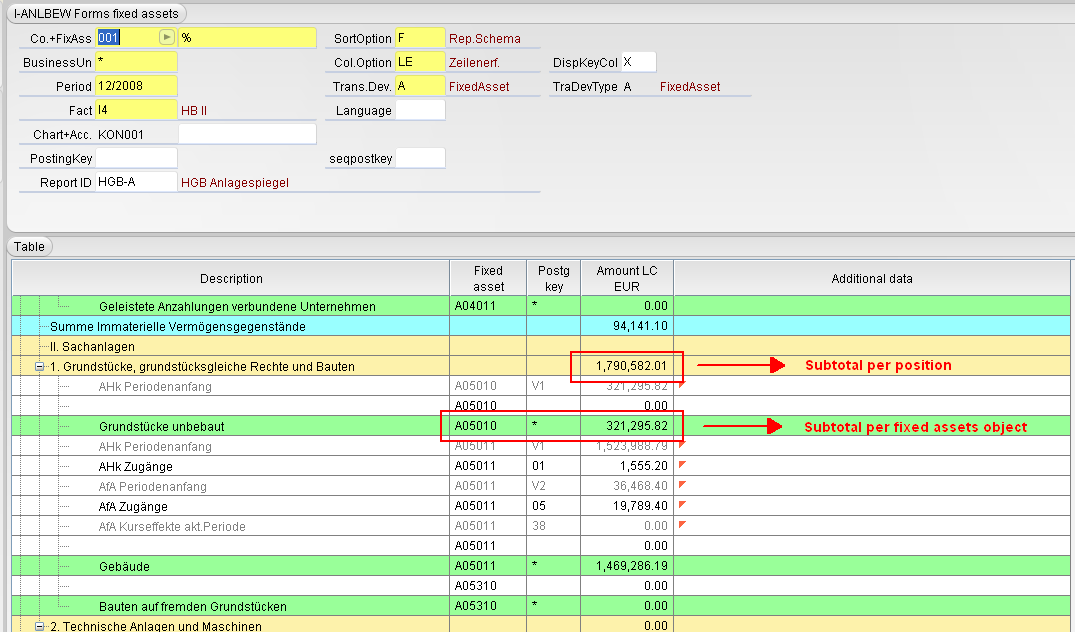
Image 8:Automatic subtotals for each fixed asset object and each position with the column option LE
Due to the fact that this application cannot only be used to make entries, but also to gain an overview, it can also be accessed by users who only have display rights. No value can be entered into the entry lines if the user does not have the rights to change/enter data. Transactions with a reserve posting key cannot be entered into the form entry unless that person has special rights to perform the actions <Insert> and <Change>.
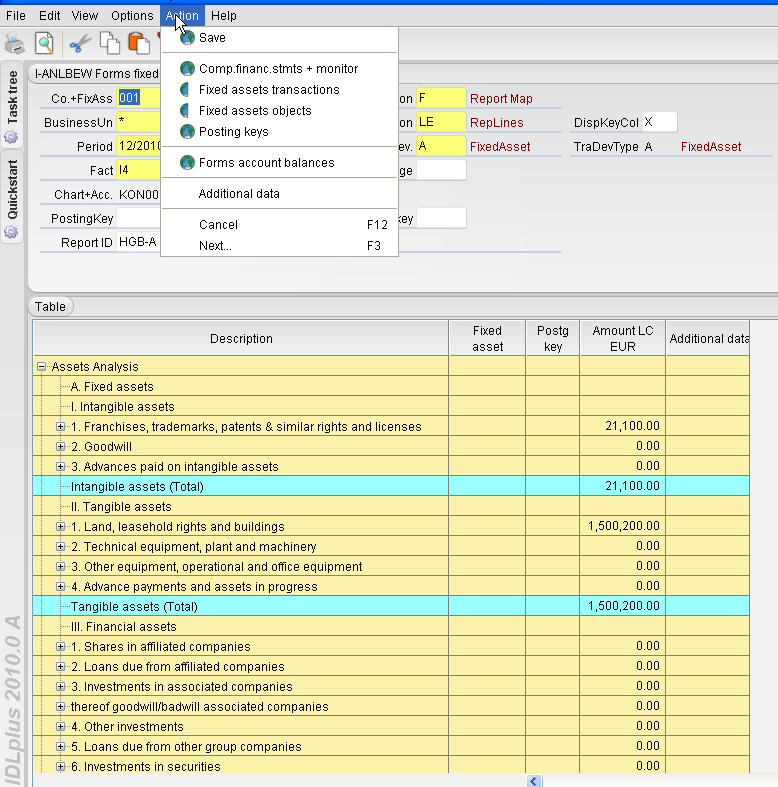
Image 9: Action Menu
[ Save ]: The function ?Save? stores all of the previous values entered as fixed asset transactions in the system. After the function ?Save? has been carried out, the display will remain at the previous position so you can continue working from here.
[ Company financial statements + monitor ]: By using the action menu in the form entry area, you can access the application ?Company financial statements + monitor?.
[ Fixed asset transactions ]: By using the action menu in the form entry area, you can access the application ?Fixed asset transactions?.
[ Fixed asset objects ]: By using the action menu in the form entry area, you can access the application ?fixed asset objects?.
[ Posting key ]: By using the action menu in the form entry area, you can access the application ?Posting key?.
[ Forms account balances ]: By using the action menu in the form entry area, you can access the application ?Forms account balances?.
[ Additional data ]: By calling up ?Additional data?, additional information can be added to an entry.
[ Cancel ]: Using the function ?Cancel?, will bring processing to a stop.
[ Continue...]: You can continue processing with the application you were using before by pressing ?Continue...?.