A report must be defined in the 'Company report' (REP) or in the 'GroupReport' (REPK) application. In order to be able to create a report header, the 'Report name' (RID) and the 'Report line definition' (REPZEI) must exist (you can find a more detailed description of this in the following 'GUIDE report definition' GUIDE Report-Definition.
To set up the report, different parameters are saved in the report header. This way, different reports of the same name but with different parameters can be defined. This is why not only the report name but also the version number are included in the report header as search terms. When the report is created certain processes are carried out when the parameters are entered.
In the report directory itself, created report results that remain saved in the database can be explicitly deleted here. This should be checked at regular intervals because the database might otherwise become unnecessarily large. Should you wish to delete past report results, it is recommended that you begin with the oldest report results.
The report directory can be displayed by making a selection in the header data. In the following figure all defined report groups are displayed for the company "001" of the 'current period' "12.2008" and the fact "I4" .
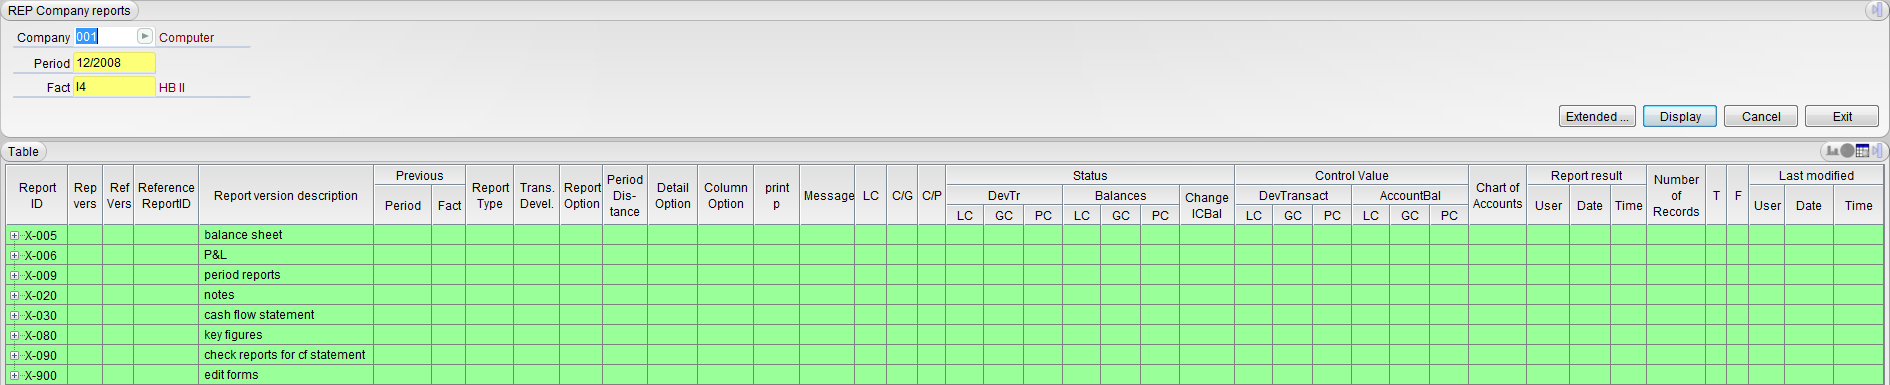
Figure: REP application overview
Extending the tree reveals the respectively assigned reports of the individual groups.
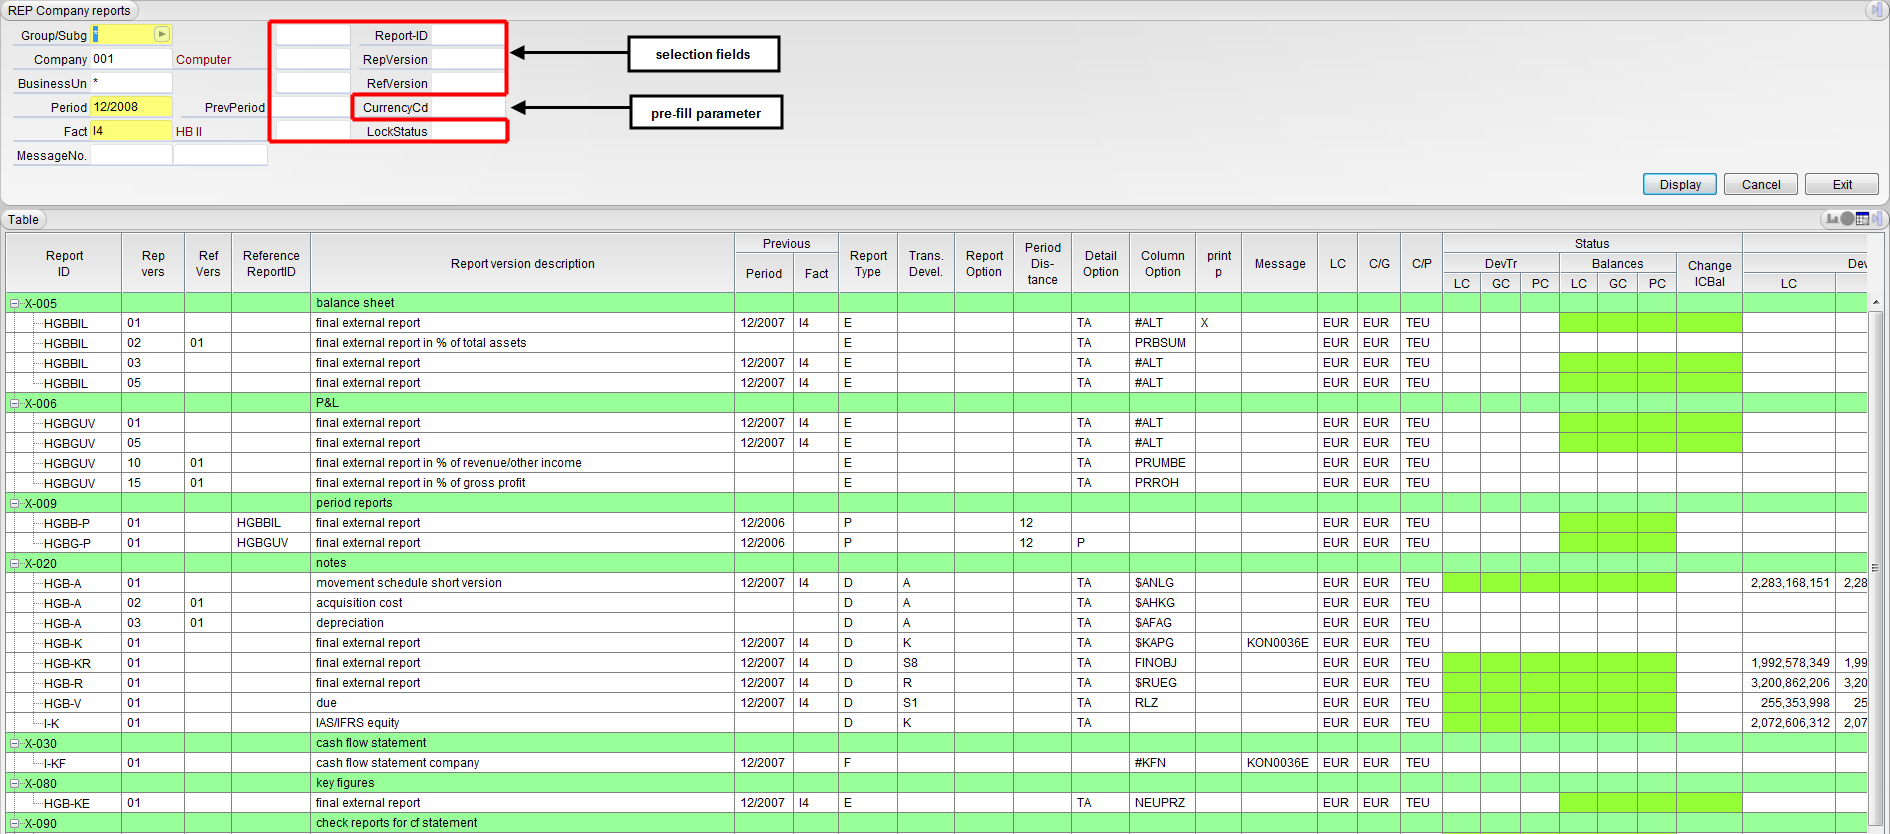
Figure: REP - selection options with the company reports
Instructions regarding column contents in the overview:
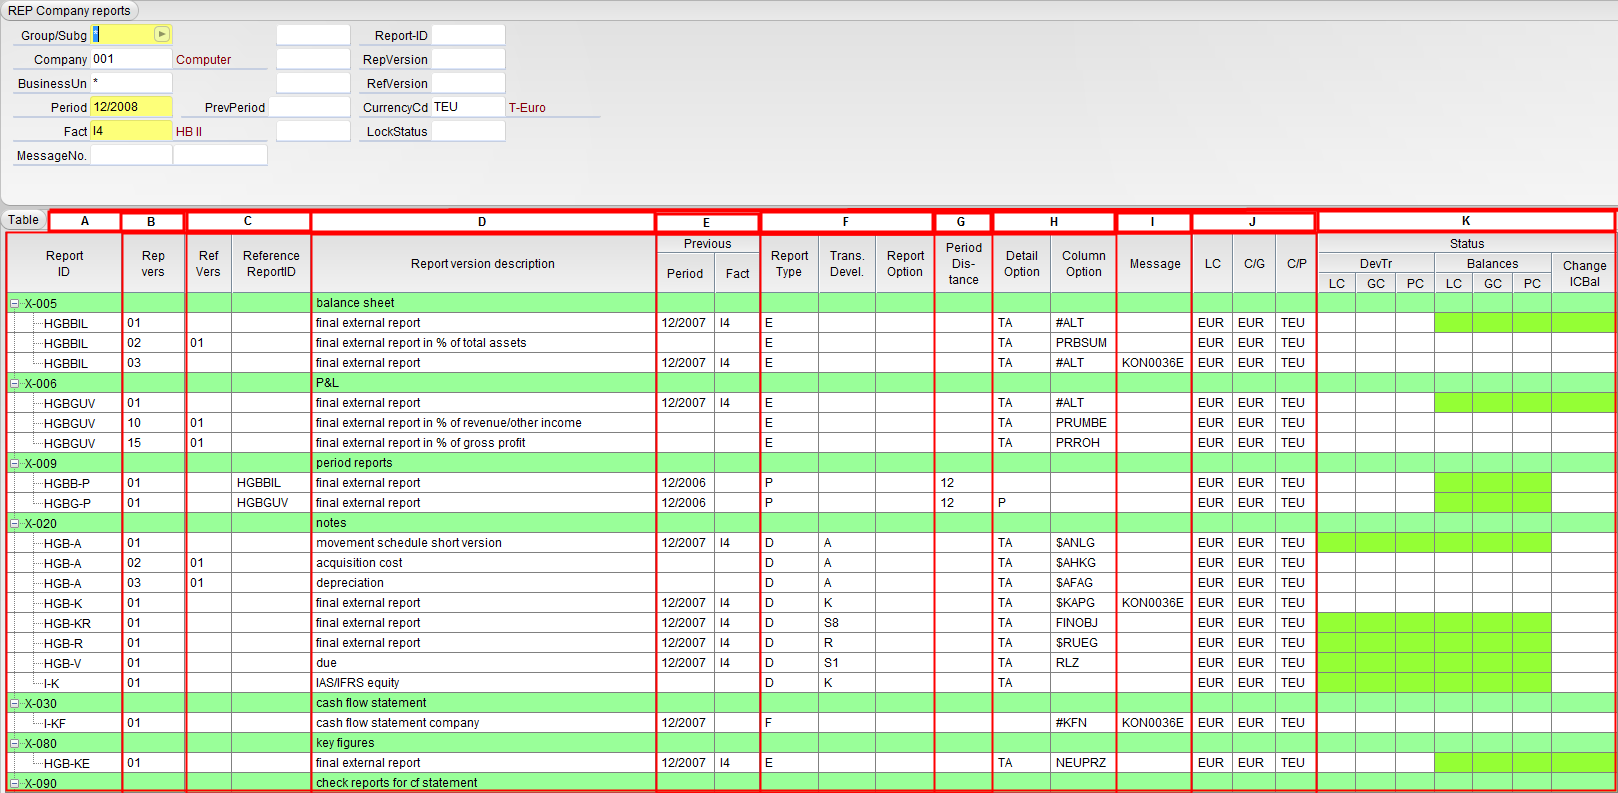
Figure: Column overview part 1
[ A Report Ident ] A unique report ID from the Report-Ident (RID) application
[ B Report version ] This involves a version number that you have assigned yourself.
[ C References ] Any reference reports that may have been saved are displayed here. Reports with a logged reference version cannot be created by themselves (see above "Selection fields"). The reference report ID shows a reference report ID that may be saved in the Report ID (RID).
[ D Report version description ] A designation of the report individually assigned by you.
[ E Previous/ comparative data ] Here you can see a display of the comparison periods and data types.
[ F Report type, -development, -option ] This column displays the report type and the underlying report level from the Report Ident (RID) application. If you have recorded a report option in the report header, this will be displayed here. (See also chapter 5.2. General parameters)
[ G Period distance ] A display is shown here for multiple period reports. (Example: 12 corresponds to a period interval of one year, i.e. 12 months).
[ H Display ] You receive an overview of your display variants, which are used as a default in the follow-up application. If no entry has been made in the outline option, REPERG Report "P" will be set by the system in the follow-up application ( Exception: Corporate reports that provide an outline of the companies must be recorded with an outline option beginning with "1"). If there is no entry in the column option, the column option saved in the Report Ident (RID) application will initially be used in the follow-up application. If nothing is saved there either, the user might have to record a column option in the follow-up application.
[ I Message ] Error messages or warnings are displayed in this column.
[ J Currency ] The country, corporate and parallel currency are displayed for you.
[ K Status ] The status displays provide an overview of how up to date the report results are. A red status display indicates that the saved report result does not correspond to the current status of the data. Here the report must be recompiled. Reports where a reference version is saved are not given a status display, as these only involve display variants. If the report has not been compiled so far, the display will also remain empty. ( An exception is the cash flow report. No status is displayed owing to the wide variety of processed levels)
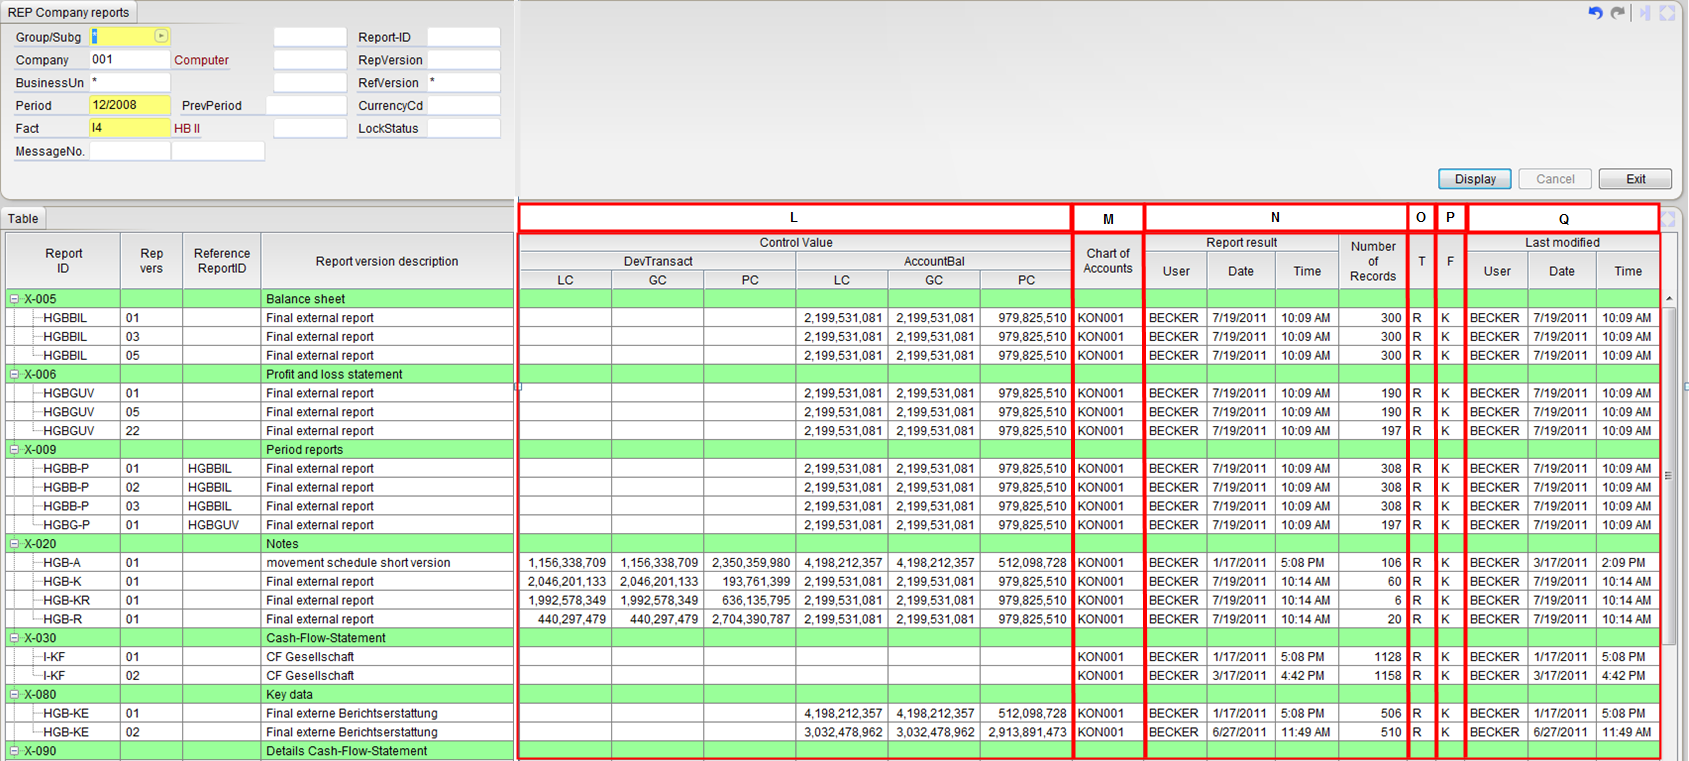
Figure: Column overview part 2
[ L Control value ] You receive a display of test sums for level and node balances in the positions where a status display is also present. The test sums serve for documentation, possibly for your auditor.
[ M Chart of accounts ] The node plan used in the report is displayed here.
[ N Report result ] This column provides an overview when and by whom the report result was last compiled.
[ O Chart of positions/ aggregation type ] Ann "R" is displayed by the system grds here.
[ P Chart of accounts/ cost center flag ] This column indicates whether the report was compiled with company (G) or corporate account plan (K).
[ Q Last modified ] If a report header has been created, be it by copying or manual individual compilation, the author will be shown here. The columns for the report result are initially empty. After each further change to the report header and after each renewed compilation of the report or when deleting the report result, the entry is updated.
A created report, whether it has been set up via manually creating individual records or by copying, shows the creator in the column entitled 'Change user' and the time under the 'Change Date' title. The columns entitled 'Rep User', 'Report Dat' and 'Change modifier time' (for the result) are initially empty. They are then filled when the report result is created. However when a manual change is made in a report header, the previously created report result and the columns entitled 'Rep User', 'Report Dat' and 'Change modifier time' (for the result) are deleted. The report result must be newly created.
When a report result has been generated, a message number is entered into the column 'Message' in the event of a mistake (e.g. in the event of a mistake in the records). Particular report attributes are displayed on the right hand side next to the message column. The 'CompNo' column will be missing if the company number is clearly defined in the header. Likewise, the local currency will be missing in the 'LC' column if one group/sub-group is involved.
NOTE: A double click on a key column will permit the user to branch directly into the individual record application ( figure column overview part 1 A and B ); a double click on a column in the movable area will permit you to branch directly into the report result display (REPERG)( figure column overview part 1+2 C till Q ).
The following applications and actions are to be achieved/carried out via action selections:
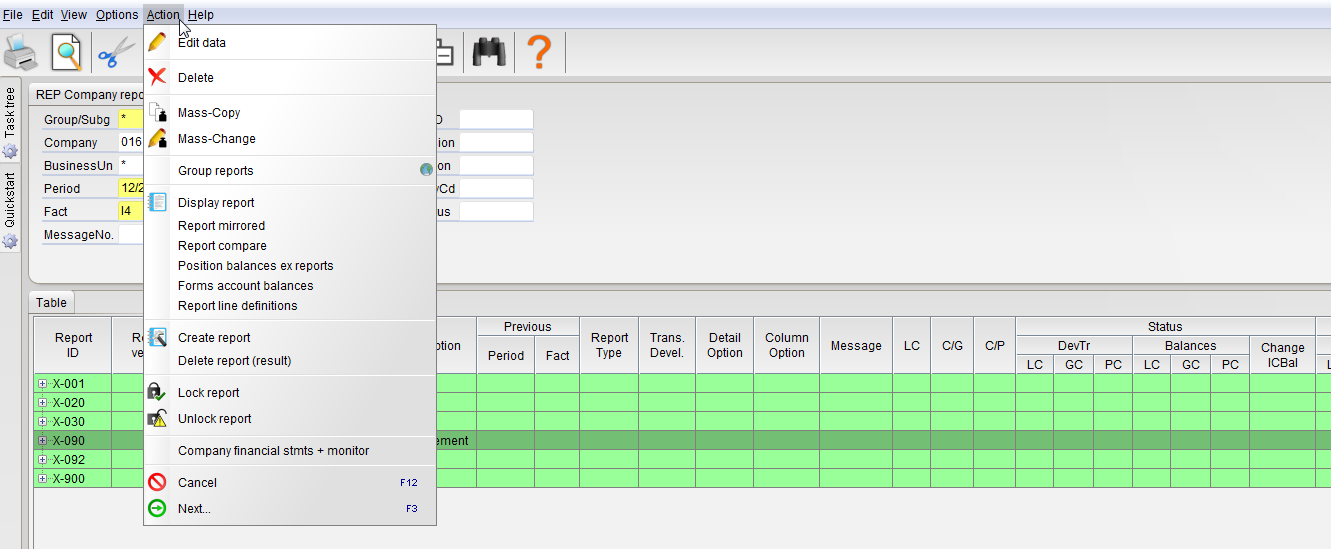
Figure: Action selection in REP
[ Edit data ]: Management of the report header in the REPE individual record handling
[ Delete ]: Delete all previously selected/displayed report headers including the corresponding report result. Mass delete can be used e.g. to simply delete converted old reports or also new reports/report versions that are no longer required.
[ Mass copy ]: By using this function, existing and previously marked report headers can be copied as desired. A 'Mass Copy' window appears in which the corresponding fields must be changed. Only the fields that have a clearly defined content can be changed. For example, if the company field says '0%', then no copy is possible. The report headers previously marked in the report index will be copied. If you remove the check mark from 'display copied data' and click 'OK', the subsequent display however will remain in the existing report index in order to be able to carry out possible further copies. A confirmation of the correct or an unsuccessful copy action will appear on the display.
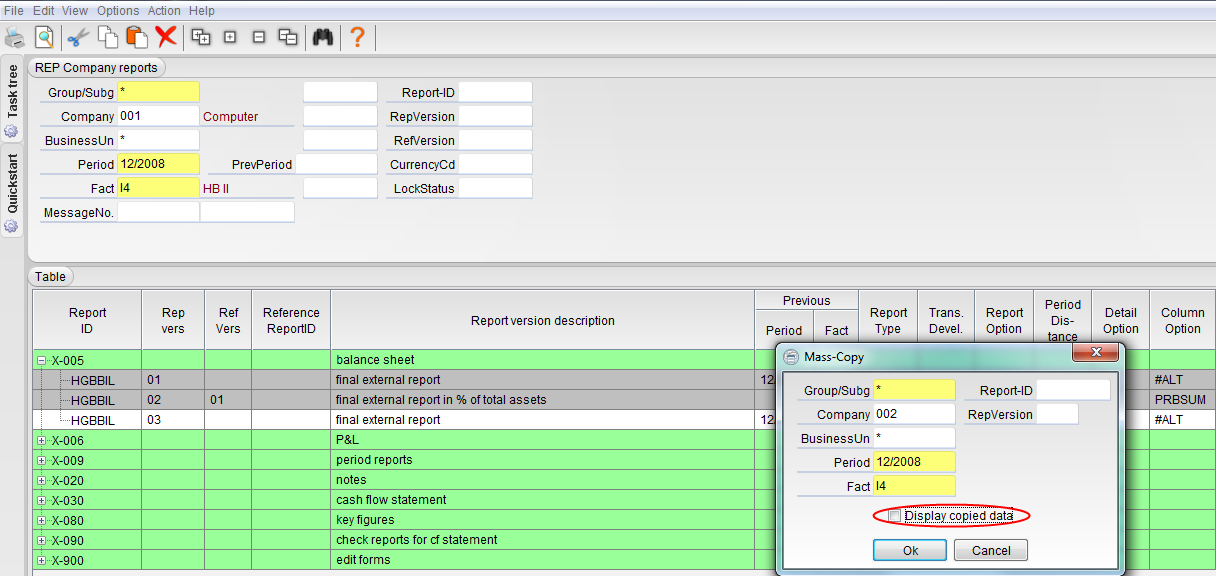
Figure: 'Mass copy' action
[ Mass update ]: By using this function, existing and previously marked report headers can be changed as desired.
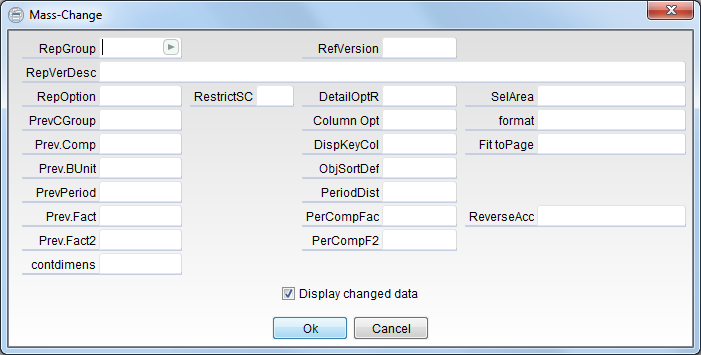
Figure: 'Mass update' action
[ Group reports ]: Branching out into the application 'Group report' (REPK)
[ Display report ]: At least one report must be marked in the report index. After carrying out the 'display report' action IDL Konsis automatically branches out into the report display (REPERG). The first marked report will be displayed. Should no 'DetailDisplayOpt', 'ColumnOpt', 'GroupCurrency' be present in the header when calling up the report result from the report index, then the report result with the 'DetailDisplayOpt'='P' (per position), 'ColumnOpt'=#ROHG' for a company level report and '#ROHK' for a group level report as well as 'CurrCode'= group currency will be automatically displayed. The parameters which are then consulted for the report result can be individually determined in the report header (see also the report header description). This is recommended especially if multiple reports have been marked for the display and should be displayed after one another by clicking on 'next' or 'F3' in the 'REPERG report result' application.
[ Report mirrored ]: This action serves to mirror the marked report in the display, i.e. former column headers will form the lines and the positions previously displayed as lines will form the column headers.
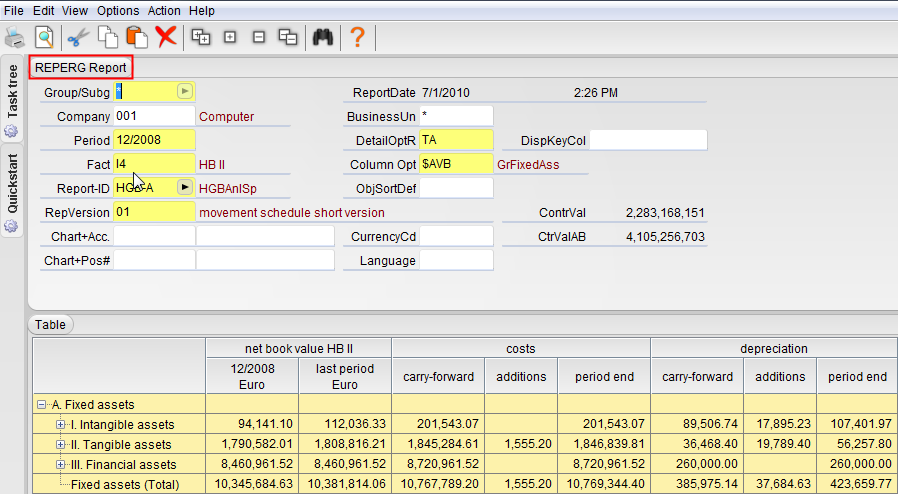
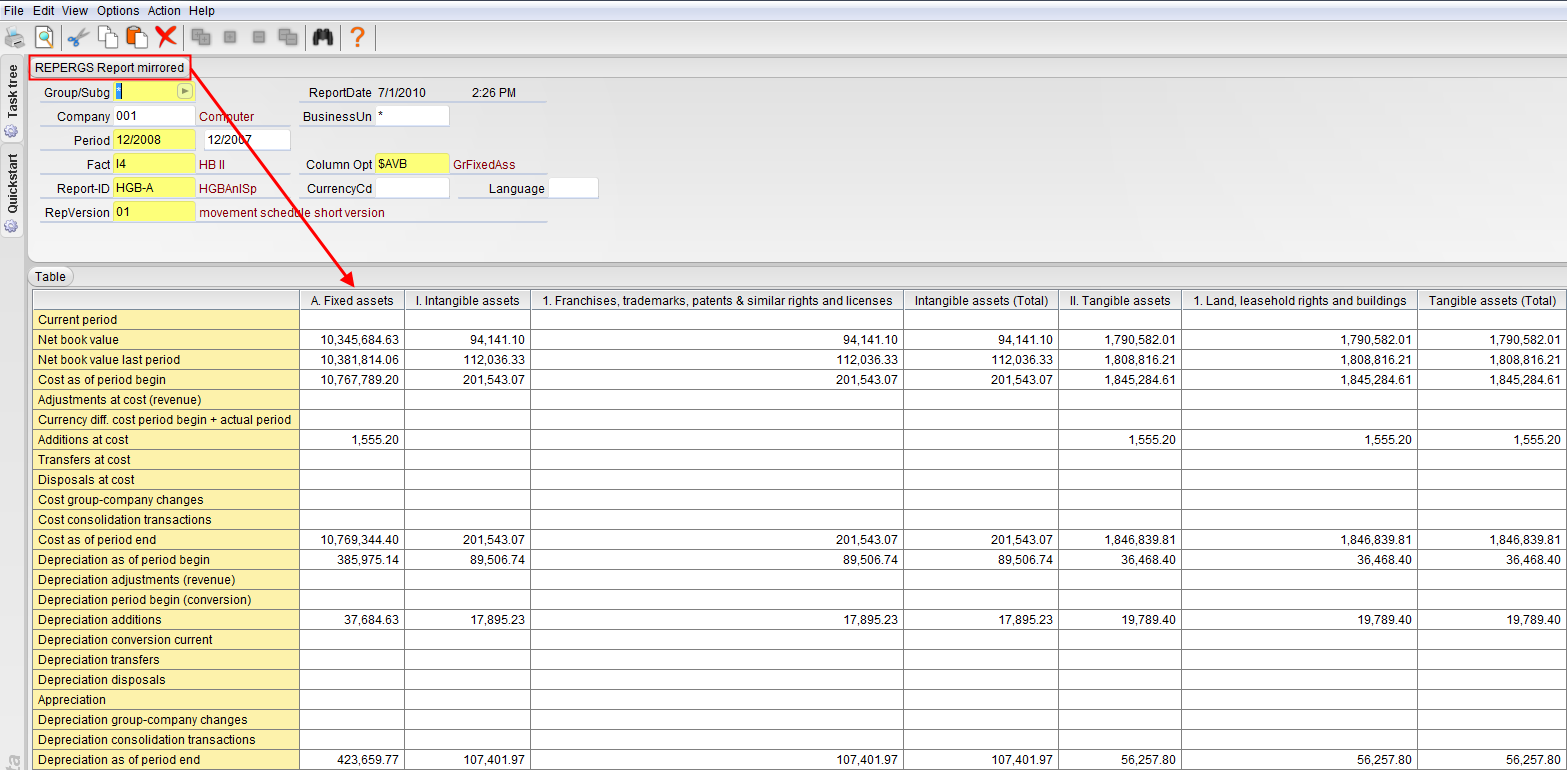
Figure: Example of a mirrored report
[ Report compare ]: This menu item takes you to the report comparison application (REPERGCOMP). The application determines the differences between two different report versions. In the entry mask, you are first prompted to indicate a comparison version. The deviations are displayed in a difference column.
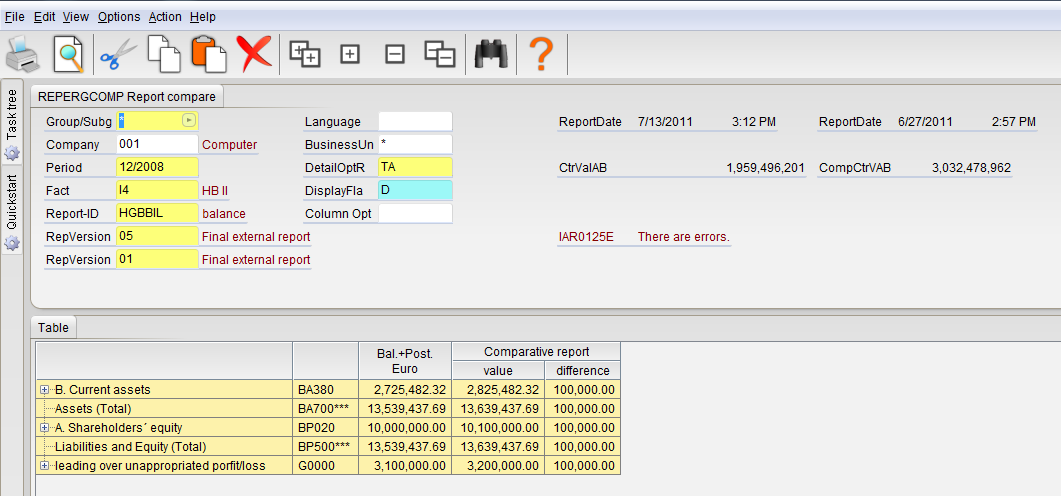
Figure: Example Report compare (REPERGCOMP) with differing report results.
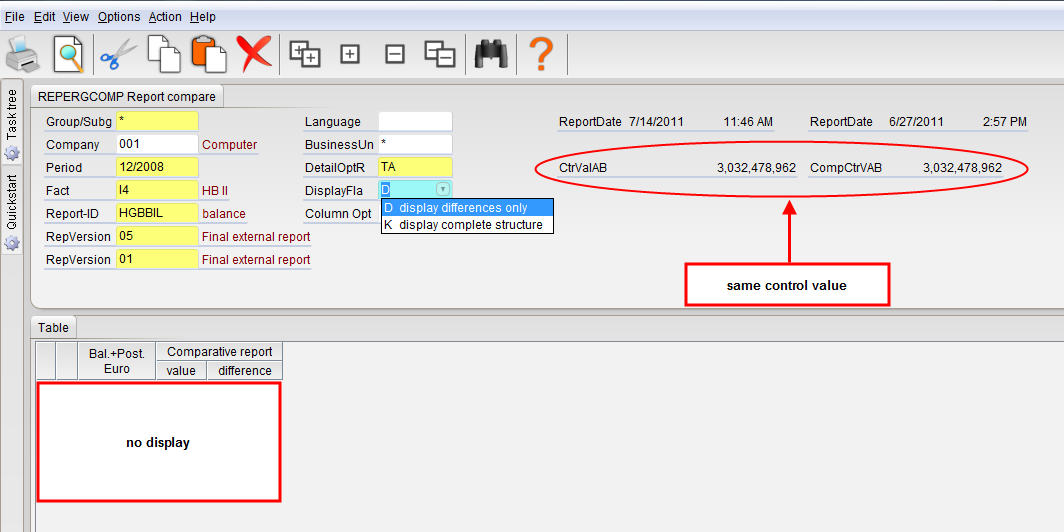
Figure: Example Report compare (REPERGCOMP) with consistent report results.
[ Position balances ex reports ]: Branching out into the application 'POSSAL'
[ Forms account balances ]: Branching out into the form of EA account balances (I-KTOSAL) application
[ Report line definitions ]: Branching out into the application 'Report line definition' (REPZEI)
[ Create report ]: At least one report must be marked in the report directory. After the selection of the 'create report' action all marked reports will be created after another regardless of whether they have already been created or not. A progress window will be displayed during the creation of the reports. If an error is recognised then it must be decided whether the creating of the report is to be stopped ( no report result will be created ), the creation is to be continued or the error is to be ignored. Usually, an error message appears during the creation of a 'data entry report', due to the fact that no balances are present for this period. Naturally the result must always be created here. The program cannot recognise that it is handling a data entry report with no existing data in the actual worked period.
[ Delete report (result) ]: When calling up this menu item, the system deletes the report result of the highlighted report header. The report header is retained. The system deletes the entries in the status display, the test sums and the report results. An error message KON0036E (no data present) appears in the message column (see Fig. column overview 1 part I).
[ Lock report ]: Reports can be locked via this action, so that a (possibly inadvertent) new compilation is not possible. A new column is added in the overview (see Fig. column overview 1 part F), so that a green field or a closed padlock with green checkmark reveals that the report is locked.
[ Unlock report ]: The report lock is cancelled via this menu item. Report results cab be recompiled. In the report lock column, the status changes to yellow or an open padlock with yellow warning triangle, so that the user always has information as to whether the report has already been locked once before.
[ Comp.finac.stmts+monitor ]: Branching out into the 'company financial statements + monitor' (EA)
The following group report-specific applications and actions are to be achieved/carried out via action selections:
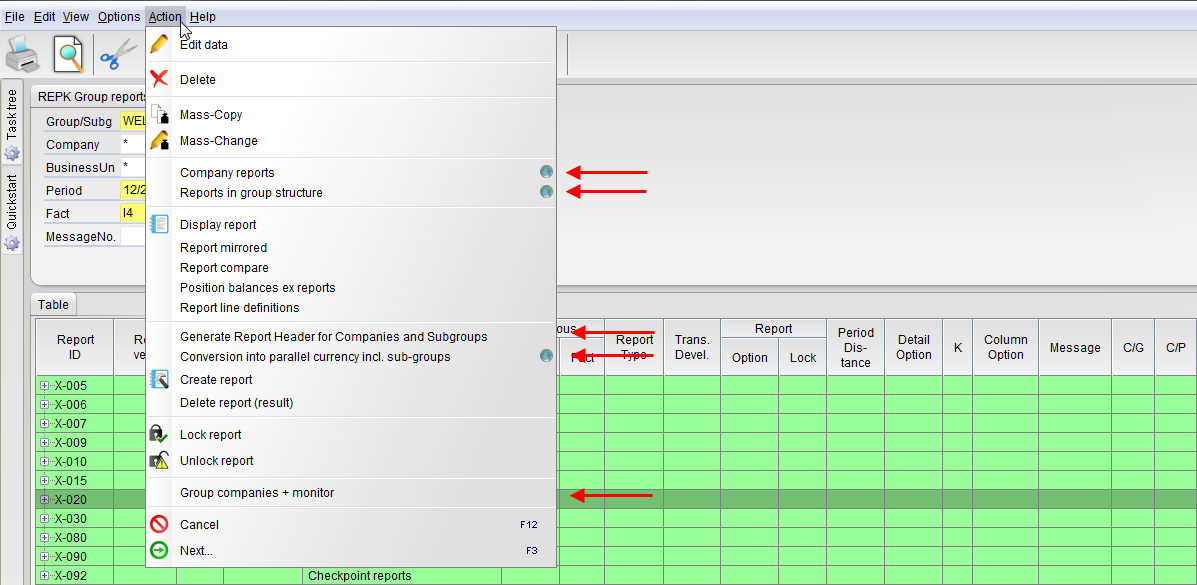
Figure: Action selection in REPK
[ Company reports ]: Branching out into the application 'company report' (REP)
[ Reports in group structure ]: Branching out into the application 'Reports in group structure' (REPSTR). A report ident and a version number must be entered there. This overview might also reveal whether standard reports are available for all companies of the selected corporate group.
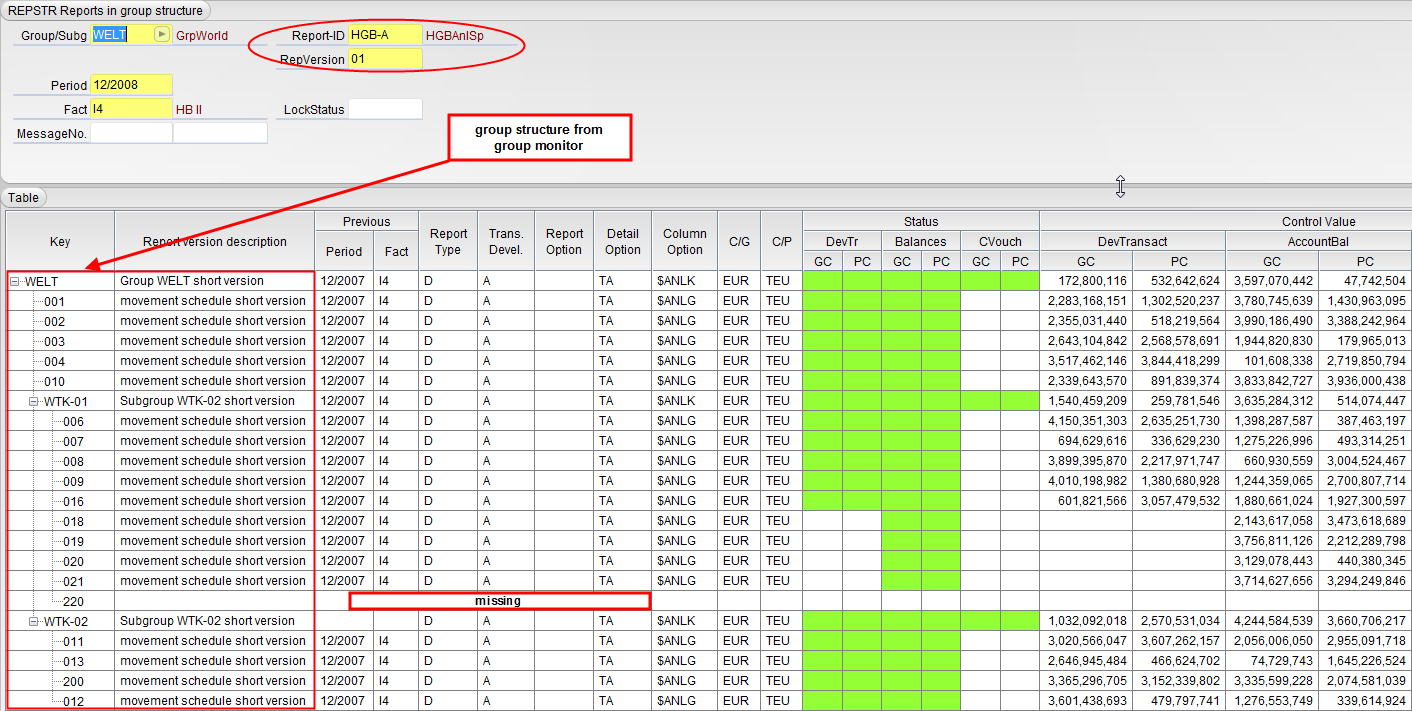
Figure: Application REPSTR
[ Generate report header for company and sub-group ]: The group report headers can be copied into all companies and sub-groups by using this action. In doing so all missing report headers for companies and/or sub-groups are completed and the existing report headers remain intact. The assignment to report groups, and the layout/column options also remain intact.
[ Conv.Parallel Curr. incl. subgroups ]: By implementing this action, all consolidation postings (also those of sub-groups) from the 'KONBUCH' application will be converted into the parallel currency so that a report can also be created in the PC. This action can also be activated from the 'KTKGES'.
[ Group companies + monitor ]: Branching out into the 'group companies + monitor' (KTKGES)
First, a header must be created/ copied for each company/ group/sub-group report and for each report version. This is to save all key and parameter information which was provided at the time the report was created. All key and parameter information are kept and will be displayed respectively in the display, print and export of the respective report application.
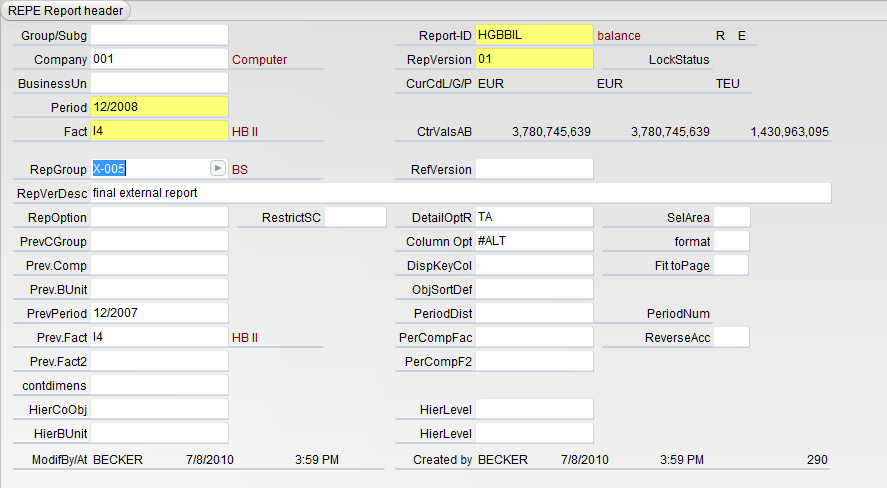
Figure: REPE - definitions for a report

Figure: REPE - Basis data
[ Group/Sub-group ]: a clearly defined group/sub-group or [ Company ] a clearly defined company.
[ Segment ]: a clearly defined segment. OR: If the user works with segments and the field is clear, all segments will be displayed in the report.
[ Period ]: the 'current' period which the report should refer to
[ Fact ]: a clearly defined fact
[ Report ID ]: a clearly defined report ID (all defined IDs are displayed in the selection box)
[ RepVersion ]: Version number
NOTE: In the case of period reports, the information regarding the period interval as well as the pre-period are also part of the key data.
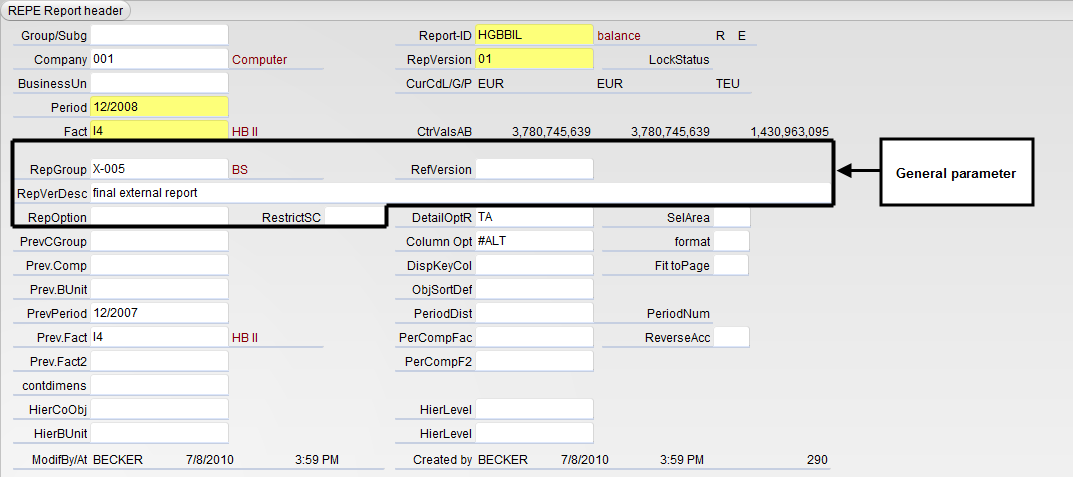
Figure: REPE - General parameter
[ RepGroup ] It is here where the assignment to a report group takes place (report groups previously defined in the 'RID' application are displayed in the selection box, see also 'DOC report definition, Chapter 'RID'
[ RefVersion ] Indicating a reference version serves the purpose of archiving an information variable. The report then references another report with otherwise identical keys. If a ref.version is indicated in the display only the display attributes can be changed. Advantage of indicating a ref.version: the database will not be so overloaded because of various report versions which are to be created.
[ RepVsnDesc ] Indicating an individual report version description
[ RestrictSC ] In the case of development reports, it is possible to create a summary report - that means a development report including multiple companies (selected according to group/ subgroup) but without group account data (consolidation postings/ group transactions). In the development reports company values and group/subgroup values will be written into the same columns. This makes it necessary to differentiate between these values from the very beginning, i.e. at the report creation stage. This can be done by an attribute in the report header additionally to the report option. Possible values are for example 'S' = Report only with statement of accounts ('summary company movements') and 'C' = Report only with consolidation postings and/or movements. This display is possibly helpful for the reconciliation of a cash flow report. If this attribute is empty, the report will display as usually company and group data.
[ Rep.Option ] Entering a report option is optional - this means that a particular report option can be positioned here. It can however be selected later in the 'REP/K' or 'REPERG' applications. The report option serves to determine the origin of the respective data for the report. The following report options are available:

Figure: Selection of the report options
In the following overview all combinations between report options and report types are summarised once again.
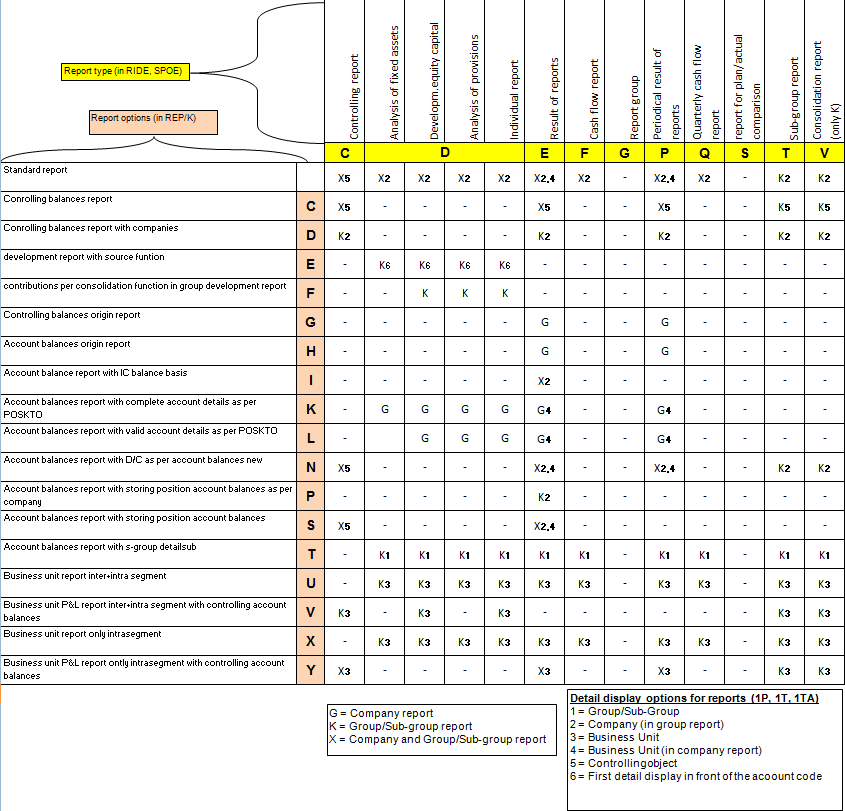
Figure: Report types and report options
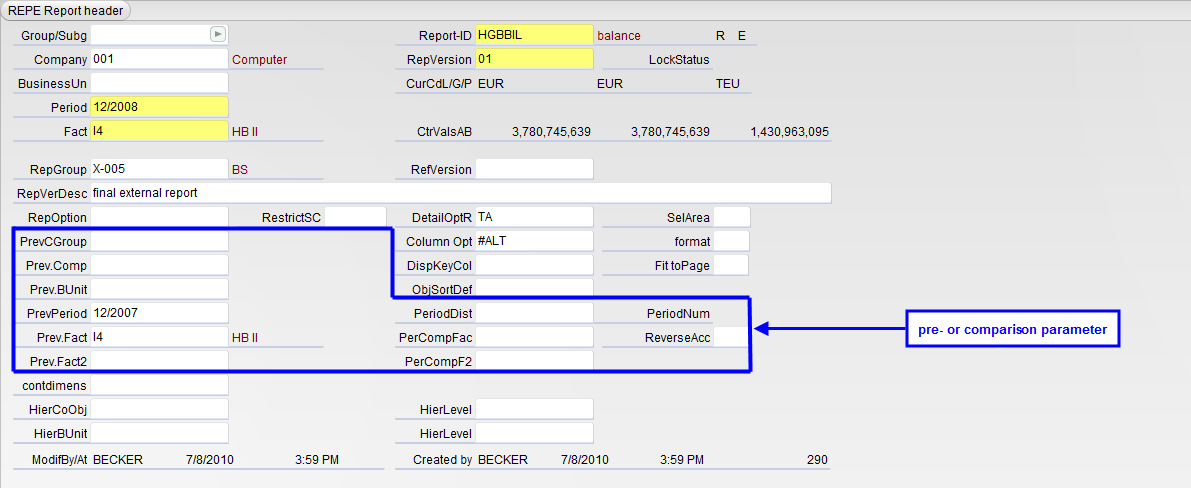
Figure: REPE - Pre- or comparison parameters
[ PrevCGroup ] Previous/Comparative Group/Subgroup: a comparison of company group/sub-group can be recorded for the report which is to be created.
[ Prev.Comp ] Previous/Comparative Company: a comparison of companies can be recorded for the report which is to be created.
[ Prev.BUnit ] Previous/Comparative Business Unit: a comparison of business unit can be recorded for the report which is to be created.
[ PrevPeriod ] Previous/Comparative period closing date: in IDL Konsis, 2 standard period fields will be used:
This field makes a flexible pre- or comparison period assignment possible.
Further information regarding the subject of accounting period can be found in the period chapter (ABR) in the master/management data documentation.
[ Prev.Fact ] Previous/Comparative Fact: This field enables you to assign pre- or comparison facts flexibly; this generally has to deviate from the fact of the current period. The comparison fact makes it possible to compare CURRENT fact data (e.g. fact I4 with PLAN fact data (e.g. date type P4) and/or position the data in sequence.
[ PrevFact2 ] With the second selection of a comparison fact it is possible to either compare 3 different facts or put them next to each another. This field was developed in order to create a report which for example display the data of 3 facts - IST, FORECAST and PLAN in a multiple period report. (e.g. JAN-MAY values CURRENT fact; JUN-OCT values FORECAST fact; NOV-DEC values PLAN fact)
[ PeriodDist ] Period Distance: In the case of a period report (ReportType=P) a pre-period and a period interval must be entered. In doing so, the number of periods will be calculated and displayed.
[ PerCompFac ] Number of periods with comparison fact: in this field the number of the periods of the pre and/or comparison facts which are to be displayed are to be entered.
[ PerCompF2 ] Number of periods with comparison fact 2: in this field the number of the periods of the pre and/or comparison fact2 which are to be displayed are to be entered.
[ ReverseAcc ] This field controls the representation of the decumulation of the multiple period report. This control for the decumulation is possible for period reports (report types 'P' and 'S') and for balance/GuV reports (report type 'E'). In the case of balance/GuV reports, a period distance must then also be indicated, which determines the distance to the decumulation period.
These fields determine the view in the event of calling up a report. They can be definitely determined here and in doing so will be automatically transferred into the report result display. However, they can be changed after calling up the report without the necessity of creating a new report.
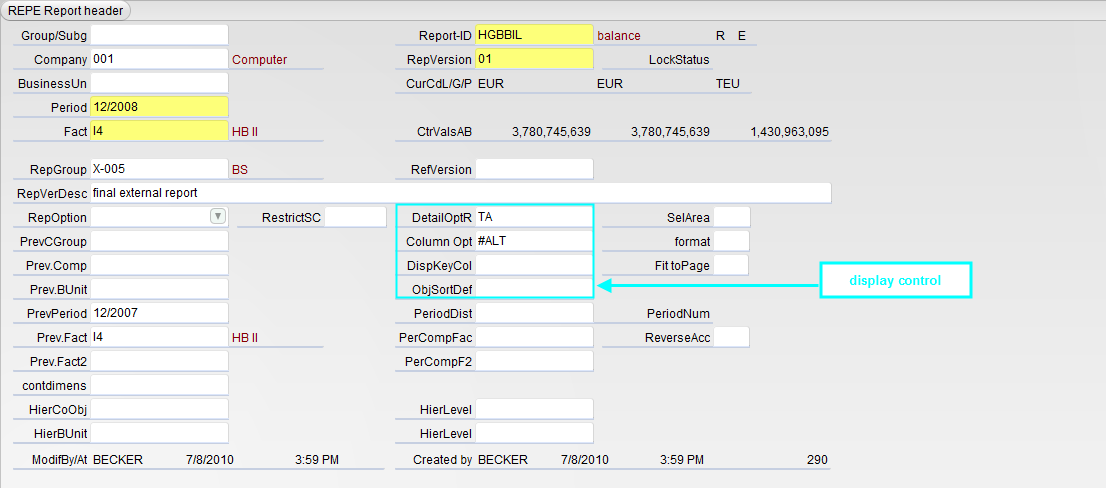
Figure: REPE - Display control fields
[ DetailOptR ] When the layout option is selected, the chosen tag determines how the lines will be displayed. The layout option has no influence regarding the amount of data of the report. If this field is not occupied, then the entry from the header of the REP overview serves as pre-occupancy.
NOTE regarding detail display option 'P' and '1P': In the case of the detail display option 'P', only the data of the position levels will be read and displayed, so that the display - especially in the case of larger reports - can take place more quickly. The '1P' detail display option repeats the position scheme per key of layout level 1 (as per sub-group, company, business unit or controlling object report). It is not possible to extend to account level or other layouts in these detail display options.
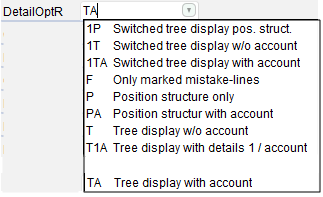
Figure: Selection of 'detail-display option for reports'
[ ColumnOpt.: ] Selection of either individually created or standard IDL Konsis column options in the SPO application.
[ Display key column ] If the switch is set here, then the position number column will be also included in the standard display. If the field is empty then the column display is omitted.
You can use these selection fields for control of the print output as far as no diverging parameters are specified in the print dialogue. These attributes are displayed in the list applications (REP, REPK) and can be entered in the single record application.
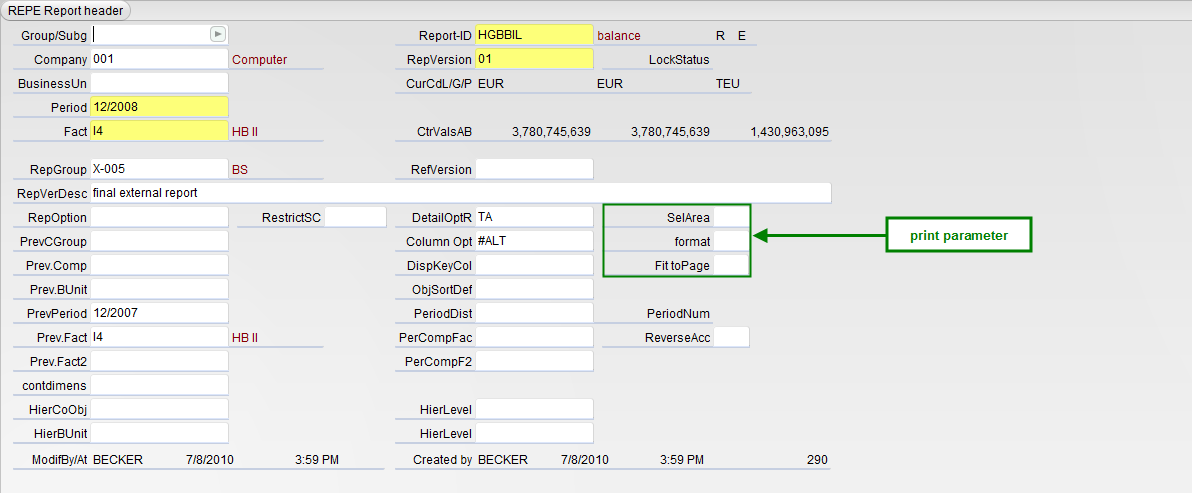
Figure: REPE - Print parameter
[ SelArea ] This field can be used to set that that the selection area is not printed ("N"), or only on the first page ("F") or on all pages ("A"). If no entry is made here, the selection area will be printed on all pages.
[ format ] The user can choose between portrait (P) or landscape (L) format.
[ Fit toPage ] If an "X" is set here, the print area is optimally utilised.
This fields are used to control the default settings for controlling or business division reports.
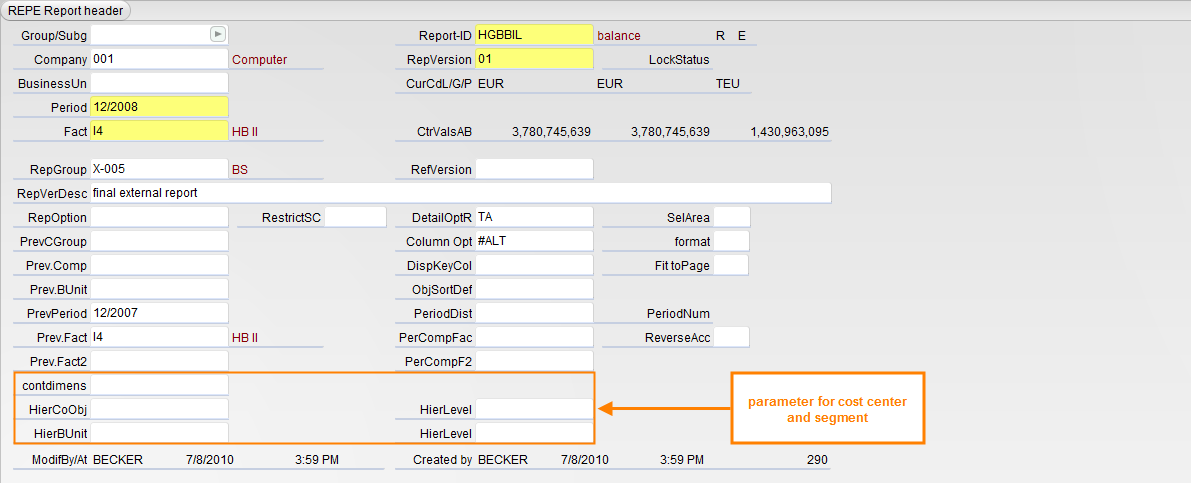
Figure: REPE - parameter for cost center and segment selection
[ contdimens ] Controlling reports on a company or corporate level can be compiled for every definite controlling dimension (CD01-CD10). When compiling the report, all accounts which have an outline corresponding to this controlling dimension (indication in the master account KTO) are outlined according to the associated controlling objects. All other controlling dimensions are not considered. Without an indication of a controlling dimension, every account will be outlines as previously according to controlling objects of the first controlling dimension for this account. These can then be different controlling dimensions. A simultaneous outline according to several controlling dimensions is not possible.
[ HierCoObj ] The highest hierarchy node of the corresponding controlling dimension (field above) must be recorded here, so that the values indicated in the report are always complete.
[ HierBUnit ] The level specifies how detailed the outline is represented. Level 0 designates the highest node itself, level 1 designates the objects directly assigned to the highest node , level 2 the next assignment level etc.. Without indication of the level, the elementary objects are shown in the outline as previously.
[ HierLevel ] The highest hierarchy node of the business areas must be recorded here, so that the values indicated in the report are always complete.
[ HierLevel ] The level specifies how detailed the outline is represented. Level 0 designates the highest node itself, level 1 designates the objects directly assigned to the highest node , level 2 the next assignment level etc.. Without indication of the level, the elementary objects are shown in the outline as previously.
The application 'REPKTK' is designed to provide the provision functions for consolidation postings for ?report sub-groups?. This application allows you to show one or more parallel group structures by copying the respective consolidation postings without actually having to consolidate the groups themselves. The data required is selected in accordance with the following rules:
The following constellations are conceivable:
1. A separate group report is to be created for a subset of companies from a "global group financial statement" and then be stored under its own group key, for example:
2. A separate group report is to be created and stored for all of the companies contained in a global group financial statement based on a deviating single or multi-layer parallel structure (with posting sub-groups).
If consolidation postings are to be collected across a multilayer sub-group structure, the respective sub-group parent company(ies) must be entered in KTKGES in the field entitled 'Posting ex sub-group'.
The application does not need to be run in multiple steps, but rather can take place from the "top genuine global group" to the "top reporting sub-group". Vouchers that need to be copied will be passed down within the structure to the extent possible.
Subsequent processing for selecting and copying the consolidation postings can be repeated at any time due to the fact that all of the previous consolidation postings must be deleted again. If corrections or additional consolidation postings are entered later in the KTK that have already been read, this subsequent processing must be performed once again so that the current status is also made available in the duplicates of the 'report sub-groups'.
The following prerequisites must be met before the application can be run:
The following mandatory entries must be made in the 'REPKTK' application:
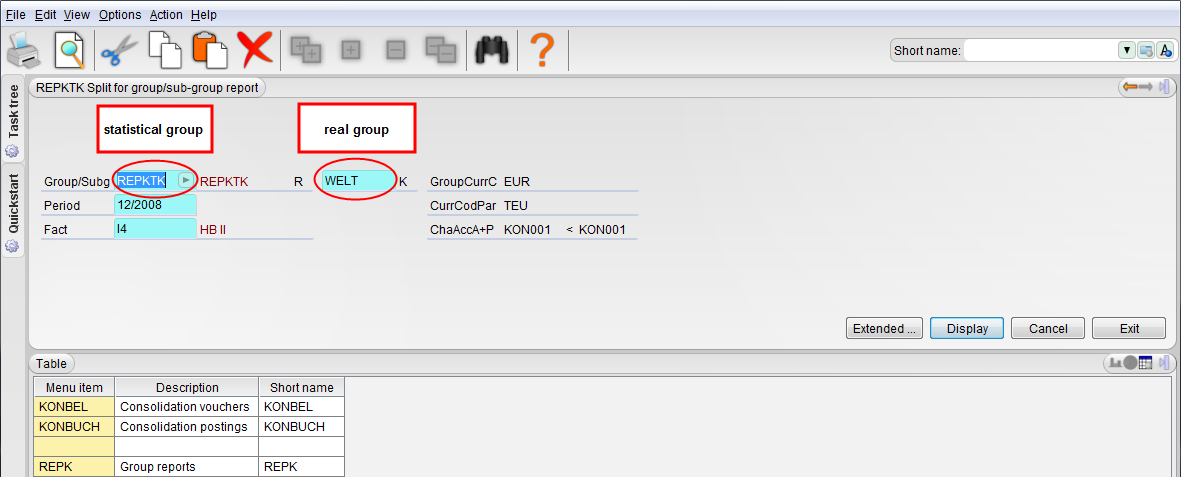
Image:REPKTK application
The reporting target group needs to be entered in the first entry field. The authentic group of origin must be entered in the field to the right of it. Furthermore, a period and a data type must be entered.
The following entries can also be made in the 'REPKTK' application:

Image:Optional input fields
[PrePeriod (a)]:A period of origin that deviates from the target period can be entered here.
[Fact (b)]:A type of data (=fact) of origin that deviates from the target type of data can be entered here.
[Debit account (c)+ Credit account(d)]:If accounts are entered in these two fields, all of the overriding sub-group vouchers will be posted twice, in other words generated for both of the sub-groups affected. The respective postings for the company that is foreign to the sub-group will be replaced by postings to these accounts in these vouchers. The accounts can only be entered altogether. These equalization accounts should only be set up for reconciliation purposes in the group chart of accounts and, if necessary, be assigned to the appropriate "other" active / passive positions. We also recommend that you do not allocate these equalization accounts to a transaction development or a transaction development that automatically calculates ongoing change. Otherwise, the posting keys will need to be maintained manually later on in the consolidation postings.
[Account for capital consolidation (e)]:If one account is entered in the field ?AccCapCons?, then this account will be entered wherever one of the two accounts of c) or d) had been entered previously as a replacement AND the consolidation processing 'K%' has been set.
['Net income postings only' (f)]:If you enter an "X", you will be presented with an alternative copying version. This entry is only possible in combination with the entry of a debit and credit account. With this version, vouchers that are not recognized in the balance sheet will be allocated to the reporting "world group". The vouchers that have an impact on profit and loss, on the other hand, will be copied over to the debit or credit account of the respective sub-groups by reposting them. The distinction between recognized and not recognized is not made for each voucher, but rather for each posting set. This means a voucher that contains both recognized and unrecognized posting sets will be copied three times. The reporting global group contains a voucher that contains the posting sets without recognition. The two sub-groups received a voucher that contains the recognized posting sets, whereby the respective postings for the sub-group foreign company will be recoded to the debit or credit account.
Processing can be initiated via the action menu under the item entitled 'Copy postings for sub-group report?.
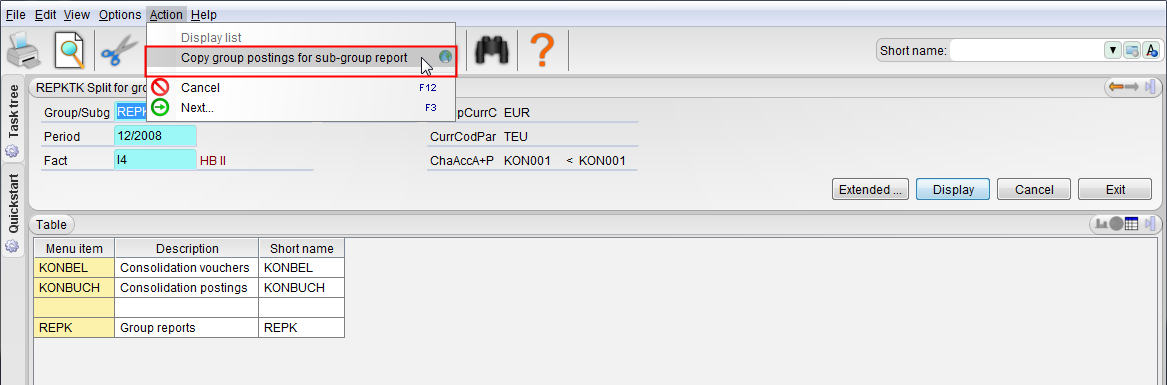
Image:Perform copy function
Afterwards, you might receive a message on postings that have not been distributed that you can confirm by pressing the "write data" button:
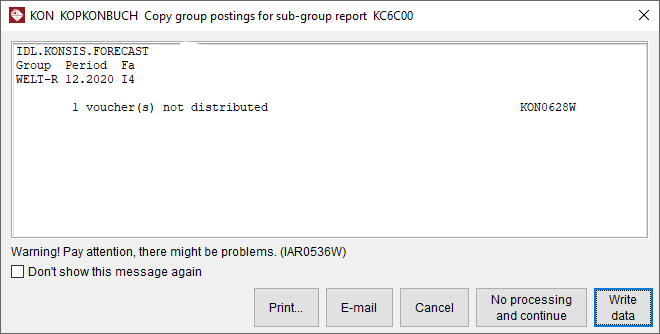
Image:Message after copying the reporting sub-group
During the selection process, the selected consolidation postings that are to be copied will be reviewed in terms of their form to make sure that the individual posting lines refer only to the company numbers listed in the voucher head. If this is not the case, an additional note will appear in the message window:
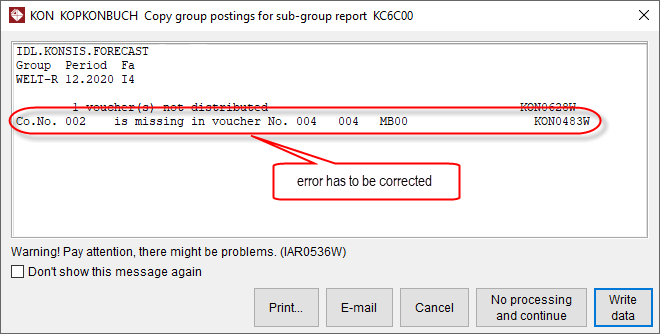
Image:Message after copying the reporting sub-group
Double-clicking onto the respective line will allow for direct branching into the respective application so that you can recheck the copied vouchers, postings and reports.
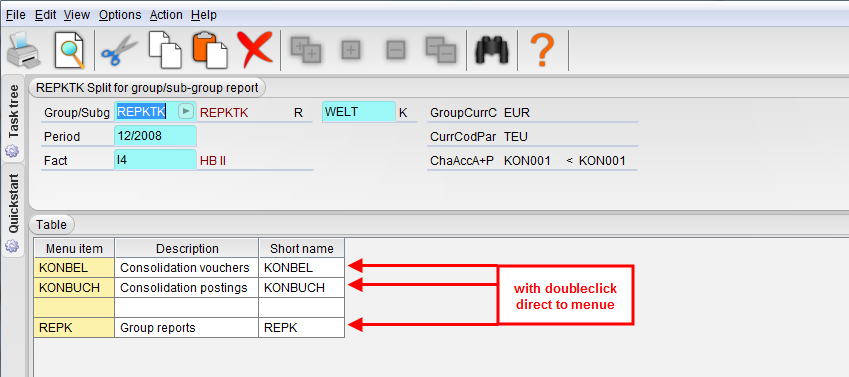
Image:Possibilities of branching off directly