This application allows you to enter IC subaccount balances with the help of forms. All of the existing IC subaccount balances that may be changed will be displayed for each account in the selected chart of accounts. In addition, an input line will be made available for each account number so that the next balance can be entered. As long as the account balance does not match the sum of the respective IC account balances, the sum line will be shown in red.
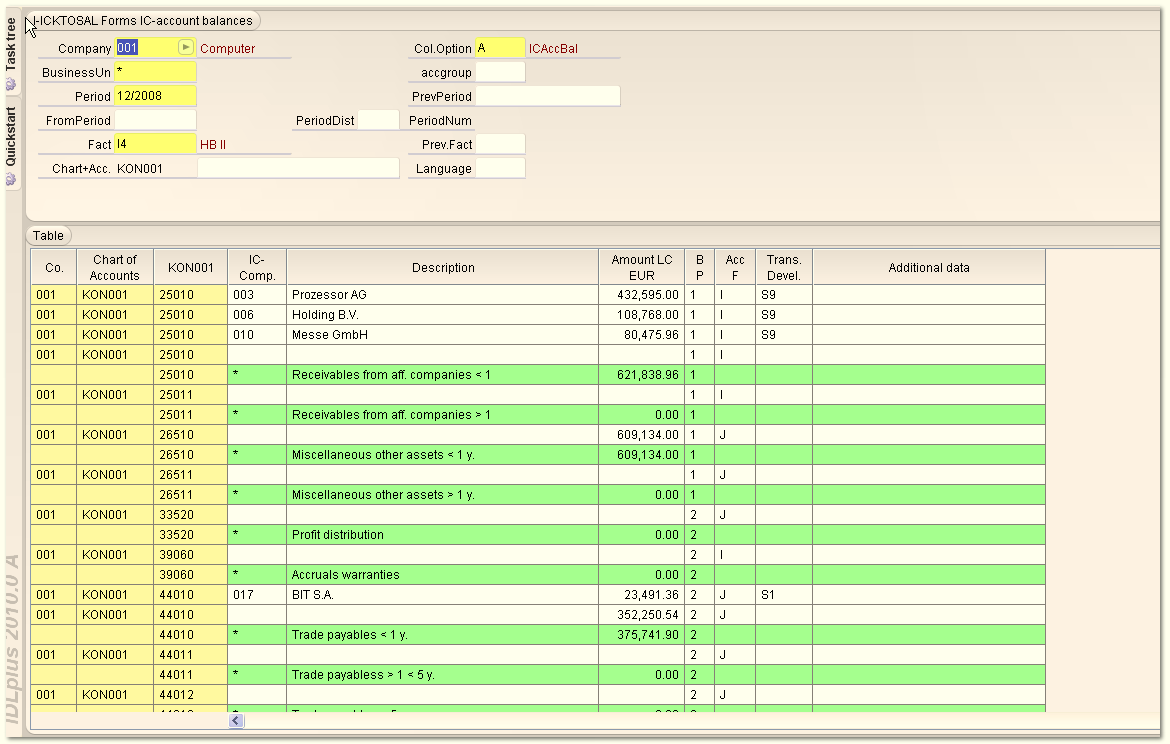
Image: Overview I-ICKTOSAL
You can find the application in the menu trees (resource tree and quick starter) below the menü <Master files>, below the submenü <Company financial statements / Entry>.
Image 2:Selection possibilities in form entry of IC balances
The keys 'Company', 'Period' and 'Type of Data' as well as 'Business Unit' must be entered clearly to start with. In order to be able to enter data, however, you will need to or be able to make additional entries:
Column option: A distinction is made between the following versions:
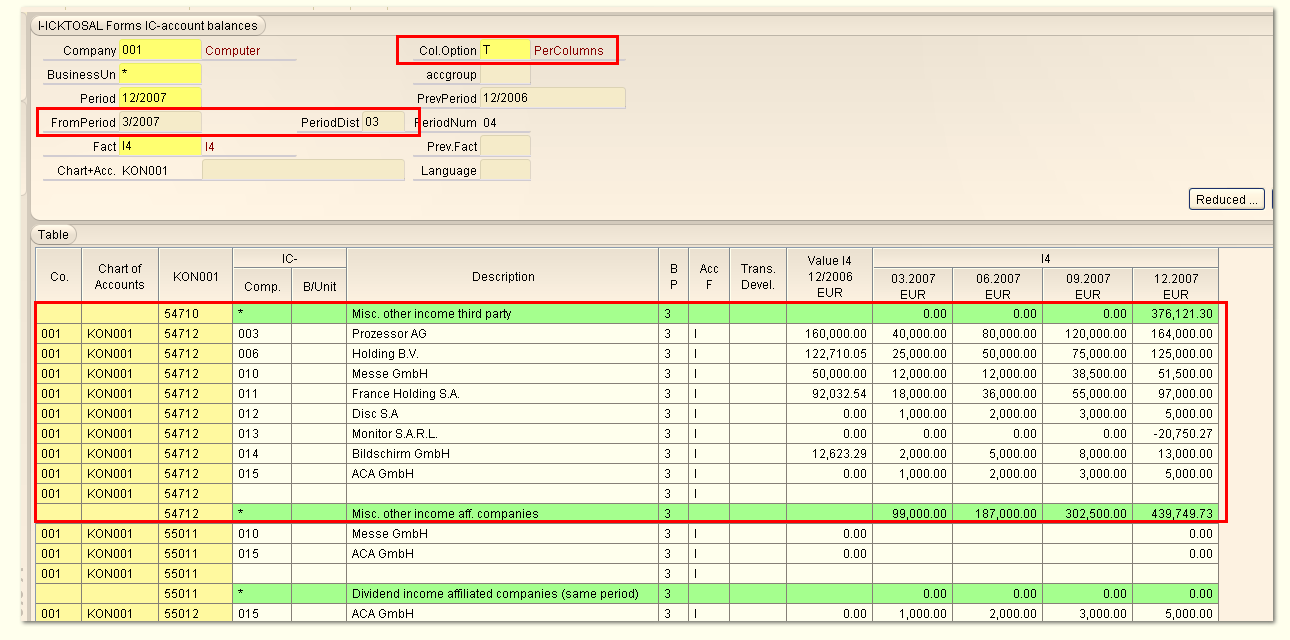
Image 3:Documentation of multiple periods using the column option ?P? and intervals between periods ?03?
[Account group]: If a business unit in the company and business unit allocation <GESUBR> is attributed to an account group (P for P+L accounts, for example), only the accounts from this account group will be displayed in the form entry area.
[From period]: With multiple recording of periods, the entry from the first entry period is displayed here
[Period Dist]: If more than one periods have been entered, the interval between periods should be entered here: 01 for monthly, 03 for quarterly and 12 for annual entries.
[Account number]: Via 'account number'that can be entered optionally, yet another limit can be applied to the display.
[Language]: By entering a language, you can control whether the accounts are to be displayed in a different language than that of the user.
Entry of data Operation takes place as in entering account balances: The buttons <TAB> and <ENTER> move the cursor into the respective next cell that is capable of accepting entries. A new input line for the same account will be automatically added to the table after the last entry cell by pressing <ENTER>. It is possible to change the entry line of another account by pressing <TAB> or by using the mouse. Analogous to form entry of account balances (I-KTOSAL), you will not be able to enter a debit/credit code. This will be considered to be a default value in accordance with the balance / P+L code of the account. Deviating debit/credit codes can be achieved by entering negative values.
Accounts that are invalid for the current period or type of data or are not authorized to accept entries will not even be offered in the form entry area to start with. If values already exist for the current period, these will be displayed with a grey background and cannot be changed (see
If the option <Feld select?> is selected under <Display > shown in the option dialog (Menu bar), the cell contents can be copied over to the clipboard using the key combination <Strg>C.
Table lines: There are 3 types of table lines:
Saving data: By pressing the <Save> button, all of the existing and perhaps modified and recorded data will be forwarded to the importing application TXTICSALD , where it will be checked and entered into the database. Existing data will be updated, if necessary. Once it has been saved, a plausibility check will be performed on the data and the results will be shown in a message window if an error has been found. In addition, the attribute that contains the error will be highlighted by marking it with a colour code. This can also apply to the cell of the additional data if one of the attributes here is defective.
Additional data (Additional data) stands for the additional attributes that possibly need to be added to an IC balance: remark text, controlling object, reference voucher number and date, clearing code and value and the currency code of the transaction currency. If additional information exists on a column, this will be shown by a small flag (small red triangle) displayed inside the cell. If the mouse remains on one of these cells for a moment, the existing additional attributes or those that have been stored will be displayed in the tool tip. Double-clicking onto one of these cells opens up a dialog box inside which the respective additional attributes may be entered or changed. As an alternative, the cursor may stop on <Tab> on this cell to open the additional dialogue by pressing the key <F5>. Furthermore, the important information fields from the additional entries will also be displayed in the overview.
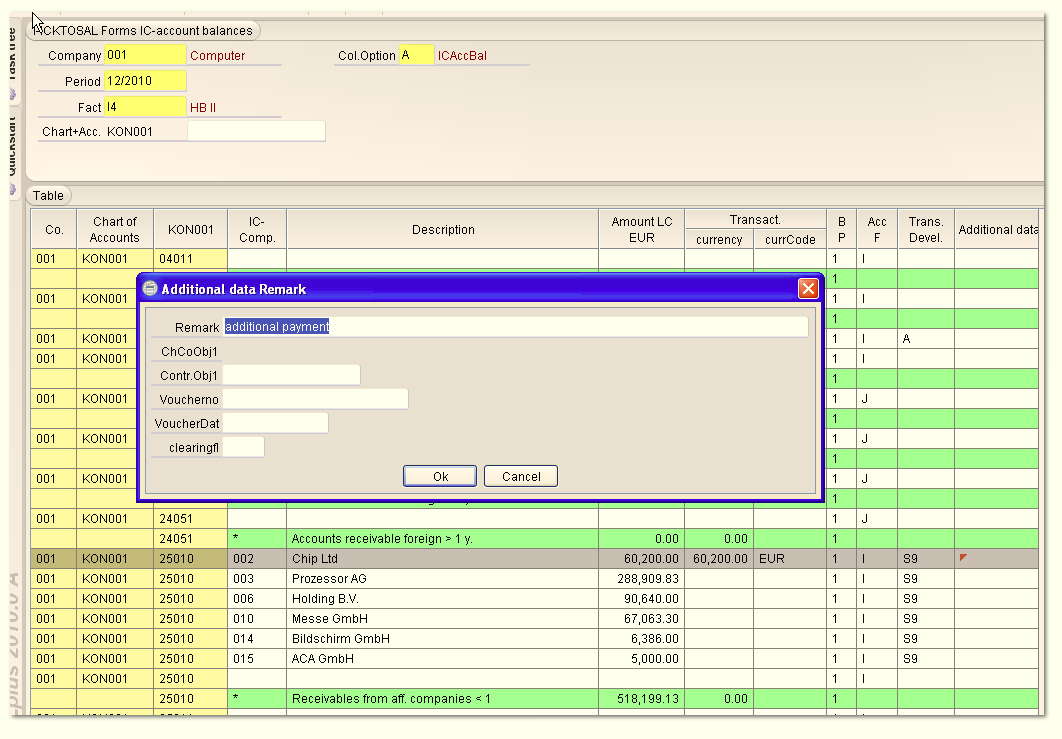
Image 4: Entry of additional data
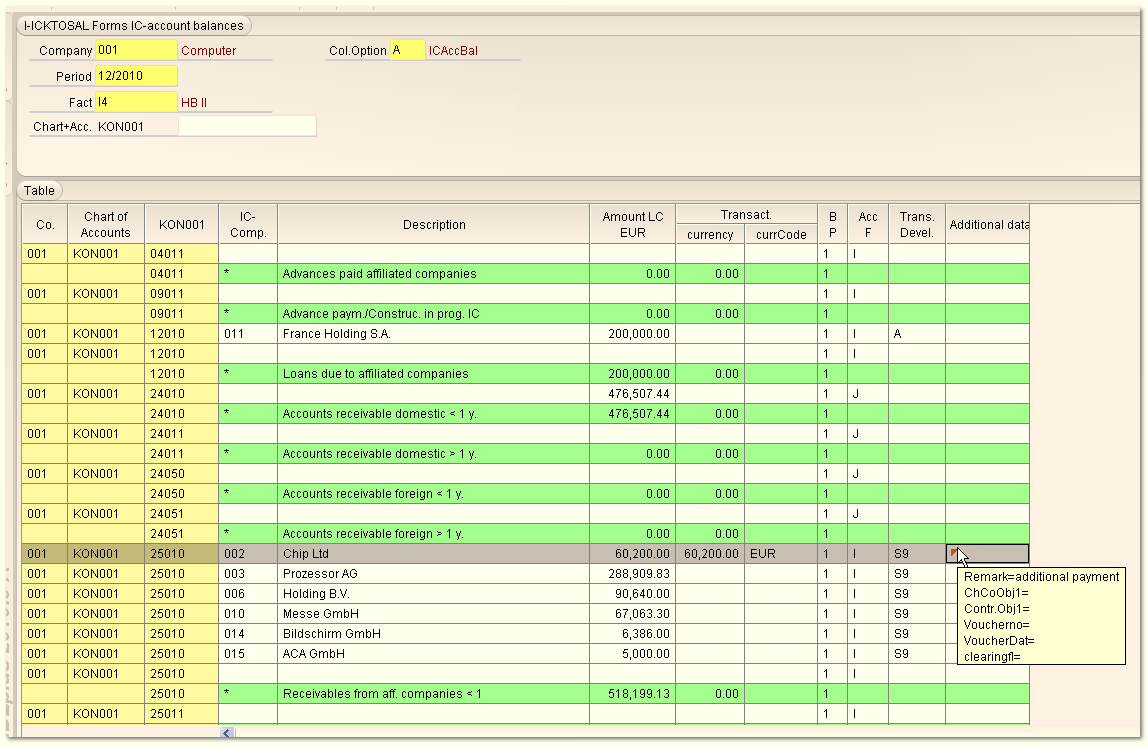
Image 5: Displaying additional data (Additional data)
Transaction currency: If the selection for the maintenance of transaction currency amounts in the consolidation function master data <KVA> is switched to?X? (Transaction Currency <TW> entry is obligatory) or ?L? (Transaction Currency <TW> entry is obligatory, otherwise local currency <LW>), additional columns for entering a Transaction currency value and a Transaction currency code will appear automatically so that no longer need to be taken care of under additional information.
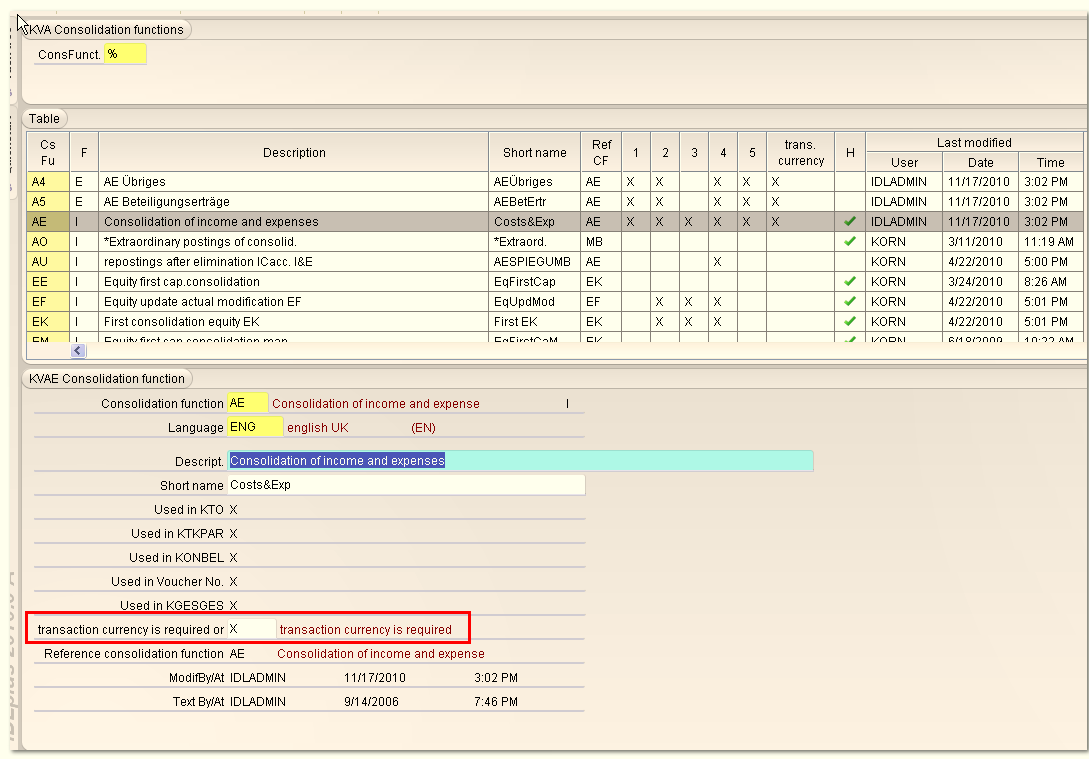
Image: Setting in KVA AE
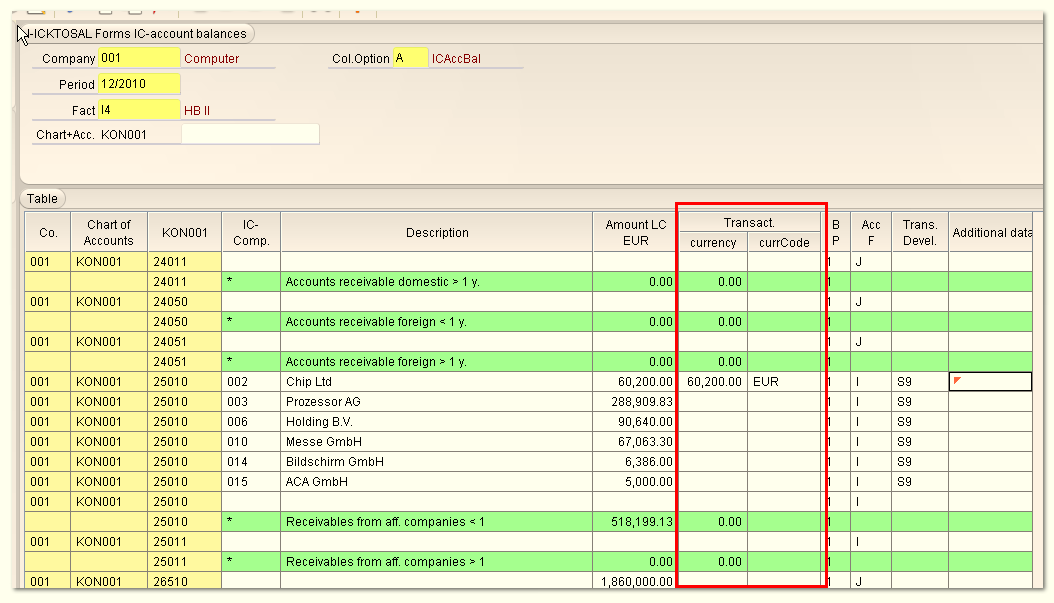
Image: Columns for the transaction currency
If the flag for the maintenance of transaction currency amounts in the consolidation function master data <KVA> is switched to <L> (transaction currency is required, but local currency is alternatively used if local currency equals group currency) then the forms application for intercompany account balances always offers an entry column for the amount in transaction currency even if local currency equals group currency and the local currency amount is used as a default. The multi-period form is excluded from this, here transaction currency amounts have to be entered in the additional dialogue.
The following actions can be started from the action menu for form entry of IC balances:
The following applications that are marked with a globe refer to the whole of the selected data, half a globe refers only to the lines marked for these actions. If multiple lines have been marked, the following applications can be called up one after another line by line by pressing the button <Continue>.
Due to the fact that the application can be used to obtain an overview and not only to make entries, this application can also be used by users who only have display access rights. If the user does not have the right to change or enter data, the entry line will be shown, but cannot be filled.
Accounts that are invalid for the current period or type of data or not entitled to make entries (for instance, if the respective period code Y, Q or M has not been placed in the account master, will not be offered for entries in the form entry area. If values already exist for the current period, these will be displayed with a grey background and cannot be changed. This might result in a situation in which values can only be entered in some of the columns if the period code in KTO has been issued in a differentiated manner for entering multiple periods.